Loading...
Loading...
Loading...
Loading...
Loading...
Loading...
Loading...
Loading...
Loading...
Loading...
Loading...
Loading...
Loading...
Loading...
Loading...
Loading...
Loading...
Loading...
Loading...
Loading...
Loading...
Loading...
Loading...
Loading...
Loading...
Loading...
Loading...
Loading...
Loading...
Loading...
Loading...
Loading...
Loading...
Loading...
Loading...
Loading...
Loading...
Loading...
Loading...
Loading...
Loading...
Loading...
Loading...
Loading...
Loading...
Loading...
Loading...
Loading...
Loading...
Loading...
Loading...
Loading...
Loading...
Loading...
Loading...
Loading...
Loading...
Loading...
Loading...
Loading...
Loading...
Loading...
Loading...
Loading...
Loading...
Loading...
Loading...
Loading...
Loading...
Loading...
Loading...
Loading...
Loading...
Loading...
Loading...
Loading...
Loading...
Loading...
Loading...
Loading...
Loading...
Loading...
Loading...
Loading...
Loading...
Loading...
Loading...
Loading...
Loading...
Loading...
Loading...
Loading...
Loading...
Loading...
Loading...
Loading...
Locksmith is a simple yet powerful tool to help you make sure the right people see the right things in your Shopify store. In the spirit of the name of our app - ✨ Locksmith ✨ - you'll be using "locks" to determine what content in your store is restricted and using "keys" to denote how, when, and who gets access.
Locks are created using the search bar within our Locksmith app. You can search for most resources in your store by name. More in depth information on the in-app search bar here:
Creating locksA lock restricts access to something on your shop.
You can lock:
Your entire shop
Pages
Products
Collections
After searching, once you select the search result you want to hide and click Save. You'll see some useful options, such as:
Is the lock currently active?
Should it also protect the products in this collection? (Disabling this means only the collection page itself will be locked.)
Should it hide the collection, and it's products, from search results and other lists?
Should it hide links to this resource from navigation?
You'll see different options depending on what type of resource you’ve locked.
A key permits access to the locked resource based on your criteria. They are created on the lock page using the "+ Add key" button:
Keys allow you to specify the exact conditions that give your customers access to the locked resource.
Check out the full list of keys in the dropdown menu on a lock page.
You can also create your own custom keys with Liquid. Create a custom key by choosing custom Liquid from the keys menu.
More information on creating keys here:
Locksmith gives you flexibility to add multiple keys and logically combine them together to create unique unlock conditions.
When you set up your key, you can create another key right away, by clicking on Add Another Key. This button allows you to add another separate key to your lock.
Keys connected by the OR operator can individually open your lock whether or not the conditions on the other keys are met.
This allows you to specify multiple different conditions that a customer can use to access. When used, a customer only needs to meet one of the conditions in order to access.
Notice that there are multiple key symbols, and each key is preceded by "Permit if the customer..." text:
Adds another condition to the current key. Choose your first key, and click on the "+ add key condition" below the condition. You'll see another selector to add your next condition.
If you connect key conditions with AND, all of those conditions must be met before the visitor gets access.
Notice that there is only one key symbol for each key, and each condition is inset under the symbol and text:
Use the inverse of a key for added flexibility.
In the key, click the "invert" box in the upper right.
This creates the opposite effect for the key.
For example: Permit if the customer is not visiting from the United States. --When used on the Locations key.
Our guide that explains this a bit more is here:
If you have created several locks that cover overlapping content (e.g. locked collections with some of the same products inside), you may want to turn ON the "force open other locks" key setting. This setting tells Locksmith to grant access to all of the content covered by the current lock, even if other locks might apply:
Locksmith has a feature you can use to create a checkout rule that ensures that products tagged with a specific product tag cannot be purchased without a specific customer tag:
Let us know if you have any questions for us! You can contact us via email at [email protected].
Basic guide to using the Locksmith app to restrict access to content in your Shopify Online Store
Locksmith is a tool for merchants on Shopify to restrict access to the content in the "Online Store" sales channel of their Shopify store. It's a simple tool, and in some cases can be set up in only a few minutes.
You'll be presented with the main page. The "Add new lock" section will be your first stop:
For a more detailed overview of what Locksmith is and how the app works, see our guide linked below:
A Locksmith OverviewTo restrict access to something in your store, simply type in the name of a product, collection, page, variant, etc - you'll immediately start seeing search results. Alternatively, select a type from the dropdown to filter your search by resource type. Select the resource that you want, to place a lock on it:
Note: This input does not work with URLs.
More information on (and help troubleshooting) lock creation here:
On the next page, press the "Add key" button to create a key:
Next, add at least one condition to your key. The most commonly-used key conditions will show up first, but you can search or keep scrolling for more options.
Simply select the condition that you want to use. Some conditions may ask you for some additional settings, you'll be prompted if appropriate.
There are over 20 out-of-the-box key conditions, and you can even create custom conditions! You can also combine key conditions in different ways to create unique access scenarios. For more information on that, and the complete list of key conditions, see the page here:
After you save the lock, Locksmith will usually take about 5-10 seconds to automatically update your theme. A green status bar will briefly show at the bottom of the page - once it is gone, the installation has finished.
You can now navigate to your locked content on your store front, and you should immediately see the restriction is now in place. Locksmith will automatically show the appropriate content, using the styling from your theme, on the page. The access denied content will correspond to the key condition that you used.
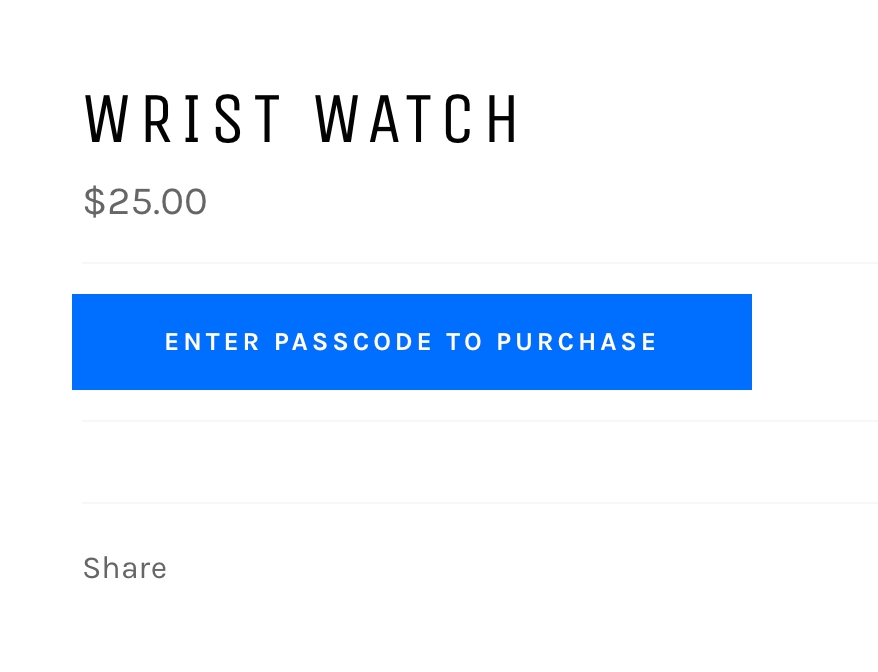
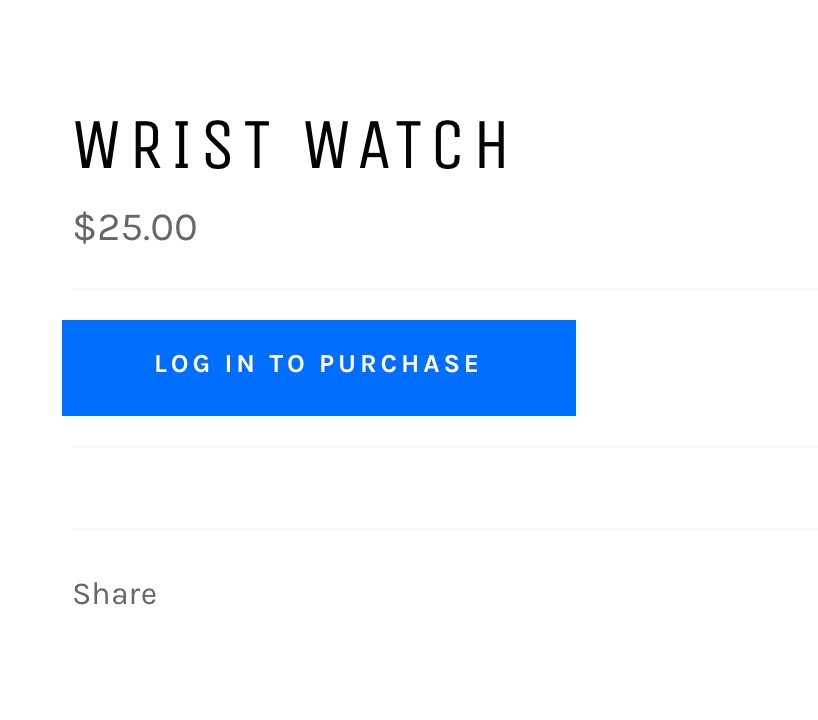
So, for example, if you chose a condition requiring a sign-in:
Or, if you chose a passcode-only entry method, you'll see a different prompt:
Each key condition type will have a slightly different landing page, the above two examples are not a complete list. The messages displayed on these pages can be customized as much as you need:
Important: The Locksmith app only restricts content inside the "Online Store" sales channel. It won't work inside of other sales channels such as the Buy Button or the Wholesale sales channel.
Prices - more information here.
The shopping cart
The login page
The registration page (type 'register' into the Locksmith search bar)
And more, with custom Liquid locks: Create a custom lock by clicking the Start a Liquid Lock link above the Locksmith search bar..
Under Advanced: Is this a manual lock? (More on that here.)


Check the following or simply use the search bar in the header to quickly find the topic that you're looking for!
How to use Locksmith's in-app search bar to create a lock
Locksmith uses the idea of locks to restrict access to specific content in your store. You can granularly control which content is restricted by adding a lock to the applicable resource.
Use the search bar within Locksmith to place a lock on any content within your Shopify "Online Store". To use it, search for your resource by name:
Here are the types of resources that you are able to lock (and search for) from within Locksmith:
Products
Collections
Pages:
Variants:
Locksmith allows you to specify the resource type to search for. This is helpful when you get many results from search term, but they aren't what you're looking for.
Try this syntax in the search bar:
product:snowboard
collection:snowboards
page:about snowboards
blog:life is snowboarding
Product tags: to lock a group of products with the same tag create an , and then lock the collection using Locksmith.
Third party apps
Any page that is not located inside of your Online Store
Menus and menu links: Menu links are not directly searchable, but they can still be hidden from unauthorized access, as long as they point to one of the resource types in the list at the top of this page. In this case, just make sure the option to "Hide any links to this [resource] in your shop’s navigation menus" is turned on (under Settings) for the corresponding lock.
Simply click into the search bar:
Once you do that, you'll see "Entire store" show up in the dropdown as an option to lock:
The store lock's settings page has a few options for excluding resources from the store lock, so they remain accessible to everyone. Those options include:
Allow access to the home page
Allow access to policy pages
Allow access to customer areas
For resources that you would like to exclude form the store lock that aren't covered by those lock options, we have guide on excluding content from locks here:
By default, Shopify stores feature an 'All' collection that automatically encompasses all products in the store. Locking this collection offers an efficient method to secure all products in your Shopify store simultaneously, without the need to lock the entire store. This collection can be locked just like any other collection. Search for the collection title 'all', select 'Collection: All' from the list of results, and follow the steps to create your lock.
If you are searching for something like a product or a collection (or something else that is definitely searchable), and it just isn't showing up, you may just need to switch up your search terms.
Try using fewer (but more specific) search terms.
Keep in mind that pasting in the URL of the item you are trying to search will not work in most cases, you will need to search by name.
For variants that aren't appearing in search results, try including some information about the variant option. For example: "Color" equals "blue".
If you've created something recently and it's not showing up, an update to Locksmith can help.
1. Open the Locksmith app and navigate to the "Help" page 2. Click on the "Update Locksmith" button:
3. When the blue bar at the bottom of the screen disappears, the update is finished. This should only take a handful of seconds.
Locksmith also gives you the ability to create "Liquid locks". This can allow you to target nonstandard resources or groups of pages in your store with Locksmith locks that are otherwise not directly searchable. You can start a Liquid lock by clicking into the search bar and selecting "Start a Liquid Lock":
If you think a Liquid lock could help you, try your hand at , or you can always write in to us for any questions about a specific use case.
Our more in depth guide on that is here:
As always, if you have questions or issues please feel free to get in touch with us at [email protected].
In Locksmith, customer access is always granted using keys – simple statements that describe the conditions for access.
For example, one might have a key that says "Permit if the customer is signed in". In this example, the key condition is "if the customer is signed in".
A full list of key conditions can be found in our guide here:
Read on in this section to find out more information about how to set up many of our most popular key condition types.
Blog posts (also called articles): You must tag an article first, and then the article tag will be searchable. More info on blog posts here
Product vendors


Check the following or simply use the search bar in the header to quickly find the topic that you're looking for!
Check the following or simply use the search bar in the header to quickly find the topic that you're looking for!
How to tell Locksmith to completely ignore specific files in your theme
Locksmith does its work by adding its code to your theme's files. Sometimes you may want to keep Locksmith from modifying a file in particular, whether it's for a customization, or some other reason.
To support this, Locksmith has a "Liquid assets to ignore" option. Configure it like so:
From within the Locksmith application, click "Settings".
Scroll to the bottom of the screen to the "Advanced" section.
For each Liquid asset you'd like to have Locksmith ignore, add its filename to the "Liquid asset blacklist" box.
That will look like this:
Please note: If you need to use the ignore list because Locksmith is causing unexpected problems with your theme, please let us know! Feel free to use the ignore list for any purpose, but do get in touch at if there's a bug we can help resolve. :)
You can use Locksmith with Seal Subscriptions to control access based on a customer’s subscription status. Seal Subscriptions supports auto-tagging customers depending on whether their subscription is active or inactive. Here’s how it works:
Seal Subscriptions can automatically tag customers when they have an active subscription.
When a subscription becomes inactive (expired or cancelled), Seal doesn’t remove the active tag. Instead, it applies an additional tag for inactive subscribers.
Reference:
Make sure Seal Subscriptions is configured to add both active and inactive tags to your customers.
Create a lock on the content you want to restrict (products, collections, pages, etc.). Guide:
Add a key condition: Permit if the customer is tagged with... and enter your active subscription tag. This is a regular (non-inverted) condition.
Now turn this into a combo key by adding the second condition inside the same key:
Because Seal Subscriptions doesn’t remove active tags, you’ll need to use both a regular (non-inverted) condition (active tag) and an inverted condition (inactive tag) in Locksmith. This setup ensures that only customers with a current subscription can access your locked content.
How to use the Locksmith app to restrict access to wholesale products or wholesale-only content in your Shopify Online Store
Locksmith allows you to restrict access to any content in your Online store, so it is a great solution for those wanting to add wholesale products that can only be purchased by select customers. Plus, Locksmith works with whatever Shopify plan you're on!
You can set up your store so that both sides of your business are run out of the same shop.
This is done by creating price tiers in your store. This requires that you create two versions of each of your products in the backend. This can be achieved by either duplicating products, or by using variant tiers.
In-depth setup instructions for this can be found here:
If your store is going to only be used for wholesale, and you don't need multiple price tiers in the same store, your setup will be more simple.
You can simply create a lock that covers your entire store:
For your key, you have options for how to grant access, but the recommended option here would be to simply use approved customer accounts:
Or, if you prefer not to use customer accounts, and want to grant access with a simple code, try passcodes:
For any browser right click on an element on a page and select "Inspect", then select the relevant tab in the DevTools panel (Ctrl + Shift + I or Command + Option + I)
Google Chrome: Ctrl + Shift + J or Command + Option + J
Safari: Command + Option + C
Firefox: Ctrl + Shift + K, or Command + Shift + K
Microsoft Edge: Ctrl + Shift + J, or Command + Shift + J
Google Chrome: Ctrl + Shift + C or Command + Option + C
Safari: Command + Option + I
Firefox: Ctrl + Shift + C, or Command + Shift + C
Microsoft Edge: Ctrl + Shift + C, or Command + Shift + C
For more information from the sources, use the following links:
Locksmith isn't supported in combination with site speed optimization apps. It may work with some, but we don't offer support for this combination.
If you run into an app that should be on this list (or if you find one that does seem to work), please let us know: .
Locksmith's session state is very tightly coupled with the customer's Shopify session state (as managed by the Online Store channel). The two operate hand in hand, and depend on each other.
Site speed apps usually work by caching, or by dynamic injection of content delivered from a non-Shopify source. This introduces a layer between Locksmith's state and Shopify's state, which creates a synchronization problem, and one that we can't sustainably sign up for.
How to deal with multiple overlapping locks preventing customers from accessing the content inside them
This setting is useful if you have multiple Locksmith locks that cover overlapping content (e.g. collection locks with some of the same products), and want to make sure that each lock grants full access to the content it covers, without other locks preventing access.
To turn on the "Force open other locks" setting, go to each applicable (overlapping) lock and follow these steps:
It is found directly under your keys in the section labelled "Key options":
You'll also notice that the the key shows a message telling you which keys are forcing open other locks.
How to create a lock that covers the home page of your Online Store sales channel in Shopify
Locksmith gives you the ability to lock your entire store, which you can select when creating a new lock:
Once the lock for your entire store is created, you'll see an option labelled "Allow access to the home page". It is unchecked by default - leave it that way to ensure that the home page is locked.
This can be done using a simple custom lock. Choose "Start a Liquid lock" from the list when creating a new lock:
For the "Liquid condition", use template == "index"
Press "Create lock" to finish the lock creation. Make sure to add your keys on the following page like normal.
Mailchimp is a great way to stay in touch with your customers (and it's free!).
Connecting it to your Locksmith account lets you grow your mailing list subscription base, by making sure your visitors' email addresses are on record.
To try it out, use these steps:
This guide shows you how to use the translation filter built into Liquid to simplify translating your Locksmith messages
Start by adding something like the following to one of your Locksmith messages. . You can use whatever keys you like, as long as it's prefixed with locksmith:
Make sure to include the quotes. In the app that looks like this:
Saving a lock with any messages that contain the above formatting will trigger a Locksmith update which will automatically edit (all of) the locale files in your theme so that they include a new editable and translatable attribute. This is an example of what that might look like from within the locale files in your theme:
Locksmith can be used to create separate areas of your store for different teams, clubs, vendors, organizations, or other groups. These areas are intended to be private, only for the eyes of those members. This guide also applies even if there is only a single customer that should gain access to each area.
To summarize, you will create a landing page that you can link all of your customers to, and then use Locksmith to lock down and redirect customers to their own content. The rest of the guide explains, in greater detail, how to do all of this.
The setup for this can become involved, particularly if you have a large number of groups that you want to set this up for. Before you go all in with setting this up, it might be best to follow the steps in this guide for just one or two groups, that way you can more quickly get a feel for how this will work for your store.
With Locksmith, it is simple to lock down a specific collection, so that it can only be viewed by a specific set of customers. However, some merchants want to take it one step further and make sure that those customers can only access their collection, while the rest of the store is restricted to them.
Add a lock to the collection that you want these customers to access. Use the search bar in Locksmith to search for the collection by name:
Under "Keys", choose how these customers will gain access. You can use whatever method of access you want. The most common way of granting access in this scenario is to use "customer tags" to grant access:
How to use Locksmith's 'timeout' feature to limit access time
This feature is available only when using "" or "" key conditions. In specific, the following key conditions types: Permit if the customer...
gives the passcode
gives one of many passcodes
Ask for a simple confirmation before granting access to content in your Shopify Online Store sales channel.
This is a straightforward key condition that allows access solely based on if the customer confirms the prompt that you set. Something like the following:
To use, simply choose the key condition labelled "Permit if the customer confirms the prompt":
Common use-cases/examples include:
It's possible to use Locksmith's passcode keys to redirect visitors to specific URLs, based on which passcode they enter. Using this technique, a single page (or other locked resource) can act as a kind of switching station, pointing visitors to the content that's appropriate for them.
To accomplish this, set up multiple passcode keys, each one having a distinct passcode value. Then, for each key, use the triple-dot menu on the right to set a redirect URL, sending the visitor to the appropriate destination when they enter that passcode.
A demonstration:
If you enter the same URL for the redirect as any of the lock's contents, then when a customer uses that key, the result will be an infinite loop. To prevent this from happening, you'll want to avoid adding redirect links to pages that are covered by the same lock.
To get started using Locksmith's Customers area, use the "Customers" button, found in the footer navigation on any page of the app:
There are two options for importing your customers: using a plain list of email addresses, or by loading in a CSV file that you create with your spreadsheet application.
Locksmith can search for and lock products based on the product vendor. A lock can be created for all products from a specific vendor by searching for the name of that vendor in the search bar on the Locksmith app's homepage.
Shopify's product vendors are part of the organization section on a products information page. More on that in the Shopify's guide below:
In this tutorial, we'll talk about configuring a Shopify store to...
Prompt the visitor to enter their postal code upon arrival
Only display variants that have their "Postal code" option set to equal the postal code that the visitor entered
To do this, we'll use a series of variant locks, and one shop lock. We'll also use passcode key conditions, leveraging the ability to use a single passcode entry to activate many passcode keys at once.
Locksmith allows you to use an already-existing Klaviyo list or segment to determine who gets access to your locked content.
The "Klaviyo member" key condition in Locksmith can check your Klaviyo lists or segments directly, to see if the current visitor should have access, and will grant or deny access accordingly.
To set this up, choose the key condition labelled "if the customer is a member of a Klaviyo list or segment":
If you are using Locksmith's passcode, secret link, newsletter, or location key-condition types on your Shopify store, Locksmith remembers access of specific visitors via browser cache. Once the lock is open, the locked content will be accessible and will begin to appear in searches and collection view (if applicable) for the rest of the visitor's browser session.
In this guide, we'll show you how to set up a product so that it can only be purchased by customers who haven't yet made a purchase. This is great for samples and first time free products.
You'll start by locking your product. You can search for it by name in the Locksmith search bar to create that lock.
Next, you'll need to set a key with two different conditions:
Permit if the customer is signed in, and
Locksmith allows you to present your customers with a form to subscribe to a Klaviyo email list, which the customer must enter before they gain access to the locked content:
To get started, create a new lock or navigate to the lock you'd like to use, then add the key condition labelled "if the customer subscribes to a Klaviyo list".
Locksmith won't lock by tag using the Locksmith search bar. The good news is that you can make this happen with a .
1. In your Shopify Admin, click on Products then Collections
2. In the upper right, click Create Collection
3. Name your collection something relevant, and then scroll down and click on the "Smart" option for the collection.
4. In the conditions area, choose "Product Tag... is equal to" and then add your product tag into that field:
5. Click Save.
Once that's done, search for your new collection by name in the Locksmith search bar, and lock it that way. You'll likely want to enable the "hide from search and lists" option on that collection lock.
In some cases, you may want your keys to unlock certain parts of the page - like keeping the product price or add-to-cart hidden, until a customer qualifies for one of your keys.
This sort of behavior can be achieved with some custom code, and the "manual mode" setting for the relevant locks. Click the link below to learn more.
You can use Locksmith to make sure content in your Online Store channel is only available on specific days and hours.
Locksmith can search for and lock an entire blog, but doesn't search for individual blog posts/articles by default. If you type in "news" (or the title of your blog), you should be able to lock the whole blog, but that'll include every article in there by default.
To lock a specific blog post/article, try tagging it in your "Blog posts" page in the Shopify admin area, and then search for that tag in Locksmith. When you search for the tag, it will display as "articles tagged with...":
For more about how to add tags to blog posts, please visit Shopify's guide, below:
How to use Locksmith's "always permit" key condition to make sure your some of your content doesn't become locked
This is useful if you have a lock on a collection, but want specific products still available. Or if you have a lock on your "entire store", but want specific pages always accessible.
It's a quick setup: you'll actually create a lock directly on the content that you want to be unlocked. This can be anything such an entire collection, a product, page, blog, etc.
Once you've added the lock, use the key condition labelled "always permit":
Save the lock, and you're done.
The "lock" that you've just created becomes a sort of anti-lock, so the product, collection, etc that you've placed it one will now always be available.
You may need to create multiple locks like this if you have multiple areas of your store that you would like to remain accessible.
At times, you'll want to permit visitors to access a resource if several conditions are met. This can be a method of increasing security: you might, for example, require visitors to arrive at your sale collection via a secret link, but then you'll want them to also provide their personal passcode.
All of Locksmith's key conditions can be combined with all other key conditions. (For the full list, see .) This is powerful! It means you can start to chain pieces of authorization logic together, to achieve really specific results.
To configure a combination key, begin by creating a standard key using whatever your first condition ought to be. Then, use the "Edit" link (shown next to the condition description). Scroll down to "+ Add key condition". Locksmith will prompt you to add a second condition, which you then configure in exactly the same way as the first.
Locksmith's variant locking feature results in automatic hiding of variants that the visitor doesn't have access to. If you're using keys that are based on things that don't require customer input (say, "permit if the customer is signed in"), then revealing those variants is automatic: if the customer qualifies, the variants appear.
If you're using keys that require visitor input, like passcodes or email addresses, then an intermediate step needs to be added to the customer experience, allowing them to actually enter their information. This doesn't happen automatically, and without it, the visitor won't have a way of accessing the hidden variants.
By default, Locksmith will only automatically install itself to and update itself on the currently published theme, and does not automatically install itself to unpublished themes. However, there is a way to test Locksmith on unpublished themes.
Head to the in-app "Themes" page.
By default, Locksmith's apply to all matching option/value combinations. For example, you'll typically see something like this:
Once a variant lock is created, you can limit which products it applies to by using the key condition labelled "If the product is tagged with":
You'll use any existing product tags to denote which products you want the variant lock to apply to, or create new product tags if needed.
If you want the lock to apply to variants on one product tag only, and leave all other products untouched, for example, you'll use an inverted key condition like so:
Then, as a separate key, add in your conditions for access to the product. So if you want to allow access to the variant with a sign in, that will look like this:
Merchants frequently have issues with Locksmith and page building apps such as GemPages or PageFly.
This is a hard area to have full compatibility since those particular apps specialize in letting merchants have full control over the look and feel of the pages. This is a great thing, of course, but it does make it hard for apps such as Locksmith to come in after the fact and also attempt to control the display.
That being said, if you are using Locksmith in a more standard way - i.e. using full-page locks on some of your products or collections, there's still a good chance that you can use both.
If you're not sure, the following points should clear up when not to use the apps together...
Locking the default registration page with Locksmith will only work with Legacy Customer Accounts. The New Customer Account system creates an account as soon as the customer uses the login form, and so registration cannot be locked. In that case, we recommend approving customers with account tags instead, after they create an account.
To try this out, open up Locksmith, and start typing "registration", like so:
Click on the "Customer Registration" result and then click "Save." Locksmith will create a lock that covers your shop's registration page. From there, feel free to add whatever keys you like!
For each group, create the collection of products that applies to them. Or, if you prefer that your customers are redirected to a single product, or some other page, you can use those instead.
This can just be a regular Shopify Page, more info on that here: https://help.shopify.com/en/manual/online-store/themes/theme-structure/pages
Call it whatever makes sense for you. You don't have to actually add any content to the page, since customers will be immediately redirected away from this page.
Optional: Add a link to this page to your navigation menu. This is how customers will find their content. Label the link whatever applies to your store, such as "Shop", or "Your collection", or "Member area", etc. If you do not add a link to your navigation menu, you will need to have another method of making sure your customers find, or are sent, the link to your landing page.
While it is possible to use almost any of Locksmith's key condition types for this (complete list here), there are two common types for determining access:
Customer tags (more info here)
Passcodes (more info here)
Create a Locksmith lock directly on your landing page.
For each of your customer groups, add a matching key that grants access to this landing page (we'll create the individual collection locks in the next step). This key should define how you want customers to ultimately gain access to their collection - so whatever you chose in step 3.
For each of the keys that you create, use Locksmith's redirect feature to redirect customer to the actual collection that you are granting access to. You can set up a redirect directly within the key settings, when creating a key. Simple use the input labelled "Redirect URL". More info on redirecting with Locksmith here.
For each of your collections, add a lock to it and add a key that defines how you want customers to gain access. This key should match whatever key you used in Step 4. Except, of course, leave out the redirect on this one.
Once you follow those steps, you will end up with a landing page that redirects customers to their own content. The redirect will happen after the customer has gained access via signing in or giving the passcode (or whatever access method you've chosen).
Feel free to contact Locksmith support at [email protected] for any questions regarding this.
Even when using standard Locksmith locks, you may still find that you cannot edit your pages while Locksmith is active. The best way to get around this is to simply disable Locksmith while you are editing your pages. This can be an inconvenience, and we apologize for that in advance. You can disable Locksmith from the Settings page in the app.
Locksmith's manual locking features are NOT compatible with page builder apps, it is not recommended to try to use both, and Locksmith support cannot help with this.
Locksmith's variant locking works similarly to manual locking, and is also not compatible with page building apps.


Locksmith cannot block RSS feeds from locked blogs.

Hint: Key conditions based on things like customer tags won't ever allow access because a customer needs to create an account and sign in before they access! If you don't want any customers to register on their own, you can simply leave this lock with no keys. Otherwise, you'll want to use non-customer-account based key conditions such as passcodes or secret links.


The force open other locks setting is useful if you have multiple locks with overlapping content. This usually means locked collections with some of the same products. If this is you, check out our guide here:

Click Edit on the key you just created.
Scroll to + Add key condition and add Permit if the customer is tagged with <active subscriber tag>
Enter your inactive subscription tag and (if needed) check invert so the condition reads Permit UNLESS the customer is tagged with <inactive subscriber tag>
Save the lock. You now have a single combo key that requires both conditions at once. See: Combining key conditions
Result: customers must have the active tag, and must not have the inactive tag, to get access. The keys should look like the following example once setup:

On the lock page, under "Keys" choose the "Mailchimp" key condition from the list:
4. In that key, click on "Connect Mailchimp" and sign into your mailchimp account. You'll be prompted to close that window when done.
5. Choose your Mailchimp list, click off the pop-up, and then click Save.
Visitors who try to access your locked content will encounter a prompt to subscribe to your mailing list, and the email addresses they submit will be loaded into your Mailchimp account.
For a brand-new mailing list, it can take a few minutes for new email addresses to appear in your Mailchimp account.
Mailchimp will not show subscribers in your admin panel if you have any required fields besides "Email Address". Check on this by opening your list in Mailchimp, then heading to "Settings" -> "List fields and *|MERGE|* tags".
To make it easy to see your subscribers that arrive through Locksmith, create a "Locksmith" segment for your list. Do this by opening your list in Mailchimp, then heading to "Manage subscribers" -> "Segments". Click "Create Segment", and set up your segment like so:
Hit the "Preview" button, then on the next screen click "Save as segment".
You can immediately open Online Store > Themes > "Edit default theme content" to edit what is shown there for your default language. If you're not sure how to edit the default content in your theme, check out Shopify's guide on that here.
When editing the default theme content, you'll now see a Locksmith tab, with a section that corresponds to what you added to the section above:
You'll need to install the free Translate and Adapt app from Shopify, or one of the other 3rd party alternatives. More info on how to use the Translate and Adapt app here.
If you've added the Translate and Adapt app to your store, you'll see the link to it from within the "Theme content" area. While you can open the app from your apps list, you can also open directly from there:
Once inside the "Translate and Adapt" app, scroll down to find the Theme > "default theme content" area and press on it.
Then, similarly to above, you'll see a Locksmith section that you are free to edit as much as you need.
Do this for all of your store languages.
The messages added with the above method are managed by Locksmith. If you delete the declaration in your messages (the {{ "locksmith.foo.bar" | t }} part), the corresponding messages will be deleted from (all of) your locale files.
If you want a persistent message, that isn't directly connected to, managed by, or deleted by Locksmith. You'll need to go with a more manual approach. Additionally, there are apps out there that can manage this kind of thing automatically. Again, the difference with this approach to the above, is that Locksmith will not automatically edit your locale files, it will all need to be done on your end.
To start, head into the language "locale" file you'd like to update in your theme, and then add a new entry at the bottom. You might see one "locksmith" entry already - do not add it to that one. Just create a new one. Use whatever label schema works for you (as long as the first label isn't "locksmith"). It can contain the word locksmith in it, just can't be an exact match. For example:
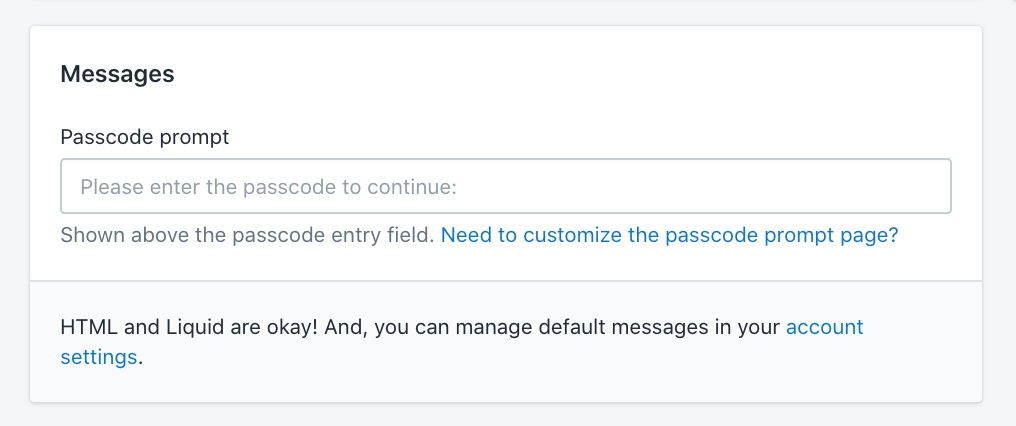
Add this same entry into all desired locales files, and update the "Enter Passcode" to the specific language. Next, in your passcode prompt message, use the translate filter on that variable. Here's an example:

Make sure the "Force open other locks" setting is turned on for this lock. Use the following guide to do this: Using the "Force open other locks" setting . This setting is important.
In order to make sure that these customers can't see the rest of your store, you need to actually add a lock to your "entire store":
For your key condition, you need to use the "invert" option to obtain the opposite of the first key condition:
Use the guide here if you need more guidance on how to invert your key condition:

arrives via a secret link
arrives using a secret link from an input list
The setup is pretty straightforward. You'll see the corresponding option, when setting up one of the above key condition types, and can adjust the time period like so:
Since most folks using the timeout setting are wanting to heavily limit their customers' access period, we typically recommend that anyone using the timeout setting makes sure to turn the "Remember for signed-in customers" setting OFF. While the two settings can technically be used together, doing this can provide you the most consistent results.
That being said, if, for any reason, you have set a longer access period (months, years), it may actually make more sense to keep the "Remember for signed-in customers" setting turned on. This will help Locksmith maintain access (via customer metafields) for the full period of time, as long as the customer is signed in.
As stated under the option itself, Locksmith won't refresh the page for the visitors, so visitors' access period will only time out when they load or refresh a page.
When adding this setting to an already-existing key condition, it will only be applied to new visitors. As in, it will not apply retroactively.
If you do want to reset access for all visitors, the easiest way to do this is to delete your key condition( press the "Remove" button on the condition) and recreate it with a different passcode or secret link.
In other words, the timer is always based on the most recent Locksmith submission/validation. If a customer resubmits a passcode or re-uses a secret link, the timer starts from then, even if that code/link was already used.
To prevent this kind of thing, you can set up your codes/links so that they have limited uses (or even one use only). Check out the corresponding guides for more information on how to do that:
Using the same passcodes or secret links for key conditions that time out, as those that do not time out will result in none of your key conditions timing out as expected.
It is possible for pages in your online store to be cached based on Shopify features and Theme settings. This may prevent the page from timing out exactly when expected. Because of this, the setting should be considered to be simply an extra tool in your toolbox, and not depended on to be exact and precise.
Please confirm that you are over the age of 21
By clicking 'Yes', you agree to our Terms of Service for accessing this page
Confirm if you have read the prerequisite material to access this advanced module
Please confirm that you have not experienced any recent health complications that could prevent you from fully engaging with this experience
etc
Any message that you decide to use can be added directly to the Messages area:
If you need to use something other than "Confirm" as your button text, this is done through your theme.
Go to Online Store > Themes > "Edit default theme content". More info on that, from Shopify, here.
Find the Locksmith tab, and edit the button as needed:
If you want to add text that shows up after the button, simply use {{ locksmith_confirmation_form }} to denote where the form will show up. Then add more text as desired:
This results in the following, when Locksmith renders the prompt on button for your visitors:
If you have multiple key condition types on the same lock, it might be useful to include other form types within the prompt, so that they display on the same page. We have a guide on doing this here:
You'll need to follow the regular workflow for translating anything in your theme. To get started with that, you'll likely want to use Shopify's free Translate and Adapt app, or one of the paid apps from the app store. More info on this, from Shopify, here.
Once you have a language/locale/translation set up for your theme, you'll see a Locksmith > "Confirmation button text" area which you can edit as needed, for each of your languages. In the Translate and Adapt app, that looks like this:
To add translatable messages to the input prompt, check out or guide here:


The only thing you'll need: a list of emails to be used, one per line(or separated by a space).
You'll also see options to:
add one or more customer tags to each customer that's created (useful for pre-approving wholesale accounts, for example)
set an account password (which would allow your customers to sign in immediately, using that password).
If you'd like to customize which tags or what password is used per customer, try using a CSV instead - read on!
For the most flexibility, set up your customer records in your spreadsheet application (like Excel, Google Sheets), and load it into Locksmith for a bulk import:
All columns are optional, unless noted.
Email (required!)
First name
Last name
Accepts marketing (can be "true" or "false")
Note
Tags (comma-delimited)
Password
etc...
Since this information is just forwarded to your Shopify store, you'll be using the same format that Shopify uses. For more complete information on CSV files for Shopify customers (and what other columns are available), check out this page.
Locksmith will give you a preview of the customers to be imported:
And after you click the "Start Import" button at the bottom of the page, you'll see the results:
In addition to skipping any invalid e-mails, you'll notice that Locksmith will also automatically skip any emails that already have a customer account, and it'll let you know which ones it skipped.
For questions, get ahold of us via email at [email protected]

Vendor locks work in a similar way to collection locks: where a single lock can be used to hide and manage access to multiple products.
Vendor locks and collection locks both have a "Hide this vendor/collection and their products" option. That can be used to tell the lock to filter locked products from the store's native search and collection lists.
Collection locks have a "Hide any links to this collection and its products" option that vendor locks do not. This option can be used to hide menu navigation links for locked products in a collection from the stores native header and footer menus.
Collections can be used to present a specific group of products in one place. When the collection is locked Locksmith will present an access message and content relevant to the locks key conditions. This is useful if you would like to present a central location to send customers to that contains restricted products they should have access to.
This section covers using your Shopify admin to create a custom automated collection that includes products based on product's vendor
In your Shopify Admin, navigate to Products > Collections
In the upper right, click Create Collection
Name your collection something relevant, and then scroll down and click on the Automated option for the collection.
In the conditions area, choose "Product Vendor... is equal to" and then add your product Vendor into that field:
Click Save.
Once your collection has been set up, search for your new collection's title in the search bar on the Locksmith homepage, and create your lock. You'll likely want to enable the "hide from search and lists" option on that lock.
Any time you add that vendor to a product, it'll automatically be included in that collection and therefore locked by Locksmith. :)
Let us know by emailing us at: [email protected]


We've set up a store that contains a couple of sample products, with a handful of supported postal codes.
View demo store (password: locksmith)
For each of your products, add an option labeled "Postal code". Add one variant for each postal code that you want to support.
In the demo store linked above, here's how the variants are displayed in Shopify, for one of the sample product:
Open the Locksmith app. Using Locksmith's search box, locate each variant option, one at a time:
Select the matching item, and continue to save the lock.
On the next screen, add a passcode key, setting the passcode to the same value as the postal code:
Save the lock.
Repeat for each of your postal codes, resulting in one lock per postal code variant option.
Back on the home screen of Locksmith, use the "Add lock" form to create a lock that covers the entire online store.
On the next screen, add a key that permits if the visitor enters one of many passcodes. Configure the passcode list to contain each of the postal codes that you support.
You're done! When visitors arrive at your online store, they'll be prompted to enter their postal code. If it's one of the codes on your list, Locksmith will let them in, and will now only show them variants that match the postal code they entered.
Your final Locksmith locks list should look something like this:
To try out the customer side of this, see the demo store linked at the beginning of this article.
The first time you access one of our Klaviyo key conditions, you'll need to set up Locksmith's API access to your Klaviyo account. This is covered in detail in our guide here:
However, one IMPORTANT detail is, if you are using segments, you need to make sure that your API Key also grants permissions for segments, in addition to the other requirements. So - just to be clear - if you are using segments, you should have an API key that grants "Full access" to:
Lists
Profiles
Segments
Subscriptions
Take note of these settings:
You can choose between a list or a segment. They function the same in practice, in that Locksmith asks Klaviyo directly whether or not the supplied email address is on the list or segment
This setting changes the behavior of this key condition significantly!
If left off (the default), Locksmith will prompt the visitor to enter their email address. The email address is the ONLY thing the customer needs to enter in this case, there is no requirement to sign in. This is what that would look like in your storefront:
If turned ON, customers will be required to sign in. Then, once signed in, Locksmith will either grant or deny access depending on if the customer is found in the configured list or segment. Here is an example of Locksmith's sign in page:

If you want to re-test what a new user would, you will need to use a browser with clean cache. Keep in mind that you may find it easier to simply open up an incognito window, or use a different browser or device. However, those steps can be tedious if you would like to test multiple times in quick succession.
Following the steps in this guide will help you clear the cache for a single website, without needing to clear the cache for all websites. GIFs included!
1. Right click, choose "Inspect"
2. In the Dev Tools menu that shows up, find the "Application" tab
3. In the Application tab, make sure that "Storage" is selected in the left menu.
4. Click, "Clear site data", and you're done!
1. Directly to the left of the URL bar, click on the lock icon.
2. Choose "Clear Cookies and Site Data" and the very bottom of the drop down
3. Make sure you choose your site only, and click Remove.
4. You're done!
1. Go to Safari > Settings > Privacy
2. Search for your website.
3. Click on your website, and click "Remove"
4. You're done.
Go to your website (that you want to delete cookies and cache for)
Launch Developer Tools ( or press F12)
Go to the Network tab
Click the Clear browser cache button, or press Ctrl + R.
permit unless the customer has purchased "*"
For Locksmith to determine whether a customer has made a previous purchase, you must require customers be signed in to access this product. This is done by adding an "is signed in" key condition to your key.
The second condition checks the customer's order history to see if they've made any purchases at all. For this, combine the "has purchased..." key condition with the "is signed in" key condition. Adding an asterisk to the "Look for products matching..." field tells Locksmith to check for any purchase in the customers history. Finally, ensure you enable the "invert" option on this condition to block customers who have made a purchase before.
Here's what that should look like:
When the full key is created, your key should look like this:
When this is all set, the customer will be prompted to log in when they try to access the product. If they already have a purchase in their history, they'll see the Access Denied message.
You can edit the access messages on the Locksimth app's settings page, or editi the access messages for specific locks on the lock's settings page. Our guide on edditing access messages is linked below.
You'll notice that Locksmith also supports only checking if a customer is already on a list (as opposed to subscribing them). This is a separate key condition, and it also supports checking segments! We have a dedicated guide on that here.
You'll need to create a Klaviyo API key and give it to Locksmith (see below). Once you do that, you'll be presented with your Klaviyo lists, and you'll be able to choose which one to use like so:
The first time you select this, Locksmith will prompt you for a Klaviyo API key:
In your Klaviyo dashboard, go to Settings > Account > API Keys. You can also use the "from your Klaviyo account" link within Locksmith to go directly there:
Click the "Create Private API Key" button to create a key for Locksmith. You'll see the new key on the next screen.
The scopes that Locksmith needs full access to from the Klaviyo API key are "List", "Profiles", "Segments", and "Subscriptions":
Copy the API key:
Then, head back to Locksmith, where you'll be able to paste in the key. Click "Continue", and Locksmith will present you with a list of Klaviyo lists, to which your new subscribers will be saved.
Once your Locksmith configuration is to your liking, hit the "Save" button. From here on out, new visitors to your locked resource will be required to subscribe before proceeding.


Once you create your collection lock, you'll be presented with these options:
The highlighted "Hide from lists" option here controls whether or not the tagged (and therefore locked) products will appear elsewhere. With the option enabled, Locksmith will automatically hide these products (unless the customer is already qualified for access). In that scenario, the customer will be able to see the products in your other collections – they won't be prompted for access until they click through to an individual product. With the option disabled, the products will remain visible in your other collections. (Note that the customer will still be prompted for access when they click through to a product, even in this scenario.)

On the lock page, after creating a key, choose the 'weekly schedule' key condition. You can start to type "weekly" or "schedule" to narrow down the list quickly:
From there, setting up the schedule should be intuitive. You'll see a section for each day, and you'll be able to add as many time periods for each day as you need, in case your opening hours are not sequential.
If you have different hours on specific dates, you can add those as well in the "Special dates" section.
Adding no time periods to a day of the week or a special date means the schedule is set to close on that day.

You must have the Locksmith app installed.
Your products should be tagged appropriately in Shopify.
You'll want to have customer tags set up for specific customers.
Go to your Shopify admin and click Settings:
Scroll down and click Checkout:
Scroll down to the bottom of the Checkout settings to find the Checkout rules section.
Click Add rule:
From the "Add a checkout rule" dropdown list, select Require customer tag to purchase specific products. This rule will restrict purchases based on product and customer tags.
In the Product tag field, add the product tag you want to use (e.g., nobots).
In the Customer tag field, add the customer tag that will allow the product to be purchased (e.g., notabot).
Save your changes:
Click the Turn on button to enable the rule:
You should be all set. :) Don't forget to test using a private browsing session to ensure the rule is working: How to use a private browsing session
Note that you'll see another "+ Add key condition" link, appearing in the key settings of your second condition. Yes, you may continue chaining conditions as needed – there are no limits here. :)
Using the example from earlier, in which a secret link condition is combined with a passcode condition, here's a demonstration:
Click the "Start a Liquid lock" on the main page of Locksmith.
Next enter this into the "Liquid condition area":
That will look like this:
Press Create lock to continue. For your key, use the following..
Select "if (always permit)" from the list of key condition types.
It should end up saying "Permit...always", like so:
That's it, for your lock setup. Make sure to save the lock!
Now, if you haven't already, create a customer account for your store, and go into your "Customers" area and add "admin" as a tag to your own customer account. You can now access any content in your store while signed in with this account.
Remember this is just a way to test what your customers are seeing, so this means you need to sign in with your customer account to gain access to locked content. If customer accounts are not enabled on your store, you won't be able to use this method.
As always, feel free to contact us via email at [email protected] if you have any questions.
In the Shopify admin area, head to the "Online Store" section, and open up your "Pages" list. Create a page that's just for customers who are shopping the particular variant(s) that you want to help them unlock. Add menu links to this page, if necessary and where appropriate.
Back in Locksmith, search for the page, and create a lock for it.
Here's where it comes together: by adding a passcode key that uses the same passcode as your variants, the customer's successful passcode entry here will result in the variant locks automatically opening, because they'll register the presence of the same passcode.
A bonus, if you're using multiple variant locks: Because locks can have multiple keys, there's an opportunity here for you to add multiple passcode keys here, one for each of the different variant locks you've got. This is a useful strategy if you're preparing variants for separate audiences - this allows you to have a single "sign in" page, where everyone can gain access to their respective variants.
If you like, use the key's advanced settings to add an automatic redirect, routing the customer to the right product page when they enter the right passcode. You can find this setting by clicking the triple-dot icon, to the right of the key condition.
As noted in step 3, this also works with multiple passcode keys. Simply add the right redirect to each passcode key, and the customers will be routed to the right place after entering their passcode.
Click the "Install" button for the theme you'd like to test Locksmith on:
To preview the lock configuration you just installed, click the three-dot menu (…) next to the theme name, and select Preview:
When testing your locks on unpublished or the currently published theme, we recommend using a brand new private browsing session each time: How to use a private browsing session
Head to the in-app "Themes" page.
Click the "Uninstall" button for the theme you'd like to remove Locksmith from:
Locksmith supports setting a Secondary theme, which receives automatic updates along with your published theme when changes are made in Locksmith.
In the Unpublished themes section, locate the theme you want to set as a secondary theme.
Click the three-dot menu (…) next to the theme name.
Select Set as secondary theme:
This theme will now receive all future updates made in Locksmith, in addition to the published theme.
The result of this is that all matching variants will automatically be unlocked if the product is NOT tagged with "Snowboard". In other words, the variant lock will only apply to products tagged with "Snowboard".


Because Shopify doesn't provide any way to group pages (in the way that collections work for products), we need to get down to the code level in order to protect more than one page at a time.
To get started, you'll need to begin a "Liquid lock:
Liquid locking basicsTo lock all pages containing a certain word in the title, fill out the Liquid lock form like so:
Example code for "Liquid condition" from above image:
Submit the form to create your lock, then proceed by configuring keys as appropriate.
To lock all pages that use a certain custom template, use this:
Example code for "Liquid condition" from above image:
Submit the form to create your lock, then proceed by configuring keys as appropriate.
To lock a list of pages based on page handles using one lock:
To list pages handles that you would like to lock, you can do that by listing each handle in the "Liquid prelude" field where the "page_handles" variable is defined (see image below).
You can replace "first-handle,second-handle,third-handle" with your own handles and list additional handles by adding a comma "," between each handle with no spaces.
Liquid condition:
Example code for the "Liquid condition" from above image:
Liquid prelude:
Example code for the "Liquid prelude" from above image:
Submit the form to create your lock, then proceed by configuring keys as appropriate.
If you'd like to use something other than the title or template to activate this lock, take a look at - you can adapt your custom lock for any of the page attributes listed there.
A strategy to protect your products from bots and unapproved resellers purchasing from your Shopify Online Store
This is a legacy guide. This technique may still be useful for some, but for those wishing to add a "Checkout rule" to their store via Locksmith, see our guide here:
Many merchants that sell collectors items, limited edition items, or other types of highly exclusive items are plagued by bots purchasing their products, and come to Locksmith for help.
Without using a checkout rule, Locksmith is NOT able to prevent bots and other unapproved resellers from purchasing from your store.
This is because direct-to-checkout links, which allow products to be purchased without even visiting the Online Store, exist within the Shopify platform, and it's not possible for apps to get involved with this layer.
While Locksmith itself cannot help here, there is a way you can prevent this from happening without the need for any apps.
So the general strategy here is to set your products up so that the public price is something pretty high - a price high enough so that the bots will ignore it. Then, you'll use to create a discount to bring the price back down to the original price that you'd like to sell at.
Thankfully, Shopify allows you to create discounts that can only be used by specific "customer segments". .
So, for example, you could create a customer segment that's based on a specific customer tag:
And then give the customer segment a description name:
When setting up the discount code, use the "Customer eligibility" section to select the customer segment that can use this discount:
The result of this is that you now have an avenue to make sure that only the customers you designate have a pathway to purchase that is secured all the way to the completion of the sale.
You can absolutely use this strategy without further involvement with any apps, including Locksmith. The customers will simply use the product pages as normal, and enter the discount codes at checkout.
Again, the price they'll see here will be higher than what the customer is most likely expecting, so make sure you do everything you can to communicate with your customers about using the discount code. You can do this in the product description, in customer mailers, or when they contact you (more on that below).
That's it for the basic setup!
Optionally, Locksmith can still help get your product pages to a place that helps direct your non-bot customers to the right place. Locksmith has features that will help hide the price and add-to-cart buttons so that the public facing price doesn't scare customers away that stumble onto your product pages. More information, and set up guide, on hiding the price and add to cart button here:
So basically, when set up correctly, your customers would see something like this when they land on your product pages:
Then, when signed in with an approved account, they will be able to add to cart and purchase.
Remember: Locksmith alone is not enough to prevent bots from purchasing the products out from under you - you'll need to combine this with the discount method outlined above.
For questions or help with setup, contact us via email at [email protected]!
This can be useful for merchants that don't need a product to be "secure", but still want to keep customers from finding the product by accident.
Locksmith also has a secret link feature, which is more heavily used and different than what this guide describes. The secret link feature is more secure. If you are looking for that, simply use the key condition labelled "Permit if customer arrives from the secret link" when setting up your key. If not, read on... Use the following steps:
Create a lock on the product in question - to do so, open Locksmith app and search for a product by name.
On the next page, under Keys, select the "(custom Liquid)" condition
Paste template == "product" into the "Liquid condition" box
Make sure the "hide this product from search results and other lists" option is checked!
You're done :)
If this technique isn't working, it's possible that your theme uses a non-standard template name (other than "product"). To fix this, just update "product" in the lock to whatever your theme uses.
Let us know by emailing us at: [email protected]
You can use Locksmith alongside a dedicated subscription app to lock content so that the content can only be accessed by active subscribers. This guide covers how to use ReCharge, but it should be noted that any recurring payment service that offers the "auto-tagging" feature would work with Locksmith.
If you haven't already, install the ReCharge app and use their instructions to set up a recurring subscription for one of your products:
One thing to keep in mind is that even if you aren't offering a subscription to an actual physical product, you can still use ReCharge and just label the subscription product as something like "Exclusive Access" or "Membership".
Recharge will automatically tag customers with "Active Subscriber" if they have an active ReCharge subscription, making the setup very simple. Also note that this tag is removed if the customer ends their subscription.
The Locksmith side of this is pretty straightforward. Open up the Locksmith app and create a lock by searching for the page, product, collection, etc that you want to limit access to.
Once the lock is created, add the following key:
That's all it takes! Locksmith will now only grant access to accounts tagged with "Active Subscriber", which will only be added to accounts that have an active subscription via ReCharge.
E.g. - you have a monthly, yearly, etc option - no additional setup needed: the same tag will get added to a customer account to matter what plan they have, and customers using all plans will be able to access the content.
E.g. Gold, Silver, Bronze tiers, but the access for each tier is different.
In ReCharge, you'd create a recurring order product for each of your tiers.
In Locksmith, add a lock to the content that is associated with a particular membership level. You will end up with at least one lock for each tier, maybe multiple, depending what content you are locking!
Use the following key:
Make sure to fill out the "Only look at orders in the last..." field with the appropriate subscription length that matches you rReCharge subscription:
If there is any content that can be accessed by more than one type of membership level, just add them both as Locksmith keys:
Feel free to ask questions if you're having any issues with any of that! We can be contacted via email at [email protected].
There are many instances in which it is useful for a key to grant access if the opposite of your key condition is true.
Locksmith makes it easy to invert keys. To do so, simply click the box next to "invert" when you're editing the key:
Notice that when this is done, the wording will update, inverting the key condition logic:
Make sure to "Save" the lock, and you're done!
As always, feel free to contact us via email at [email protected].
How to set up Locksmith locks to hide from collections, in-store searches, and any other lists and grids in your Shopify Online Store
Locksmith allows you to hide locked content from lists across your store. This includes hiding products from collections and search result pages - only showing them to visitors that have gained access to the appropriate lock(s). This is turned on in your lock settings on your lock page:
Searches
Collections
Related products
Featured products
And more! Any time your theme is showing a list of products, this feature likely has the ability to filter locked products from it - as long as the list is not displayed by a third party app.
Although less commonly needed, you can also turn this feature on for page, blog, and article locks. In these cases, if your theme has a way to display "all pages", or "all blogs", for example, Locksmith can remove these from from those types of displays as well.
Using third party apps that take over the display of your collections or searches will likely prevent Locksmith from hiding products correctly. Most filtering/search/display apps are not compatible with hiding products via Locksmith.
Hiding a large number of products this way can introduce blank spaces to your collections. .
While this setting is capable of hiding products from the search results page, it cannot always remove products from search results that are fetched dynamically (i.e. shows results as you type).
For more specific information regarding how locksmith works with your in-store search, including some troubleshooting steps, see our guide here:
Some strategies to improve the appearance of your collections and searches when Locksmith is filtering out products
Locksmith supports hiding locked products across your shop, preventing them from appearing to unauthorized customers in collection listings, search results, and anywhere else product lists appear.
However, if a collection has some products which are locked, and some that aren't, the result can be a collection with empty or partially-empty pages. This is because Shopify only permits filtering products out of a collection page by page - there's no way to reshuffle products so that every page appears full.
There are, however, some other options to get around this issue.
The maximum products per page, Shopify-wide, is 50. This may not work for everyone, but it can make pages appear less empty. And, if you have less than the maximum products in your collection, this can eliminate the issue completely in those cases.
Simple enough. To make sure that each customer type gets pointed to the right collections, follow these steps.
Create versions of each collection that are geared toward each audience. For example, if you have a "Staff" collection that has some manager-only products, create one "Staff" collection with just non-manager products, and another "Staff" collection with all the manager-friendly products.
Next, add links to all versions to your shop's navigation menus. We'll take care of filtering the links themselves in the next step, but for now, make sure your shop's navigation gives your visitors a way to get to the collection that's right for them.
Finally, lock each collection, making sure to check the box labeled "Hide any links to this collection and its products in my shop's navigation menus". This will instruct Locksmith to only show a collection link to the visitor if they're qualified to open its lock.
We've seen that some infinite scroll features and apps can handle reordering, or "filtering down" the products on the collection page, removing the empty spots where the locked products would normally show.
Shopify generates a default collection called "All", located at the /collections/all url of your shop. Out of the box, this collection contains your entire product catalog.
Because this collection is subject to the same conditions that are described above, it may be useful to override this collection with one that just contains the products in your shop that are public friendly.
To do that, simply create a new collection in your shop called "All", and manually specify the products (either individually or using conditions) that should be visible to the public. This will override the default collection, and visitors who open it will see normal, full collection pages, containing your public-friendly products.
Some themes include the ability to feature a collection of products on the frontpage, or elsewhere. Most themes don't support swapping collections based on the visitor, so it will require custom code to use audience-specific collections in these cases. This kind of thing would only work with specific key types such as customer tags or e-mail addresses.
Feel free to get in touch if you have questions about any of this! You can do that by just hitting the message icon on the bottom right of this screen ↘️
When testing Locksmith configurations, it's frequently useful to open a private browsing session, thus guaranteeing that neither Locksmith nor Shopify will remember any of your previous activity, giving you a clean slate to test with.
All major web browsers support private browsing. Here's how to start a session, in each browser:
Google Chrome: File → New Incognito Window (Ctrl+Shift+N, or Command+Shift+N)
Safari: File → New Private Window (Command+Shift+N)
Firefox: File → New Private Window (Ctrl+Shift+P, or Command+Shift+P)
Microsoft Edge: File → New InPrivate Window (Ctrl+Shift+N, or Command+Shift+N)
For more information, from the sources, on how to use "private session" (sometimes called an incognito window), use the following links:
How to set up your Locksmith locks to automatically manage the seo.hidden metafield for any content covered by them.
Shopify provides merchants with the seo.hidden metafield that, when added to your resources, does the following:
Removes it from sitemaps
Prevents search engines from indexing (via the "noindex, nofollow" metatag)
Removes it from the customer-facing search within your Online Store (with some exceptions, depending on theme or apps used and how they treat the "seo.hidden" metafield)
More complete information about the seo.hidden metafield, directly from Shopify, .
Locksmith will automatically add this metafield if you turn on the 'Hide from sitemaps' in your lock settings (found under Advanced):
Locksmith will remove this metafield if you:
Disable the lock
Delete the lock
Disable the "Hide from sitemaps" setting
Press the Disable Locksmith button from the Settings tab
Important: Locksmith cannot perform any metafield operations if you remove the app from your store. So it is very important to perform one of the above - before deleting the app from your store.
Products
Collections
Blogs
Pages
This setting can be convenient to remove locked products from all storefront searches, but just keep in mind that products covered by this setting won't show up in storefront search at all, even for customers that have access. If this is an issue for you, stick to whenever possible.
Products in more that one locked collection: if you have the "Hide from sitemaps" setting turned on for more than one collection lock, products will retain the metafield as long as at least one locked collection with this setting turned on remains.
The add-noindex-metatag setting for Locksmith locks adds a "noindex" to the page during rendering, which signals to search engines that you don't want that particular page indexed. This setting is turned on by default since the vast majority of merchants want their locked pages kept out of search engines.
Keep in mind that turning this setting OFF does not result in your locked content being indexed or available. It simply results in the locked version of the page (i.e. "This content is protected....) being available for indexing.
This setting overlaps with the hide-from-sitemaps setting. This setting does not add any metafields to your Shopify resources, but since the seo.hidden metafield already results in the "noindex" meta-tag being added to the resource page by Shopify, the add-noindex-metatag setting is automatically toggled on when you turn on the hide-from-sitemaps setting.
You can use Locksmith alongside a dedicated subscription app to lock content so that the content can only be accessed by active subscribers. This guide covers how to use PayWhirl, but any recurring payment service that offers the "auto-tagging" feature would work with Locksmith.
Note: This guide covers recurring subscriptions. If you want to grant access based on a single purchase, that is a built-in Locksmith feature, no third party app required. More info on that here.
If you haven't already, install the PayWhirl app and use their instructions to set up a recurring subscription for one of your products. Start by creating a product on your store, and then linking it to a subscription through PayWhirl. You can find the full setup instructions here:
Important: You'll need to configure PayWhirl to tag customers who subscribe. To do this, click on the Workflows tab in PayWhirl, and then click on "Create customer tagging":
Next, click on "Tag active subscribers", and then "Create and activate workflow". Your setup should look something like this on the Workflows screen when you're done:
Open up the Locksmith app and create a lock by searching for the page, product, collection, etc that you want to limit access to.
Once the lock is created, add the following key:
Here's a refresher on how to create keys:
That's all it takes! Locksmith will now only grant access to accounts tagged with "Active Subscriber", which will be added to accounts that have an active subscription via PayWhirl. Based on the Workflow settings you set up already, the tag will be removed when the customer cancels or is otherwise unsubscribed. As a result, they'll also automatically lose access to the locked content.
E.g. - you have a monthly, yearly, etc option - no additional setup needed: the same tag will get added to a customer account to matter what plan they have, and customers using all plans will be able to access the content.
E.g. Gold, Silver, Bronze tiers, but the access for each tier is different.
In PayWhirl, you'd create a recurring order product for each of your tiers.
In Locksmith, add a lock to the content that is associated with a particular membership level. You will end up with at least one lock for each tier, maybe multiple, depending what content you are locking!
Use the following key:
Make sure to fill out the "Only look at orders in the last..." field with the appropriate subscription length that matches your PayWhirl subscription:
If there is any content that can be accessed by more than one type of membership level, just add them both as Locksmith keys:
Feel free to ask questions if you're having any issues with any of that! We can be contacted via email at [email protected].
How to use the Locksmith app to restrict content in your different Markets on your Shopify: Online Store sales channel
Locksmith can be used to show different content depending on what Market a customer is visiting.
The first step is to divide up the content in your store. If you already know what products or collections you want to show or hide in different Markets, then you do not need to create extra collections here.
Since the goal for merchants here is typically to just to show a different product offering to different markets, you'll want to create collections that each contain the products that you'd like to display for each market. Keep in mind that you can use Shopify's automated collection feature to make this easier. Once your collections are created, it's simply a matter of adding a lock to them in Locksmith:
Once the lock is created, you'll need to create the correct Locksmith "Key". Markets are typically set up by either creating subdomains on your store, or by creating subfolders. Depending on which one of those you are using, you'll need to set up Locksmith a bit differently...
This will usually look something like www.my-store.eu, or ca.my-store.com, where the subdomain of the URL represents a different region that you're selling to. In this case, simply use Locksmith's "domain" key condition:
When setting this up, Locksmith will automatically show you suggestions for which domain to use, based on the domain settings for your store.
This will usually look something like www.my-store.com/en-us or www.my-store.com/fr-ca. In this case, your key conditions will look slightly different. Start by selecting the :
Next, you'll add in something like the following as the "Liquid condition", making sure to edit the last part to match the subfolder you are wanting to grant access to:
{% ifrequest.locale.root_url == "/en-us" %}
Note that only the bolded part needs to be entered, as the rest is included automatically.
You'll end up with something like this:
If you want to set up a key condition for your primary domain, use "/" as your root_url. In specifically:
{% ifrequest.locale.root_url == "/" %}
Similar to the above, you can also use the Liquid localization object in your custom key condition. This is useful if you don't use subfolders. Shopify's documentation on the localization object is here: .
Important! Using this feature doesn't mean you can use any arbitrary country in your condition. It will only work for the countries that you've set up localization options for in your store. If you want to grant access to visitors based on their IP address location, that can be done with our "locations" key condition: .
Your condition will look something like the following - where "CA" is the ISO code for Canada:
{% iflocalization.country.iso_code == "CA" %}
A list of country ISO codes can be found here:
Many of Locksmith's key conditions use the customer account system that comes by default with all Shopify stores to check for specific customer attributes before granting access. These are detailed below.
When these key conditions are used, Locksmith will ask that a customer signs in first, whenever a customer tries to access the locked content in your store. Locksmith does so by automatically displaying the login template from your theme:
Some of the options available to you include checking if the customer...
is signed in This condition requires all customers to log in. Once they're logged in, they'll be granted access to the locked resource.
is tagged with… This condition first requires all visitors to log in with a customer account. Once the customer has logged into their account, they'll be granted access if their customer account has the tag you've chosen in Locksmith. (When inverted: unless the customer is tagged with..., or is not signed in)
has placed at least x orders
Don't forget that all key conditions can be inverted! Which just means that Locksmith will check for the opposite of the original condition. More info on that here:
If the list above does not include the exact customer attribute that you are wanting to check, you have the flexibility to use . This is done by using a "custom Liquid" key condition.
Most notably, this would allow you to use customer metafields in order to grant access. More complete information on custom liquid key conditions - including setup guide - here:
Here are a few more links to guides that you might find useful as you set up Locksmith to work with your customer account system:
As always, please feel free to reach out to us directly via email at [email protected] if you have any questions!
If you've been using Locksmith to protect your shop, uninstallation means two things:
Removing Locksmith from your theme
Removing Locksmith from your Shopify apps list
The order is important! Locksmith is NOT able to clean up its code from your theme after you remove it from your apps list (and neither can Locksmith staff), so it's critical to have Locksmith remove itself from your theme before removing the app from your list.
Please note - Before proceeding, please consider whether or not there has been any Locksmith code added to your theme manually in the past. This can happen if you are doing price hiding with Locksmith, or if you wrote in for support help and your theme needed to be adjusted. Any Locksmith code that was added manually to your theme needs to be manually removed from your theme! If this is you, do not follow the rest of this guide - simply disable Locksmith from the "Settings" tab in the app, for now. This will cause Locksmith to be dormant in your store. Then, contact us at for help removing the code.
Do not delete the app from your apps list before getting the code removed - deleting the app while the code is still in your theme can cause your pages to be inaccessible!
Important: If you've already deleted Locksmith from your apps list, you'll need to temporarily add the app back to your store and accept the permissions, which will give Locksmith the ability to edit your theme to remove its code. You can add the app back to your store from .
You do not need to start a subscription to run Locksmith's code removal process.
To start, open the Locksmith app from within Shopify.
Click on the "Help" link under "Locksmith" from the Shopify admin navigation menu.
Click the red "Remove Locksmith" button.
After clicking this, you'll see a status bar at the bottom of the screen, which is Locksmith letting you know that it's syncing your settings with Shopify. When this status bar goes away, the removal has completed - it should only take a handful of seconds. Wait for this to complete before continuing.
Delete Locksmith from your apps list in the standard way. Namely, from your Shopify admin, go to Apps > App and Sales Channel Settings > Locksmith > Delete.
.
If you have decided to NOT delete the Locksmith app from your apps lists, as outlined above, please make sure to cancel your subscription manually, to avoid being charged unexpectedly:
The best way to hide out-of-stock products is to create a automated collection containing these products, which is then protected with Locksmith.
For more automation options around out-of-stock products, see Mechanic's "out of stock" task library.
In the "Collections" area of the Shopify admin, create a new collection. Under "Collection type", select the "Automated" option, and configure its conditions such that products match an inventory stock level of less than 1. Save the collection. The result: a collection that only contains products that have been sold out.
Open up Locksmith, and use the "New lock" form on its homepage to search for your new collection, using the collection title that you specified earlier.
Click on the matching collection, and follow the steps to save its new lock.
On the next screen, update the lock's settings so that "Hide this collection and its products" is enabled.
Save your settings. You're done! The result: this collection, and its products (representing all out-of-stock products in your store) are now fully hidden from visitors.
How to adjust your lock settings to prevent your content from being found via your in-store search
Locksmith includes a checkbox inside of the "Settings" area, on lock pages, that will remove products and other resources from searches - but only from the default and static searches in your store.
Note: Locksmith can NOT remove products from display in other apps, nor can it remove products from dynamic (shows results as you type) searches. In these cases, see suggestions below...
You'll find the hide-from-lists setting on each of your lock pages, like so:
Using the above Locksmith setting to 'hide from search results' will not remove the search results when a third party or dynamic search is enabled in your store, so we have some suggestions for alternatives.
The only option here, if you want to make sure that your locked content is never displayed inside of your in-store search, is to disable the dynamic loading of the products. Each theme is different, but this is typically done within the "search" settings for the theme.
Once you open the Theme Editor, you can find it under your "Search" settings. On the Debut theme, for example, go to:
Theme Settings > Search > Enable product suggestions (turn OFF)
Locksmith won’t be able to hide your products from a search in this case, since the third party app is completely responsible for displaying search results when enabled. Suggestions:
Many third party apps have their own ways to prevent products from showing up in them. Check the settings for the app that you're using! At the very least, they should allow you to remove certain products entirely from appearing in searches, using a specific product tag.
For product and collection locks, Locksmith also gives you the option to hide from sitemaps:
Behind the scenes, this setting uses , which removes products from any in-store searches, but also works to remove products from search engines like Google.
Note: When enabled, his setting will remove products completely from in-store searches. In other words, even visitors that have access to the content via Locksmith won't see the products appear in searches. Because of that, this setting may not work for everyone, but is still available as an option.
On collection locks, as long as the 'protect products in this collection' option is enabled, the setting will also be applied to each product in the collection.
Locksmith enforces variant locks at the Liquid level, which can result in a different set of DOM elements being present than the theme expects. For example, a list of product images might be filtered down to omit images belonging to protected variants; this could result in a DOM error when the theme tries to address an image that Locksmith has prevented from appearing.
Solving this kind of problem usually involves some trial and error, all centered around making the theme's JavaScript more tolerant of elements being unexpectedly missing.
Start by locating the specific line of JavaScript that's raising the error.
All error messages come with a filename. Match this filename to the relevant JavaScript asset in your Online Store theme.
Look for line numbers at the end of the filename: theme.js:73 could mean that the error came from line 73 from that file.
Use the Locksmith app to hide navigation links in your Shopify Online Store channel
Locksmith allows you to hide navigation links that point to locked resources - only showing them to visitors with access to your locks. This is turned on via the settings on your lock page:
You'll find this option on locks for the following resource types:
Product
Collection
Page
Blog
Liquid locks
Using third party apps to create your navigation will likely prevent Locksmith from being able to correctly hide your navigation links.
Locksmith is generally not able to hide navigation menu links that are a part of a mega menu, whether via third party apps or a theme setting. These generally rely on AJAX/Javascript, which Locksmith cannot filter.
Locksmith is not able to hide empty navigation links that don't point to any resource.
The way you add in the links when creating your navigation menus may affect Locksmith's ability to remove links in your menus.
Specifically, it's important that you search for and select the resource directly and that you do NOT simply paste/type in the link. Selecting the resource directly means that there is a liquid resource associated with it, and Locksmith can more consistently detect the correct lock status that way. From the Online Store > Navigation area in your Shopify admin, It should look something like this when setting up:
Use Locksmith to only grant access to customers that subscribe to your newsletter
Locksmith allows you to integrate directly with either Mailchimp or Klaviyo. When setup, Locksmith will ask customers for an email address when they arrive on a locked page. Once the email is entered, a customer is immediately granted access, and Locksmith will automatically send the subscription information to the corresponding service.
Detailed information on how to setup Mailchimp can be found here:
If using Klaviyo, you have the option to simply request that visitors subscribe in order to gain access:
Or, you can also use Klaviyo to grant access only to those who are already subscribed to a specific list in your Klaviyo account:
Shopify ships out of the box with a marketing mailing list service. If you would like to use Locksmith to grant access to those who have already subscribed to this, you can do so using a custom Liquid key condition.
This is slightly different than the above options, in that it will only grant access to a signed in customers - if the customer is already subscribed! To start, check out our guide on this here:
The condition you're looking for is:
{% if customer.accepts_marketing %}
When set up, this will present the customer will the regular prompt to sign in (as opposed to the subscription prompt):
If desired, you can adjust your message prompt to direct your customers to the page footer(in most stores) to subscribe to your newsletter. More information on editing messages here:
Locksmith does not support other mail services at this time.
However, if you have a mail service that automatically tags customers that are subscribed, you can use Locksmith to check for a customer tag:
Please feel free to contact us via email at [email protected] if you have any questions!
You tested out your key, and it worked great. But now it stopped asking for verification. This can often happen when using one of these key types:
IP Address
For background, Locksmith remembers your previous access using the same mechanism Shopify uses to remember you: via browser cache.
The easiest way to move forward is by opening a private browsing session (sometimes called "incognito mode"), and then proceeding to test Locksmith in your online storefront.
Detailed information on using private/incognito mode here:
Tip: Each time you test, be sure to start a new private browsing session. Remember, the cache in private browsing doesn't clear stored access until you close all private windows or stop the main Incognito process.
When you open the key, Locksmith remembers it as long as your browser application remains running. To get around this, you'll need to use a private session (see above), or use a different browser or device.
In the case of location keys, if you're using a VPN to change your apparent location, it can even be useful to delete the browser cache during the same browser session. We have a guide on how to do this here:
If you were signed into a customer account when you opened the key, Locksmith can remember access on that account. This is a toggle-able setting on those key condition types, and, when turned on, Locksmith will never ask again when you're signed in.
To turn this setting off, head into the lock and click on the link to the key condition. Next, scroll down in the pop up and disable the option "Remember for signed in customer":
Toggle the setting OFF, and don't forget to save your lock!
Most of the messages that Locksmith shows to your customers on the front end of your store are completely customizable!
You can edit the text itself as much as you need, plus you can add code, just like you would a template in your theme. That means you can use the following:
HTML
CSS (via the <style> tag)
The Locksmith can be used to lock most resources in your store, preventing their content from appearing between the header and footer of the site. However, Locksmith doesn't have a built in way to lock or hide the header and footer in your theme.
It's worth noting that some locks have an option that can be used to conditionally hide specific menu navigation links for locked resources. More on that in our guide below:
This is an incomplete guide! In an effort to share the information we have as soon as possible, this guide has been started and published here in what we consider to be an incomplete state. If something is missing, please let us know by emailing us at .
Locksmith can be used to restrict checkout from the cart page by creating a lock for the cart. This lock can be used to hide the whole cart page, or to only lock the checkout buttons on the cart page. Locksmith has a few cart specific key conditions that can be used to check specific attributes of a customers' cart. This guide will primarily focus on the use of the “has a certain product in their cart” key condition.
Manage pricing and other options by creating multiple variants, and use Locksmith to manage access.
In addition to managing access to your products and collections, Locksmith can protect individual variants within your product listings.
New to product variants? Learn more here:
This is a powerful feature! It can allow you to tune your product listings in a way that previously required elaborate coding, or deep manual integration with other apps.
With variant locking, you can:
... set up wholesale pricing on your existing products without creating duplicate products, then ensure that only your wholesalers can view those prices.
Is your Locksmith installation synced up with your current theme? When changing around themes, Locksmith needs to be re-installed each time you do this. To initiate a new theme install on your currently published theme, press the "Update Locksmith" button on the "Help" page:
If your online storefront is showing poor performance after installing Locksmith or adjusting Locksmith settings, it's possible that an unintentionally aggressive Locksmith configuration is to blame.
Start by using the following troubleshooting steps:
This will help you figure out if Locksmith is actually causing your issue. If your site is still performing poorly after disabling Locksmith, it's probable that the issue lies elsewhere, and you will need to continue your search for the culprit outside of Locksmith.
Disabling Locksmith is done from with the
How to set up Locksmith to show more than one input form when using more than one condition type on the same page
Many of Locksmith's access conditions require input from your customers, whether that be a login, or just a code entry or a confirm button press. Sometimes you might wish to give your customers flexibility by providing multiple different ways for a customer to gain access. For example, perhaps they can enter a passcode OR subscribe to your mailing list. Setting that up would look something like this:
By default, Locksmith only shows one entry method at a time to customers. In the above example, you'd see something like this:
{{ "locksmith.foo.bar" | t }}customer.tags contains "admin"page and page.title contains "MEMBERS"


This setting cannot hide filtering options in your theme's filter menu (shown on collection pages), as filter items are displayed differently from product grids and navigation menus.


has purchased… This condition requires the visitor to be logged in with their customer account, prompting them to log in if they aren't already. If their last 50 orders contain a certain product (identified by SKU, title, or by product tag), they'll be granted access.
the customer's email contains… This condition requires the visitor to be logged in with their customer account. If their email address matches some text that you specify (say, "@mycompany.com"), they'll be granted access.
has one of many email addresses This condition requires the visitor to be logged in with their customer account. If their email address is on the list that you specify, they'll be granted access. Simply to set up, but not recommend if you have a large number of email addresses. See below for an alternate option.
has an email from an input list This condition requires the visitor to be logged in with their customer account. If their email address is on the list that you specify, they'll be granted access. This key condition is different than the above, in that it leverages Locksmith's input list feature, which lets you use a very large number of of email addresses. While not hard to set up, it does require a few more steps than the one-of-many-email-addresses key condition above.


Determine how that line of JavaScript is attempting to reference a DOM element on the page.
For example, the line group.querySelector('option[value="'+ value +'"]').disabled = true; is attempting to address an <option> element based on a product's option values. If Locksmith has filtered out that variant option, this DOM element might not exist.
Modify the relevant JavaScript to insulate it against the possibility of that DOM element being missing.
Using the example from above, we could separate the querySelector call from the attribute update.
assign optionElement = group.querySelector('option[value="'+ value +'"]')
if (optionElement) { optionElement.disabled = true; }
Or, we could wrap the entire thing in a try/catch block, logging the error if one was raised.
try { group.querySelector('option[value="'+ value +'"]').disabled = true; } catch (error) { console.error(error); }

This setting cannot hide filtering options in your theme's filter menu, as filter items are displayed differently from product grids and navigation menus.


Press the Remove Locksmith button from the Help tab
On collection locks, disabling "Protect products in this collection" will remove the metafield from the products inside the collection.

page and page.template_suffix == "preview"page_is_locked{% assign page_is_locked = false %}
{% assign page_handles = "first-handle,second-handle,third-handle" | split: "," %}
{% if scope == "page" and page_handles contains page.handle %}
{% assign page_is_locked = true %}
{% endif %}<meta name="robots" content="noindex">To get started with this, you'll want to first create the lock that covers the content that you want to restrict. Since Locksmith gives you flexibility to decide what content you want to lock, you can apply this restriction to your entire store, or just to specific pages or collections in your store. Our full guide on locks contains all the information you need to create your lock, including how to create a lock to cover your entire store:
If you are choosing a more granular approach, you will need to create multiple locks that span the different products, collections, and pages that you want to lock.
Once the lock is created, you'll want to create the key next. When setting up an approval process, the simplest way to do it is to use the key condition labelled "Permit if customer is tagged with...". This means that only accounts that have the specific tag can gain access to the locked content. That will look like this:
Using customer tags to grant access is the easiest way to approve accounts. However, you can technically use any customer data to grant access. More information on that here:
The above two steps outline how you use Locksmith to approve customer access to content. However, it's also important is to decide how the customer accounts are created to begin with.
You have some options:
Allow customers to create the accounts on their own
Create pre-approved customer accounts, and send email invitations.
This would be considered the default way, and doesn't require any extra steps. Customers will simply register their accounts as normal, using your default registration form, and you can choose the ones you want to "let through" to your locked content. You'll simply use Shopify's "Customers" area to tag the customers appropriately.
Shopify does NOT send registration notifications. If this is important to you try this customer email alert task from Mechanic.
If you already have the email addresses of those to whom you'd like to grant access, you can use Locksmith's customer import/creation tool to create their accounts. The customer import tool allows you to pre-tag any customer accounts that you create this way, so they'll automatically be granted access once they begin using your site.
A complete guide on the importing tools is here:
Beyond entering the customers' email addresses, make sure to use the "Customer tags" field and enter "approved" as the tag, so that all of the customers imported this way are tagged. There are also some other options worth taking a look at:
If you are using Legacy Customer Accounts, you also have the ability to place a lock on the registration form directly, so that customers cannot register their own accounts.
In general, your messages can be edited in two places...
To customize your messages for one lock only, go to the lock page and scroll down to the "Messages" area.
You can also customize the default messages, which will be used for all applicable locks when a lock-specific message is not present. To edit these, head over to the "Content" area of the "Settings" page:
Locksmith will only show the type of messages in the "Messages" area that apply to the key conditions you've selected in your lock(s). Most of the key conditions in Locksmith use customer data, and therefore require a sign in. In these cases, Locksmith will show you the following two editable messages:
Guest message content: shown to customers that are not yet signed in.
Access denied content: shown to customers that are signed in, but don't meet the requirements for the lock (e.g. don't have the specific customer tag that is required for access, if applicable)
There are two other types of messages that will show up if you have selected the applicable key conditions:
Passcode prompt: for 'passcode' conditions only.
Newsletter prompt: for Mailchimp and Klaviyo conditions only.
These conditions both show a special prompt to the customer, asking for their submission before continuing. You can customize the message in the same places as outlined above.
For merchants that have multiple passcode or newsletter conditions in one lock, you can customize the messages at the condition level. This is done inside the condition popover in the input labelled "Custom input prompt, as shown below.
In most cases, you won't need to set the prompt at the condition level - simply use the lock level messages, as shown above - this is a convenience feature for when it's needed.
Important: If a message is set at this level, it will override any messages set at the other levels. If this is the case, you'll see a warning, just to let you know what's going on:
Additionally, you can customize the submit buttons and loading text. To do this, head over to your theme's "Edit default theme content" settings:
... and open the "Locksmith" tab:
Locksmith will use the values you customize here when displaying content to your visitors.
While we cannot make extensive custom edits to your form for you, if you have any questions you can contact us via email at [email protected]
You can add any text prompt to the "Mailing list signup prompt" area, and it will be displayed right before the email input. The default prompt is shown below:
In addition, you can add any code to this area, and it will be rendered normally, as if adding it to the theme. Including:
HTML - using regular HTML tags
CSS - using <style> your CSS code here </style>
Javascript - using <script> your javascript code here </script>
Liquid - using regular Liquid syntax
Use {{ locksmith_email_form }} to denote where the form (input and button) itself will go, and then add in content that you want to display before and after it.
This results in the following:
To edit the text for the button, you'll need to follow Shopify's guide to "Edit default theme content":
Once there, you'll find a Locksmith tab in which you can edit the text as needed:
We have a dedicated guide on adding translated messages here:
If you have multiple key condition types on the same lock, it might be useful to include other form types within the prompt, so that they display on the same page. We have a guide on doing this here:
Please note that this is NOT compatible with overriding/editing the form itself (as detailed in the next section).
Note: This is advanced and requires knowledge of code. If you choose to override the form, the coding and style is up to you, we are not able to create a new form for you or edit the code for you. With that said, you are still free to contact us with any troubleshooting questions that you have.
Use the following steps in order to override the form. The screenshots are taken from Chrome, but the steps are similar if using other browsers.
Once you've created a Mailchimp or Klaviyo key condition, open up your locked page in your storefront.
Right click on the email list signup form to inspect the code.
This should take you to the "Elements" tab. There, find the <div> element with the "locksmith-email-container" class:
You can copy the entire element and all child elements like so:
Paste this directly into your "Mailing list signup prompt". You should end up with something like this:
Save that, and open your locked page again on your storefront. If everything worked, your email list signup prompt and form should look exactly like it did before. But now you have the ability to edit it as needed. Please note that you must always include a <form> tag with an id of locksmith_email_form - otherwise Locksmith will try to include the form itself, and you'll end up with two forms - so don't remove that when editing the code.
The intent here is to illustrate that conditionally hiding the site's header and footer can be set up with some custom Liquid.
In general, this can be straightforward to set up, if you have a little experience with Liquid and editing your theme's code. Alternatively, a developer or theme designer should be able to help with this.
The header and footer section groups are typically located in the theme.liquid layout file in Shopify 2.0 themes. A Liquid condition can be set up to show or hide these sections based on a Liquid attribute, such as a customer being signed into a store account, or a customer viewing products from a specific collection.
Locksmith has "manual code" that can sometimes be used to hide the store's header and footer. The code used in this example will interact with all locks in your store. You may need to consider using some additional Liquid to limit this section hiding to specific locked resources if needed.
The following code can be added to the top of the theme.liquid layout file to include Locksmith's variables that will support the function of Locksmith's manual code:
The {% sections 'header-group' %} can be wrapped in Locksmith's manual code to show the header, if the resource that's currently being viewed isn't locked:
We have some more information on Locksmith's manual code in the guide here:
Locksmith has a new experimental feature that can automatically hide sections, blocks, and snippets in Shopify 2.0 themes.
You can find our guide to using this feature at the link below:
In some themes, this can be used to hide the header and footer sections. To set this up:
Navigate to the Theme tab in Locksmith, and click the Edit theme hiding profile button for the theme you’d like to configure.
Click the Add new definition button at the bottom of the page. In the Name of section, block, or snippet field, search for header.
From the dropdown results, select the theme’s section file for the header, then click Add.
Repeat steps 2 and 3 for the footer.
In the Liquid variable field for each definition, enter "item".
When you’re done, click the Save button at the top of the page.
There's a Shopify directory here if you're looking to hire someone to help with something like this: https://www.shopify.com/partners/directory
Let us know by emailing us at: [email protected]
Our guide on setting up a cart lock is linked below. That guide covers both locking the whole cart page and locking the checkout button.
Locking the checkout button can be a better option here. This will allow customers to still be able to edit the products in the cart, even when the checkout button is locked.
There are three general ways of restricting access to the checkout via your Shopify cart based on mixed products or combinations of products. Keep in mind, this isn’t an exhaustive list.
The "Look for products matching…" field on the "has a certain product in their cart" key condition can be used to check for a product title, or product tags. For example, "tag:wholesale will check for any products with the "wholesale" tag.
You will need to create three separate keys for your cart lock. Our guide on adding keys is here for reference: Creating keys
Create a key and then select the "has a certain product in their cart" key condition and add “tag:wholesale” to the "Look for products matching…" field on the condition.
Then combine a second "has a certain product in their cart" key condition with the first, add “tag:retail” to the "Look for products matching…" field on the condition, and then invert the condition. Combining Key Conditions Inverting conditions in Locksmith You should have a key that looks like the following image.
Create a new key by clicking the “+Add key” button and then select the "has a certain product in their cart" key condition and add “tag:retail” to the "Look for products matching…" field on this condition.
Then combine a second "has a certain product in their cart" key condition with the first, add “tag:wholesale” to the "Look for products matching…" field on the condition, and then invert this condition. You should have a key that looks like the following image.
The third key can be used to grant access for when there are no products with the "wholesale" or "retail" tags in the cart. This will require the combination of two inverted "has a certain product in their cart" key conditions, one of each product tag.
You should have a key that looks like the following image.
The method locks down the cart page only. The cart page is always found at the '.../cart' link in your store (e.g. www.example-store.com/cart). Using other types of carts (slider, dropdown, dynamic/ajax, etc.) or adding "Buy Now" links to your store (which point the customer directly to checkout without going through the cart page) will not work with this method.
Locking the checkout area itself is not possible using Locksmith. So any check out links that lead straight to checkout including "Buy Now" button, upsell links, or abandoned cart links can't be used with this method. Please see Setting up checkout validation with Locksmith
Let us know by emailing us at [email protected]
As you can see, this does require manual coding. If you need a hand with this, let us know! :)
{% include 'locksmith-variables', locksmith_scope: 'search' %}
{% if locksmith_access_granted %}
<!-- your search form here! -->
{% endif %}... reserve a certain amount of stock for a particular customer.
... allocate your inventory by distribution center, and restrict access regionally.
... add bulk quantities for your trade customers, only allowing pre-approved customers to access it.
Note: This feature may conflict with other apps. See the Incompatibilities section below for more.
Start by ensuring you've got at least one product variant set up in your catalog. (Learn how to set these up for new products, and for existing products.)
Then, open Locksmith, and search for the name of your variant:
Note: if you don't see your variant in the search results, try opening up the "Help" page in Locksmith and pressing the Update Locksmith button there, and try your search again. This is sometimes necessary if you've very recently created your variant.
Next, select the variant and click Save. You may then add your keys.
That's it! :)
It's possible to limit the scope of products the variant is hidden on using the product tag key condition. To learn more, please visit:
Passcode keys don’t work by default when placed directly on a variant lock. This is because variants don’t have their own pages, and Locksmith only shows the passcode prompt by replacing full page content.
If you’d like customers to use a passcode to unlock specific variants, you’ll need to pair the variant lock with a separate landing page:
Create a new page in your Shopify admin (this can be a simple landing page).
Add a lock to that page using the passcode key you want.
Apply the same passcode key to your variant lock.
Direct customers to the landing page, where they’ll be prompted to enter the passcode. Once entered, they’ll have access to the locked variants.
Because this feature allows you to filter out variants from view, it's likely that it will conflict with any other apps that also operate in this way. For products that are locked with Locksmith, we add a metafield to prevent them from being included on the Shop app sales channel. However, this automatic protection only applies at the product level. When variants are locked, Locksmith doesn’t add the metafield automatically, which means variant visibility on the Shop app needs to be managed manually by merchants. To learn more about this, see the page here:
Variant locking is not compatible with variants being displayed by other third-party apps, including page builder apps. To learn more about this, see the page here:
Variant locks are not compatible with Locksmith's manual locking feature.
Read our full guide on this here:
If you've been testing out your locks, and you've already entered the passcode or used the secret link, etc, during the current browser session, the content is now unlocked for you, and will be accessible on your current browser: Locksmith will not continue to ask you for access credentials.
To test out what a new visitor to your website will see, use an incognito window, or try on a different device or browser.
For more information from the sources on how to use an incognito window in each of the different types of browsers(sometimes called "private session"), use the following links:
If you recently switched to a new theme or published an updated version of your existing theme, any manual locking code or theme hiding profile definitions you previously added will not automatically carry over. This is expected behavior in Shopify — theme files are unique to each theme version, and apps can’t migrate custom edits between themes.
If you were relying on:
Manual Locking Liquid code inserted directly into templates (for example, to hide prices, add-to-cart buttons, or sections etc)
A theme hiding profile that references your theme’s specific section or block structure
Custom CSS added for supplemental hiding
Any other theme-specific customization using Locksmith manual locking code made outside of Locksmith’s automatic installation
…you’ll need to re-add these changes in the newly published theme.
If you’d like help identifying which code needs to be brought over or where to place it in your new theme, please feel free to reach out at [email protected] — we’re happy to walk with you through it or add it ourselves if that's helpful. :)
If none of the above helps, inside the Locksmith app, double-check each lock individually for warnings. Or, for any extra keys that might be accidentally allowing access.
If you're still having trouble, email us – [email protected]. We're here to help. :)

There are two lock settings known in Locksmith to potentially cause speed issues in certain circumstances:
The exact labels might differ slightly depending on if this is a product lock, collection lock, page lock etc.
When either option is enabled, it creates the possibility for Locksmith's suite of security checks to be run many times, slowing the rendering process of your storefront. Because of that, disabling these two settings on all of your locks will result in Locksmith removing its security checks from places where your storefront theme performs a "loop", e.g. the places where it cycles through lists of links/pages/collections/products/etc.
Keep in mind that it is typically safe to use either of these settings, but there are a few situations you'll want to look for if you are seeing speed issues.
If you have this setting enabled, even on just one of your locks, AND you have a large navigation menu (25+ links, including sub-menus), this is very likely the culprit. Because of this, it is not recommended to try to use this setting with large navigation menus.
Try disabling this setting (on all locks) and then check if your site is loading better.
It is more rare that this setting will slow down your site. However, with certain themes, there may be unexpected loops in product or collection templates where Locksmith inserts its checks.
If you see Locksmith only loading slowly on collections or search results pages, that could be the signal that this setting is the issue.
Enlist their help to find the specific assets in your storefront theme which contains Locksmith code that might be unnecessarily running too many times. It's simple to tell Locksmith to ignore specific files in your theme, and this fact can be used to your advantage here.
To do this use the Settings > Advanced > "Liquid ignore list" field:
Using this settings will mean that Locksmith will strip itself out of that asset.
If the above strategies do not provide anything useful, please do not hesitate to contact us via email at [email protected], and we'd be happy to help you troubleshoot this.
To include a specific form for a key condition that you're using, you can mix and match the following liquid variable outputs in your Locksmith messages:
passcode
{{ locksmith_passcode_form }}
mailing list signup (i.e. Klaviyo or Mailchimp)
{{ locksmith_email_form }}
confirmation
{{ locksmith_confirmation_form }}
login - for store accounts. If you are not using legacy customer accounts, this is just a button pointing to the sign in page
{{ locksmith_customer_login_form }}
registration - for store accounts. only applicable if you are using the legacy customer account system
{{ locksmith_customer_registration_form }}
Continuing the passcode/klaviyo example from above, add this:
Which results in this:
The easiest way to make sure your locked pages display correctly when using multiple prompts is to simply copy/paste the same exact message to each of your messages. Technically only one of them will be used - which is based on Locksmith's internal sorting rules. But, for simplicity, use consistent messages:


How to use the Locksmith app to sell digital content on Shopify
If you have special content that you want to monetize, and it lives in your Shopify store, Locksmith allows you to sell access to it via in-store purchases.
Common choices for this are to add your restricted content to one of the following:
. Keep in mind that you are not restricted to a single blog, so you can have a general access blog for your site news, etc, and still use a restricted blog for your digital content.
.
Product page - You can build custom product templates that also house your restricted content and combine it with , so that the restricted portion only reveals itself after the product has been purchased. This option has a less straightforward setup, but is still available if desired. If this is you, the best place to start is by contacting us via email at [email protected].
Again, for best results, your content should live in your online store. However, there are some other options that might apply to you:
This requires another provider, and we recommend Dropbox: .
You can embed the videos to be viewed just like any of your other content. However, if you want to secure this process, you'll need to enlist the help of a third party video viewing service. We recommend private and unlisted videos on Vimeo, but keep in mind that making your videos private/unlisted on Vimeo requires a paid Vimeo plan! .
If your content must live elsewhere, consider using iframes to embed your content into a Shopify page, which you can then lock. This is more of an advanced technique and would require someone familiar with code. Locksmith support won't be able to code this kind of thing for you. This is also less secure because the original source of the iframe can't be locked by Locksmith.
You'll need to have at least one product that is clearly marked as the product that customers will purchase, in order to gain access to the locked content. Something like this:
You'll need to use a third party app to set up the subscription service. We recommend ReCharge or PayWhirl, and we have in-depth guides for those here:
on your subscription product (the one created in the previous step). For your key, use the condition labelled "has purchased..." to create a key condition that permits access if the customer has purchased the appropriate product:
In order for Locksmith to register that a customer has actually purchased your "access product", it is important that you require that customers are actually signed in when the purchase is made.
You can do that with either of the following ways:
Make customer accounts required for your entire store: This means that everyone must be signed into your store when they check out. . This might be considered overkill for some merchants, so if that's the case, use the next option.
Use Locksmith to require that a customer is signed in when purchasing your "access product": Pretty simple - just add a lock directly to the "access product" and use "Permit if customer is signed in" as the key condition. You can by editing the "Guest message content" message to let the customer know that they need to sign in before access. Or, if you prefer, you can even if you just want to hide the add-to-cart button instead of the whole page.
You may wish to direct customers to the content that they just purchased.
We can use some custom code to conditionally add a link to your locked content if the customer has purchased the right product.
To set this up: head to Settings -> Notifications in your Shopify admin, then select "Customer notifications" and click the link for "Order confirmation". To edit the code for this email, you'll need to click the "Edit code" button in the top right of the page. Insert this code and adjust as needed:
Feel free to add multiple copies of this code, if you need to send the customer to one of several pages.
The code above can also be modified to suit the order confirmation screen that your customers see, right after completing an order.
To set this up, locate the "Additional content and scripts" box, near the end of the Settings -> Checkout area in your Shopify admin.
Use this code:
... adjusting the "Some Product" for your actual product title, and "/pages/some-locked-page" part for the address to your locked content.
Feel free to add multiple copies of this code, if you need to send the customer to one of several pages.
Let's say you want to grant access based on the purchase, but not immediately. You can grant access later using two conditions in your key. For example, this key will grant access 12 weeks (84 days) after the purchase of the Starter Pack:
Notice the "unless" in the first condition. That's the result of using the option. :)
First thing to know is that Locksmith uses the built in customer account system that comes with your store! This means it doesn't create a separate registration form, sign-in form, or customer database.
Important: This guide applies only to Legacy Customer Accounts.
Shopify’s New Customer Accounts don’t use a traditional registration page — an account is created automatically when someone signs in. Because of this, the registration form can’t be locked or customized in the same way.
If your store is using New Customer Accounts, we recommend using customer tags to approve or review new customers after their account is created instead.
All Shopify themes come with a registration form that includes Name, E-mail, and Password fields.
Many merchants want to collect more information from a customer when they register. Although Locksmith doesn't get involved directly with this process, you do have options here.
This is a simple solution to the issue and does work for some merchants. Use the Locksmith access-denied "Messages" area, which you can customize in the app, to let your customers know the contact email.
lets you create unique registration forms and add fields in an easy way. You can enable account approval, auto-tag customers, and receive email notifications when customers create or update their accounts. The Customer Fields app is not created by us, but we have had merchants have a lot of success with it!
Extremely easy to set up
Install forms nearly anywhere on your storefront (no coding required)
Choose whether to automatically create customer accounts in Shopify or require admin approval before an account is created
Create unique forms for different customer groups, or use conditional logic to show/hide fields for different users on one form
It is, naturally, a paid app
If you just need to collect information, and don't need to automatically do anything with it, it is always an option to use Google forms, Wufoo, or other online forms. There are some other great services out there that let you create a fully customized HTML form.
Free
Can be used to create a second registration to be used by some of your customers while leaving your regular registration form alone. (These accounts will still be funneled back to the same customer database.)
You can get notified by e-mail when the form is filled out!
The accounts are not automatically created which means you'll need to manually move the information over to Shopify from the third party app
If you are using Shopify's Legacy account system with a Legacy theme, your theme will have a built-in registration form which you can edit as needed. Shopify has a guide that will walk you through doing this. You can .
Editing your own theme is free
Requires coding knowledge. (But, If you don't have coding knowledge, you can still !)
Extra fields in the registration form end up as customer "notes". Saving unique customer data to the customer note doesn’t allow much flexibility for using that data, or segmenting customers accordingly.
Changes the registration form for everyone which means that your different types of customers(I.e. wholesale and retail, if applicable) would be using the same registration form. You can still make the form usable for everyone by making the extra fields optional.
Locksmith works in and around the online storefront theme layer – an arena shared by many, many other apps. Locksmith's interoperability is excellent; its internal Liquid engine is very good at injecting its code in the right places, without causing issues for themes or apps. Because of this, in the vast majority of cases, you won't need to worry about Locksmith's compatibility.
Having said that, there are a few places where there are specific points of compatibility or incompatibility.
We're pleased to announce that Locksmith is now compatible with the Shop app. Shopify has updated its policies to allow stores using Locksmith to remain eligible for the Shop app, provided all other Shop app eligibility requirements are met.
Shopify's policies prohibit the use of password control and age verification apps, such as Advanced Registration, B2B Login Access Management, Login to View Price, and MagicPass Wholesale, for stores wishing to use the Shop app. However, Locksmith is now explicitly listed as an exception to this rule.
When you use Locksmith to lock certain products, your store will still remain eligible to display on Shop, and your locked products will not be included in your Shop Store. This ensures that merchants can maintain the control Locksmith provides while remaining eligible for the Shop app.
Locksmith can only manage visibility in the Shop app at the product level. Products locked by product and collection locks will automatically be removed from the Shop app. However, variants locked by variant locks will still be purchasable in the Shop app. It is therefore your responsibility to manage desired visibility for your variants in the Shop app.
For more details on Shop app eligibility requirements, including prohibited product types or other restrictions, please refer to Shopify's . Variant Locks and the Shop App
Locksmith’s variant-level locks don’t automatically remove locked variants from the Shop app, as the app manages visibility at the product level. While Locksmith adds a metafield to exclude locked products or collections from the Shop app, Shopify doesn’t support sales channel visibility controls for individual variants.
If a product includes locked variants, the Shop app will flag it with a warning (“This product is hidden by a third-party app”) and prevent it from being listed.
Workaround for Variant Visibility on the Shop App To keep unlocked variants available while hiding locked ones, you can create duplicate products:
One product with only unlocked variants, published to the Shop app.
Another product with locked variants, excluded from the Shop app.
This solution offers greater control but may increase inventory management complexity. For guidance on using duplicate products, refer to our tutorial on . You can also explore .
The following apps have known compatibility issues with Locksmith - although they may work in some cases, with the correct settings.
Any other access control apps that work in a similar way to Locksmith will almost certainly not work well alongside Locksmith, as they tend to inject code into the same areas of your theme.
- but only when using and features.
Any app that controls price at the variant level - but only when using and features.
Predictive searches - Locksmith generally cannot remove products from searches that dynamically show search results as you type. This includes built-in theme searches, and most apps that add predictive searches to your theme. That being said, it is possible to manage the appearance of specific products in store searches using product metafields: .
- Apps are pretty heavily limited in their ability to make changes to the checkout area, for security reasons. This means that Locksmith cannot restrict access to payment methods, shipping methods, shipping addresses, or anything else that is shown during the checkout process. If you wish to use Locksmith to restrict customers ability to check out,
you now have two options:
Create a theme hiding profile to lock specific parts of your Shopify themes according to your Locksmith lock conditions
By default, when you create a lock on a resource in your Shopify store, Locksmith prevents access to the direct URL for that resource only. For most locks, you can also toggle hiding for:
Navigation menu links. More information here.
Search results. More information here.
For products: product and collection grids/lists. More information here.
If you are wanting to hiding anything beyond the above, or just want more granular control over what is hidden, you can use our "theme hiding profile" feature.
The lock setting to "Enable manual locking" (which disables full page protection for locks) is useful for most applications of Locksmith’s theme hiding rules. You can find this option under your lock's Advanced Settings.
Because each theme is different, hiding profiles are added per theme. So, this feature is accessed via the Themes tab. Once there, press the "Edit theme hiding profile" button.
A hiding definition hides a section, block, or snippet in your theme. One of the most common use-cases for this is to hide prices and/or add-to-cart buttons. To add hiding definitions for this use-case, use these steps:
Press the "Add new definition" button
Leave the "Selection method" at the default (Add by name)
In the "Name..." box, type in "price". Locksmith will show you all of sections, blocks, or snippets that have price in the name:
Add each of the desired definitions. You'll need to repeat the search for each one.
Repeat the above 4 steps for every type that you want to hide. E.g. "quantity", "buy", etc. If you are hiding price and buy buttons, you will likely end up with something like this:
"Liquid variable" is how you specify which Liquid object in the theme Locksmith should base the hiding on. Most use-cases for this feature are geared towards products and most of the time, theme developers simply use product. However, there are some exceptions. A "card product" file might assign to a variable called card_product, or a "featured product" file might use featured_product.
If you are not locking a product, you'll want to use the applicable variable (collection, cart, blog, shop, etc).
Ultimately, what you put here depends on what is used in the theme, and if you want to ensure that this is right, it will be necessary to open up your theme code editor to check what is used there.
If the "Replace" checkbox is toggled on, instead of just hiding the content, Locksmith will replace it with the access denied message or access prompt. These messages can be customized in your locks. .
For conditions requiring a customer login, the following is used as the default replacement to render a "Login to purchase" button that links to the login page. If you wish to customize the appearance of the button, you can copy/paste this code to your "Guest message content" and edit it as needed. It differs slightly depending on if you're using legacy customer accounts or standard.
Standard customer accounts:
Legacy customer accounts:
If you are using a passcode key and need to render a passcode prompt button, use the following code (the button classes may need to be edited):
Once you've added all of your hiding definitions, save your hiding profile. Locksmith will perform an installation to the theme. Once the installation finishes, make sure to verify that everything is working as expected on the frontend of your store! Make sure you have the setting checked to "Enable manual locking" before testing:
Hiding profiles are intended to work alongside - or in many cases as a replacement for manually adding code for . Hiding profiles function in almost the exact same way on the backend. Some differences are:
Hiding profiles are easier to setup.
Hiding profiles don't need manual removal from your theme, they remove themselves when Locksmith is disabled/uninstalled.
Hiding profiles rely on the modularity of Online Store 2.0 themes, so adding code manually will still be necessary for legacy or highly customized themes.
If the hiding target is not contained within a section, block, or snippet, manual locking will still be necessary.
Note: While this method does hide elements like prices visually, it may still be possible for someone viewing the source (or interacting with the browser console) to see the price. This is because of the presence of things like Google Analytics and other tools, which reproduce the price in the source - but not visually on the page - for their own usage. These are out of control of the Locksmith app.
How to restrict access to the content in your Shopify Online Store based on the location of the IP visitor's IP address
Locksmith can help you restrict access by automatically detecting the location of the IP address of a visitor. The location condition supports many type of locations including:
Regions (eg: North America, Asia, Antarctica)
Countries (eg: Australia, Germany, Nauru)
Provinces/States (eg: Texas, Nova Scotia, Sikkim)
Cities (eg: Montreal, Chicago, Tokyo)
Towns (eg: Český Krumlov, Santa Maddalena)
Important: Locksmith uses the word "location" in the generic sense. This "location key" feature from Locksmith does NOT correspond to the. Consider using , if you need to restrict purchasing based on inventory location.
Once you've created your lock, choose the Location key:
Next, in the key configuration box, search for the location:
Click the name of the area to add it to the key. Feel free to add additional locations:
Save the key, and you're all set. Those locations will be given access to your locked content, but everyone else around the world won't.
To make sure some locations don't see your locked content, you'll use the same method.
Add your location(s) to the key like normal, but this time click the "invert" box in the lower left of the key box:
The result here is that customers around the world can get access to your locked content, all except for those in that location.
It is important to know that content protected under these key types will not be indexed properly, when used normally. This will strongly effect your SEO for any pages that are covered by these locks. This is because of Google's rules against cloaking. That is to say - we are not allowed to show different content to a search engine vs a regular visitor, as per Google regulations.
If you are using Location or IP address keys, and you still want your content to be indexed, you still have options!
If you have specific products that are not available in certain countries: You'll need to use manual locking to hide only the add-to-cart button. .
If you have different versions for different countries: You can create separate versions of your products using variants, and setting up Locksmith to hide the variants depending on who is visiting. .
Locksmith can only protect the frontend of your Online Store, and cannot extend its protections to Checkout. So, this does not prevent customers who have IP addresses located in an allowed location from choosing a specific shipping address that is in a blocked location at checkout. Locksmith is not able to control shipping destinations during checkout. For this, .
When testing, the browser may cache your access and continue showing you the same version of that page. So, to test the location key you'll want to:
1. Connect to a VPN for a specific location.
2. Open up a new private browsing session (sometimes called 'incognito mode').
3. Visit the locked collection/page/product etc. using the private browsing session.
4. Close all of your private browsing windows when you're done testing a single location.
5. Repeat the steps 1-4 for each new location.
You'll want to make sure you use a brand new private browsing session each time you test a location, as Locksmith uses the same mechanism as the browser and Shopify to remember previously stored access.
How to use the Locksmith app's redirecting features to make sure your customers arrive on the intended page
Out of the box, when a Locksmith lock is activated on a specific page, Locksmith will block acess to the main content of the page (i.e. everything in between the header and footer). The main content will then be replaced by Locksmith's access denied content, which might be a sign-in page, a passcode prompt, or simply a message letting the customer know that they don't have access (depending on what keys and settings you are using).
Then, of course, once a customer gains access, they will be shown the content of the page normally.
While that is the default behavior, you also have the ability to send customers to a different page before or after they gain access to the content. So in this way, there are two types of redirecting - redirecting customers right away once they arrive on the locked page, or redirecting customer once they gain access.
Customizing the login form shown on a page locked by Locksmith in your Shopify Online Shop
If you are using Shopify's , the login form comes directly from Shopify (as opposed to coming from the theme) so editing the login form is not possible. However, using this guide, you can still edit Locksmith's landing page (which links to the login form).
Whenever you use Locksmith to require your visitors to log in with their customer account, Locksmith will automatically pull in your theme's customer login form, with a message of your choosing added just above it.
You can customize the message in two places:
Locksmith access denied content is presented to customers who are signed in, but don’t meet the access requirements of the lock (e.g. the customer doesn’t have the specific customer tag that is required for access). Or when the lock has no keys.
is tagged with…
Locksmith has a feature to create "Liquid" locks, which allows you to lock pages in your store that are otherwise not searchable using the basic "Add lock" resource search in Locksmith.
This is an advanced guide that requires knowledge of . If you're a developer type, read on! Otherwise, please note that Locksmith support is not able to write advanced custom Liquid locks for you. While we are happy to answer any questions you have along the way, if you need help writing these, you'll need to hire a paid Shopify expert. . Alternatively, you can check .
Moving on - to begin, click in the "Add a new lock" search field and select "Start a Liquid lock", or type "Liquid" in the search field:
Then click "Start a new lock":
By default, Locksmith's apply to all matching option/value combinations. For example, you'll typically see something like this:
Once a variant lock is created, you can limit which products it applies to by using the key condition labelled "If the product is tagged with":
You'll use any existing product tags to denote which products you want the variant lock to apply to, or create new product tags if needed.
If you want the lock to apply to variants on one product tag only, and leave all other products untouched, for example, you'll use an inverted key condition like so:
Then, as a separate key, add in your conditions for access to the product. So if you want to allow access to the variant with a sign in, that will look like this:
<div class="locksmith-email-container container page-width"><p>Subscribe to our mailing list to continue! </p>
{{ locksmith_email_form }}
<p> Content to be displayed after the form </p>{% if customer %}
{% sections 'header-group' %}
{% endif %}{% if customer.tags contains "example-tag" %}
{% sections 'header-group' %}
{% endif %}{% capture var %}{% render 'locksmith-variables', variable: 'access_granted', scope: 'subject', subject: product %}{% endcapture %}{% if var == 'true' %}{% assign locksmith_access_granted = true %}{% else %}{% assign locksmith_access_granted = false %}{% endif %}{% if locksmith_access_granted %}
{% sections 'header-group' %}
{% endif %} Subscribe to our mailing list to continue!
{{ locksmith_email_form }}
Or, enter the passcode:
{{ locksmith_passcode_form }}You can get notified by e-mail when the form is filled out!
Plenty of other features
Locksmith's manual locking feature, and many times full-page locks, can not generally be used to hide content being displayed by other third-party apps, including prices, buttons, widgets etc.
Gempages - while it is possible to use the apps together in some cases, there are still many compatibility issues between the two apps.
Weglot - Locksmith's location detection key condition is not compatible with Weglot, but you should otherwise be fine using both apps at the same time if not using location detection.
Use our checkout validation feature, which allows you to set up a single rule: products with a specific tag can only be purchased by customers who have a specific customer tag. This can help block unauthorized purchases—without modifying the checkout UI itself. Learn how to set that up here.
Protecting against bot/resellers - Locksmith can’t fully prevent purchases made by bots or resellers—especially when they’re using direct-to-checkout links, which bypass the Online Store entirely. Since Locksmith works within the Online Store channel, it can’t intervene at the checkout layer directly. However, we do now offer a checkout validation feature, which can help you block unwanted purchases after a customer reaches checkout. This is a powerful way to add another layer of control over who gets to buy what. Learn how to set it up here: Setting up checkout validation with Locksmith There are also other strategies you can use alongside Locksmith to reduce the risk of bot purchases. While these aren't built into Locksmith itself, we've outlined a helpful approach here: Protecting against bots (without using Locksmith directly)
Locksmith cannot block RSS feeds from locked blogs.
Locksmith can only hide products published to the Online Store sales channel, and absolutely cannot help with protecting, hiding, or restricting purchases on other channels.
Locksmith generally cannot hide elements or filter locked content in areas controlled by other third-party apps, especially if those apps render their content outside the theme files where Locksmith injects its code.
Locksmith is not compatible with headless or custom storefronts (e.g. sites built with Next.js, Hydrogen, custom frontend frameworks). Locksmith relies on Shopify's Liquid rendering engine and only works within the Online Store sales channel. In fully custom storefronts, there is no theme for Locksmith to work with, and no way for it to insert or enforce access logic.


It cannot. To our knowledge, this feature cannot be disabled, and its behavior cannot be adjusted – and, it's an integral part of the operation of many themes. If you have questions about this, contact Shopify support.
If preventing access to these endpoints is mission critical, you could consider building a web proxy that allows all traffic except those endpoints. This would be a custom project, and it's not something we can help with, or support.


Using the sidebar navigation, go to Settings > Messages > Guest message content. This is where you can edit the default message that is applied to all locks.
On the lock page, find Messages > Guest message content. This is where you can edit the lock-specific message, which overrides the default.
You can customize this message using as much HTML, CSS, and Liquid as you need!
Also, keep in mind that the "Guest message content" only applies to pages locked by keys that actually require a login. If your lock does not require a login, you may need to edit one of the other fields under "Lock Messages".
There are many ways to customize this page which the rest of this guide will cover!
Since Locksmith is just grabbing the login template directly from your theme, you'll need to head into your theme to edit it. Shopify has a guide dedicated to doing this here (please note: this is for Legacy customer accounts only ). Using that guide you can do things like remove the "Register" link from your login form or edit the styling in other ways. If you have a theme from a third-party developer, feel free to contact them for more personalized guidance on your specific theme's login template.
Important: Anytime you edit the login template in your theme, you'll want to make sure that Locksmith is using the updated version of it. To do this, go to the Help area within the Locksmith app and press the "Update Locksmith" button there.
Easy! Just add the following into the "Guest message content" area.
Once again, this is just grabbing the registration page from your theme. If you've edited your registration template and you aren't seeing it updated here, head to the "Help" area within the Locksmith app and press the "Update Locksmith" button to see the latest version on your lock page.
By default, the "Guest message content" is displayed in its entirety as the first thing on the page (after the header) followed by the login form. You have the ability to change this: display the message after the login form, or perhaps add content before and after the login form. To do this, use the following in your "Guest message content" area:
This will determine the placement of your login form and you're then free to add any content before/after it.
If you don't want your customers to see the login form on this page for whatever reason, you can remove it by just adding this to your "Guest message content":
You can then add the rest of your message alongside that code.
If the message is nowhere to be seen, it's probably just hidden under your header. Some themes don't add padding directly to the header and rely on the template to have its own padding. Since Locksmith replaces the template's code with its own content, it may be necessary to add the padding to it. This is usually as easy as adding this to the beginning of your "Guest message content":
Of course, you can adjust the number as needed.
As always, feel free to contact us at [email protected] if you need help with this.
To get the text on this page centered, change the beginning <p> tag to the following:
If you've removed the beginning <p> tag, just add a new one :) And, of course, make sure to close it with </p> at the end of your text.
If you have multiple key condition types on the same lock, it might be useful to include other form types within the prompt, so that they display on the same page. We have a guide on doing this here:
There are a few reasons you might want this. For example, if your login form is preceded by a heading or some breadcrumbs, you may want to insert the Locksmith-specific message beneath the heading, but above the email and password fields.
This gets a bit technical, so if you need a hand, just hit that message button in the lower-right corner! :)
To customize where your guest content message appears, open up the code editor for your Shopify theme ( here's how!), and open the file templates/customers/login.liquid. You might see something like this:
Add the code <!-- locksmith-message --> wherever you'd like your guest message to appear, like so:
Next, head to the "Settings" tab of your Locksmith account, and scroll down to the "Guest message content" field. Use a value like the example below to (a) customize your guest message, and (b) have Locksmith display your login template with your custom message injected into it:
That's it! :D You've just customized the login form's display using pure Liquid - congratulations, and feel free to experiment until the result is just right for your shop. :)
Let us know by emailing us at: [email protected]
<p><a href="/customer_authentication/login?locale={{ request.locale.iso_code }}&return_to={{ request.path | url_encode }}" class="btn button button--full-width button--secondary">Log in to purchase</a></p><p><a href="/account/login?return_url={{ request.path }}" class="btn button button button--full-width button--secondary">Log in to purchase</a></p><p><button class="locksmith-manual-trigger btn button">Enter passcode to purchase</button></p><p><strong>This content is protected</strong> - please log in with your customer account to continue.</p>{{ locksmith_customer_register_form }}{{ locksmith_customer_login_form }}{% comment %}
{{ locksmith_customer_login_form }}
{% endcomment %}<p style="padding-top: 150px"></p><p style="text-align: center"><h1>Login</h1><br><br>{% form 'customer_login' %}<br> {{ form.errors | default_errors }}
<label for="customer_email">Email Address</label>
<input type="email" name="customer[email]">
<label for="customer_password">Password</label>
<input type="password" name="customer[password]">
<input type="submit" value="Sign In">
{% endform %}<h1>Login</h1>
<!-- locksmith-message -->
{% form 'customer_login' %}
{{ form.errors | default_errors }}
<label for="customer_email">Email Address</label>
<input type="email" name="customer[email]">
<label for="customer_password">Password</label>
<input type="password" name="customer[password]">
<input type="submit" value="Sign In">
{% endform %}{% capture locksmith_message %}<br> <p>Please login below! :)</p><br>{% endcapture %}<br><br>{{ locksmith_customer_login_form | replace: '<!-- locksmith-message -->', locksmith_message }}To redirect customers this way, you'll simply use a regular Javascript redirect script, and enter it into the "Messages" area in Locksmith. More information on the messages area here:
This is an example of a simple redirect script:
The only thing you'll need to change is the exact URL. Use the full URL whenever possible (as opposed to partial URLs).
In Locksmith, this will look something like the following:
Tip! Redirect scripts can be used on any type of key condition, including customer account keys, passcodes, secret links, etc.
Also keep in mind that in the case of customer account keys, you have the option to define different messages(or behavior, in this case) based on whether or not the customer is signed in when they arrive on the page. So, you could redirect customers that were signed in (but still didn't have access), for example. This would look like the following:
Important notes: By default, Locksmith will present the theme's login form in place of locked resources for key conditions that require a customer to sign into a store account. Once signed in, Locksmith will also return customers to the resource they were trying to access.
This redirect is only necessary for certain issues or requirements from the store's login form. When using this redirect, Locksmith won't be able to display the lock's access message content along with the login form to which customers are redirected.
Sometimes, a theme's login form will include features that Locksmith is unable to present when replacing locked resources with Locksmith's access denied content. This redirect is a good way to ensure customers see the correct login form.
The following code provides an example of a JavaScript redirect that automatically redirects customers to the default login form in a Shopify store. This script includes a variable that captures the customer's current URL and sets it as the return URL after signing in. This script can be pasted into the "Guest messages content" area in Locksmith.
Locksmith also has the ability to redirect customers once they've arrived to a page that they have access to. This could be useful if you wanted to show different pages to different customers once they've gained access. Passcodes is an area that this is frequently used for.
So - for example: three customer groups that each need to see a different collection. If I have a landing page that I put a Locksmith lock on, we can use the redirect feature to send each customer to a different collection, depending on which passcode they've entered.
The redirect-after-access feature is found in the key settings, accessed with the edit link to the right of each key:
The Redirect URL field is in the Key options section, at the bottom of the keys settings card:
Since this is a key setting, you can set a different redirect for each key. Notice in this example that each key is redirecting to a different collection URL:
If you enter the same URL for the redirect as any of the lock's contents, then when a customer uses that key, the result will be an infinite loop. To prevent this from happening, you'll want to avoid adding redirect links to pages that are covered by the same lock.
To redirect customers in this way, you can use some Liquid code to check if a customer is on a product page and then include a regular JavaScript redirect script within that Liquid. This code can be entered into the "Guest message content" field or "Passcode prompt" area on the collection lock's settings page. More information on the messages area here:
The following code provides an example of some Liquid and a JavaScript redirect that automatically redirects customers to a collection page from a product page in a Shopify store. The Liquid code checks for the default product template to prevent the script from running on the collection page. This script includes the URL that can be modified to redirect customers to the collection page for the locked collection.
This script can be pasted into the "Guest message content" field or "Passcode prompt" field on the respective collection lock's settings page.
Notes:
This should only be added to the "Guest message content" field or "Passcode prompt" field on a collection lock's settings page, and not to message fields on the app's settings page. Otherwise, the script will be run for all collection locks.
The JavaScript redirect's URL will need to be set to match the collection URL for the collection that the lock has been set up to protect.
The default product template has been used in this example. If your products use a custom template, you will need to adjust the Liquid to check for that custom template, or for custom and default product templates.
has one of many email addresses
has an email address from an input list…
the customer's email contains…
has placed at least x orders
has purchased…
(custom Liquid) in some cases
The "Access denied content" message field can be modified in the same way as Locksmith’s other access messages, including using code to modify the appearance and functionality of the message.
HTML
CSS (via the <style> tag)
Javascript (via the <script> tag)
Liquid (Shopify's template language for themes)
Simply add the following Liquid to the "Access denied content" message field:
This will render the theme’s default registration form.
Liquid code can be used to render a snippet or section from your theme that contains a custom form or message.
render - Renders a snippet
section - Renders a section.
A JavaScript redirect can can be added to the “"Access denied content" message field if you would like to automatically send customers who are denied access to your lock, to some other part of your store.
This might be useful for a few different reasons:
To take customers to a specific product they can purchase for access. For example, to buy a product, or membership, or subscription for access.
To take customers to an information page.
To take customers to a custom registration form
To direct customers to an alternative resource
Simply add the following code to the "Access denied content" message field and modify the URL to your desired location.
Let us know by emailing us at: [email protected]
This will bring up the following form:
The "Liquid condition" is the condition that is evaluated to decide if the lock will be engaged on the current page. The Liquid condition simply needs to evaluate to true or false.
All liquid objects in Shopify are fair game here, more info on Liquid objects here.
Useful examples
Any condition that evaluates to true will result in a locked page. So, imagine if you created a lock with this condition:
That would result in every single page in your store becoming locked. This isn't advisable, it's just a proof of concept :)
One of the most useful variables that you can use is the canonical_url variable. This variable contains the full url of the current page, so it is a good way to lock pages that aren't usually searchable. For example you have an app that lives at my-store.myshopify.com/apps/bulk-order-form-app, you could lock it with the following condition:
Another useful variable is the template variable. For example, an easy way to lock only the home page would be:
If your home page template is called something else, you have the flexibility to lock it by adjusting the condition above.
The "Liquid prelude" will be evaluated before the liquid condition, and is where you'll add any code that helps you set up the Liquid condition, and can span multiple lines. For example, you can assign to a specific custom variable, which can then be used the the Liquid condition later.
For example, if you have a large number of pages that you want to lock at once, normally you'd need to do that by creating a separate lock on each page. You could use the Liquid lock feature to lock them all at once. Perhaps something like the following:
In your Liquid prelude:
In your Liquid condition:
This would result in all "Pages" in your store that contain "member" or "secret" in the title becoming locked.
You can also create Liquid keys! While the function of Liquid keys is fundamentally different than what is covered on this page, the concepts while setting them up are very similar:

The result of this is that all matching variants will automatically be unlocked if the product is NOT tagged with "Snowboard". In other words, the variant lock will only apply to products tagged with "Snowboard".


Passcode keys are a simple way to grant access to content without needing to require sign in or registration. They work completely independent of the Shopify customer account system.
After you use the Locksmith search bar to create a lock on the product or collection that you want to lock, choose one of the passcode conditions from the conditions list under "Keys":
Single passcode: Use when only one passcode is needed.
Many passcodes: Allows you to enter many passcodes at one. Enter your passcodes one per line. This is a quick way to set up multiple passcodes at once. However, the input-list is more performant with large quantities(more than a thousand or so), particularly if using single-use passcodes, so in these cases, it is recommended that you default to an input list.
Input list: Allows you to add your passcodes to a google sheet or other file that is stored online outside of Locksmith. Capacity for many hundreds of thousands of passcodes. More information on input lists here. When setting up an input list, you can specify a usage limit that will apply to all passcodes inside the input list.
Once the key is created, and the lock is saved, your customers will now be prompted to enter the passcode when they visit the locked page:
When you give the correct passcode at the passcode prompt form, Locksmith will remember you by saving a session cookie in your browser. That means that when you come back to view the shop, you'll likely still have access, making it seem like the lock isn't working.
So, when testing passcode keys, be sure to use a new each time. That shows you what a new visitor will see.
Passcode keys allow you to require a password for access without requiring the customer to log into an account. They are completely separate from the customer account system.
Passcode keys will increase loading time just a bit, on the first page load.
The passcode key is what we call a "remote key" which saves info in your cart attributes. That info gets passed through as a note on your orders. You can remove that following .
Passcode uses left
Found in the single passcode key. Use this option only if you want the passcode to have a usage limit. The number will decrease by one each time the passcode is entered. When the number hits zero, the passcode will no longer work.
Remember for signed in customers
This option will remember a customer who was signed in when they entered the passcode, and never ask them again when they're signed in.
Customer auto tag
If the customer is logged into their account when they give the passcode, they'll get tagged with the tag you enter here.
Allow only one use per passcode
Found in the "many passcodes" key only. When the customer gives a passcode from the list, it gets removed from the list and can't be used again (unless you re-add it). Note: If you want to add a usage limit to a passcode-from-input-list key condition, that is done on the input list itself. .
Passcode keys are compatible with manual locking! This means that you can hide only selected parts of the page, instead of the whole page. For example, .
If you have a manual passcode lock set up, the customer will not get prompted for a passcode automatically. So in this case it's necessary to add a button to trigger the passcode prompt. Use the following code to add a button to your page:
The classes may need editing to match your theme.
When the customer clicks that button, they'll be presented with the passcode prompt as normal. If they enter the correct passcode and submit, the page will reload but this time showing your locked content.
Passcode keys are not compatible with variant locks by default. Please see:
Explore the types of key conditions that Locksmith makes available to you!
Once you create a lock, you'll need to create keys – simple statements that describe the conditions for access. For example, one might have a key that says "Permit if the customer is signed in". In this example, the key condition is "if the customer is signed in".
Keys are added, unsurprisingly, inside of the "Keys" section on the lock page:
Press that "Add the first key" button, and you'll be presented with the full list of key conditions that are available to you. There are quite a few options here!
These are all the key conditions that Locksmith supports:
Permit if the customer...
is signed in This condition requires all customers to log in with a customer account. Once they're logged in, they'll be granted access to the locked resource. (When inverted: unless the customer is signed in)
is tagged with… This condition first requires all visitors to log in with a customer account, by presenting your store's usual login form. (If that login form includes a link to customer registration, it'll be included here, too.) Once the customer has logged into their account, they'll be granted access if their customer account has the tag you've chosen in Locksmith. (When inverted: unless the customer is tagged with..., or is not signed in)
gives the passcode… This condition prompts the visitor to enter a passcode, which must match the passcode you configure. If they don't enter a matching passcode, they'll be given the same prompt again.
gives one of many passcodes… This condition allows you to configure a group of passcodes, and will grant access if the visitor is able to provide one of the passcodes on that list.
gives a passcode from an input list… This condition works the same way as the other passcode conditions, except that it uses an input list as the passcode source, making this key condition suitable for bulk passcodes. ()
arrives via a secret link… This condition generates a "secret" URL for the locked resource, containing a secret code. If the visitor arrives via that link, they'll be granted access. If they use any other link, they will be denied access.
arrives using a secret link code from an input list… This condition works the same way as the other secret link key condition, except that it uses an input list as the passcode source, making this key condition suitable for bulk passcodes. ()
is visiting from a certain location (city, country, etc) This condition uses the visitor's IP address to estimate their location, matching it with a location that you define ahead of time. (Under the hood, this condition uses to estimate visitor locations.)
subscribes to your Mailchimp list This condition connects to your Mailchimp account, and grants access once a visitor has provided their email address, adding that address to your Mailchimp list.
subscribes to your Klaviyo list This condition connects to your Klaviyo account, and grants access once a visitor has provided their email address, adding that address to your Klaviyo list. This option can be configured to only allow access if the submitted email address is already on that Klaviyo list.
has one of many email addresses This condition requires the visitor to be logged in with their customer account, prompting them to log in if they aren't already. If their email address is on the list that you specify, they'll be granted access.
has an email address from an input list… This condition requires the visitor to be logged in with their customer account, prompting them to log in if they aren't already. If their email address is on the input-list that’s specified on the key condition and has been previously synced with Locksmith, they'll be granted access.
the customer's email contains… This condition requires the visitor to be logged in with their customer account, prompting them to log in if they aren't already. If their email address matches some text that you specify (say, "@mycompany.com"), they'll be granted access.
has purchased… This condition requires the visitor to be logged in with their customer account, prompting them to log in if they aren't already. If their last 50 orders contain a certain product (identified by SKU, title, or by product tag), they'll be granted access.
has placed at least x orders This condition requires the visitor to be logged in with their customer account, prompting them to log in if they aren't already. If their lifetime order count is at least the number that you specify, they'll be granted access.
has a certain product in their cart This condition scans the visitor's current cart, and grants access if a certain product is found.
has a certain variant in their cart This condition scans the visitor's current cart, and grants access if a certain product variant is found.
has at least $x in their cart This condition checks the subtotal of the visitor's current cart, and grants access if the total is at least a certain amount.
has a certain IP address This condition checks the visitor's IP address. If it matches the address or range that you specify, they'll be granted access.
is visiting before a certain date and time This condition checks the current time, and grants access if it's before the time that you specify.
is visiting after a certain date and time This condition checks the current time, and grants access if it's after the time that you specify.
is visiting a certain domain This condition checks the domain of your store, and grants access if the visitors domains matches up . This is useful if you have multiple domains on your store that might be scoped to different regions of the world (or any other reason you have for creating multiple domains.
the customer confirms the prompt This is a straightforward key condition that allows access solely based on if the customer confirms the prompt that you set.
(always permit) This is a special condition! It's useful when "forcing open" a lock, under some certain circumstances. To learn more about this, see:
(custom Liquid) This condition allows you to write custom Liquid code, granting access if your Liquid condition evaluates to "true". This is the most powerful key condition, because it allows you to grant access under any circumstances that you can determine using Liquid.
If you need to reuse a key setup from one lock in another, Locksmith includes a handy copy and paste feature for keys. This makes it easy to duplicate your key structure without recreating it from scratch.
Here’s how it works:
Find the key you want to copy
On any existing lock, locate the key you’d like to reuse.
Click the copy icon to the right of the key name:
Navigate to your new lock Open the lock where you’d like to reuse that key.
Paste the key
Click the paste icon beside “Add key.”
Locksmith will automatically add the copied key to your new lock:
You can repeat this as many times as needed to reuse key configurations across multiple locks.
If your keys include product- or time-specific conditions, be sure to update those details after pasting.
More information on how to combine key conditions together is covered in our "Overview" guide here:
Remember that all key conditions can be inverted!
Having issues with locks overlapping? Perhaps the "Force open other locks" setting is for you:
Deep breaths! We can figure this out. :)
Check status.uselocksmith.com for platform updates.
Try accessing Locksmith's app domains directly:
Try opening uselocksmith.com directly.
Try opening . (You should be redirected to ; this is normal.)
If loading fails, try again from a private/incognito browser session.
If that doesn't work, try again from another device.
If that doesn't work, try again from another network. (Switch WiFi networks, or switch to cellular.)
If these steps don't reveal the issue and a path for resolving it, write to with the following details:
How far you got in the list above
The contents of and
A screenshot from
A screenshot (including the browser's URL bar) of the app failing to load
How to use the Locksmith app to add checkout restrictions on your Shopify Online Store
Locksmith allows you to restrict checkout by using a lock on the cart page in your store. This is a good choice for merchants who want to allow customers to view all content in their store and browse fully, only adding in restrictions on the last page before checkout. Or, to simply add extra restrictions for checking out, on top of other locks in the store.
Testing: We strongly recommend testing your secret links in the same manner they will be sent to customers before launching a marketing campaign or exclusive sale. This ensures that customers receive a functioning link. See our guide that covers testing troubleshooting tips below:
Click the "Help" button, and then click the "Update Locksmith" button:
When changing around themes, Locksmith needs to be re-installed each time you do this. To initiate a new theme install on your currently published theme, press the "Update Locksmith" button on the "Help" page:
This will trigger a full reinstall of Locksmith's code into your theme - this is important, because Locksmith is able to do what it does via Liquid code in your shop's theme.
Locksmith supports permitting visitors based on their IP address.
Start by opening the settings for a lock you've created. Then, follow the steps shown to add a key that permits "if the customer has a certain IP address", as shown below:
This key can be configured with a series of IP addresses, one given per line. It can also be configured with CIDR definitions, allowing you to specify entire subnet ranges.
No - It's not possible to protect shipping methods, billing methods, or coupon codes.
Shopify keeps a pretty tight leash on the checkout process itself, and third-party apps aren't permitted to get involved here at this time.
If you absolutely must set up different shipping or billing terms, your best bet may be to set up a completely new Shopify store.
If you want to dig into this further, get in touch with the Shopify support crew directly, at .
<script>
window.location = 'https://www.example.org/my-example-page-url';
</script><script>
var current_url = encodeURIComponent(window.location.pathname);
window.location.replace("/account/login?return_url=" + current_url);
</script>{% if template == "product" %}
<script>
window.location = 'https://example-store.myshopify.com/collections/example-collection';
</script>
{% endif %}{{ locksmith_customer_register_form }}{% render 'filename' %}{% section 'name' %}<script>
window.location.replace("http://www.example.com");
</script>{% if true %}{% if canonical_url contains "apps/bulk-order-form-app" %}{% if template == "index" %}{% assign page_is_locked = false %}
{% if scope == "page" %}
{% if page.handle contains "member" or page.handle contains "secret" %}
{% assign page_is_locked = true %}
{% endif %}
{% endif %}{% if page_is_locked %}{% for line_item in line_items %}
{% if line_item.title == "Some Product" %}
<p>Thank you for your purchase! You may now access <a href="https://awesomeco.myshopify.com/pages/some-locked-page">this locked page</a>.</p>
{% endif %}
{% endfor %}{% for line_item in order.line_items %}
{% if line_item.title == "Some Product" %}
<p>Thank you for your purchase! You may now access <a href="https://awesomeco.myshopify.com/pages/some-locked-page">this locked page</a>.</p>
{% endif %}
{% endfor %}This is important! If you are using Locksmith for price hiding or other types of manual locking, or any other type of Locksmith code manually added to your theme by a developer or our team, you'll need to re-instate the code changes in your new theme.
If this is the case, contact us via email at [email protected], and we'll be happy to add the manual code to your new theme for you.


<a href="" class="btn button locksmith-manual-trigger">Enter passcode to access</a><br>Locking the checkout area itself is not possible using Locksmith’s standard locking methods. This means that checkout links leading directly to checkout—such as ‘Buy Now’ buttons, upsell links, permalinks, or abandoned cart links—cannot be restricted using this approach. However, you can enforce a single checkout restriction using Locksmith’s checkout validation feature. Learn more here: Setting up checkout validation with Locksmith
Moving on, this is the checkout page without any locks in effect:
You can lock the entire cart page if preferred. This will work just like any other Locksmith lock. However, it is also possible to take it further and lock only the "Check out" button. Once Locksmith is set up, the result will be something like one of these screenshots (depending on your settings):
------
Use the following steps
1. Open up the Locksmith app and search and for "cart" and click on it, or select it after clicking into the search bar when it comes up in the search dropdown:
2. On the next page, under "Keys", you'll add in your conditions. Here are some of the more common conditions used...
To impose a minimum purchase amount:
To make sure only customers that are signed in and have approved accounts can proceed:
Customer must enter a passcode to checkout:
3. If you just want to lock the entire cart page, click "Save" to finish. If you want to lock only the "Checkout" button, make sure "enable manual locking" is checked under Advanced Settings before saving:
Done with part one!
If you need help with setting up more complicated checkout conditions, Locksmith may be able to help. Just get in touch with us :)
New to manual locking? Check out our general introduction.
Some modifications to your shop's theme will need to be done to protect just the checkout button.
The rest of this guide gets a bit technical! We can take care of adding the code for you for you, no problem, so if you're interested, get ahold of us.
In this portion, you'll update your shop's theme to protect just the checkout button(s) on your cart, allowing your visitors to manage their cart but not check out until they meet your criteria.
From your Shopify admin area, navigate to "Online Store" -> "Themes". Then, click the three-dots button in the upper-right corner for your theme, and select the "Edit HTML/CSS" option.
Open the "cart.liquid" file (under "Templates"). If you have a newer "sectioned" theme, you may actually need to edit the "cart-template.liquid" file (under "Sections")
Add the following to the very top of the file:{% capture var %}{% render 'locksmith-variables', variable: 'access_granted', scope: 'subject', subject: cart %}{% endcapture %}{% if var == 'true' %}{% assign locksmith_access_granted = true %}{% else %}{% assign locksmith_access_granted = false %}{% endif %}
Find the checkout submit button(s), and wrap this code with {% if locksmith_access_granted %} ... {% endif %} . You can also add an "else" section to show a message to anyone who's been prevented from checking out.Here's a pretty typical example:
Before:
After:
Save the template, and you're done! :)
Some merchants set up their cart restrictions so that they only apply to certain signed-in customers and the exclusive products they have access to. In this case, it might be possible for customers to sign out to bypass these conditions once restricted products have been added to the cart. If that applies to you, consider ensuring that all products are removed from the cart when a customer signs out.
You can achieve this by adding the following JavaScript to your layout/theme.liquid file, just before the closing tag:
This will clear the cart when the logout button is pressed, preventing that workaround.
If this script doesn't work in your theme, your theme may not include jQuery libraries. To include those libraries, the following script can be added to an empty line right before the cart clearing script mentioned above.
If you have abandoned cart emails enabled on your shop, either through the built-in Shopify feature or an app, those emails may allow the customer to circumvent checkout restrictions.
These emails can send the customer directly to the checkout process without touching the cart page. The customer will be able to check out with whatever amount was in the abandoned cart, whether or not it passes your restrictions.
Your checkout restrictions will not work 100% of the time if you're sending abandoned cart emails, so keep that in mind when you're setting this up. :)
In Locksmith, a "secret link" is a Shopify URL that contains a "secret code" on the end of it, like this:
https://example.com/products/example?ls=FoO-rNBaTquJgqh1tbXjEQ
When a locked resource has a secret link key, only visitors who arrive via that link will be able to view the resource. This makes secret links useful for secret sales, or for offering specific products that are only available via certain ad campaigns.
To configure a secret link, start by creating a lock (If you need more information on creating a lock, start with our guide here).
Then, in the lock settings, follow the prompts to create a secret link key:
This will generate a single secret link for you that can immediately copy and use. You can also enter a custom secret link code if preferred. The setup is very straightforward (shown in the screenshot above).
It is also possible to use secret links in conjunction with our input list feature. Input lists allow you to store a list of links in a google sheet or other outside file source. This is great for merchants that want to easily create a large list of unique secret links that can be used. Go here for information on setting up input lists. To use the input list version, select it instead of the regular secret link key condition type.
Input lists also allow you to create usage limits on your secret links (usage limits are not possible for the single secret link option). So, for example, you could create a large list of secret links that could each only be used one(the input list guide, link just above, gives more information on setting this up). Or, you could simply add in a single secret link with a large usage limit.
To use the input list version of the secret link key, select it from the key dropdown:
Secret links consist of two parts:
The secret link code (top box): This is the "secret" part of the link, which you can change to whatever you like.
The full secret link (bottom box): This is the link you send your customers, or whoever should see the locked content. It's the regular URL for your locked content, with the secret link code appended to it. Click the copy button to copy to your clipboard.
Want your link code to be something different? You can simply change that, and it will update the full link:
It's important to note that the secret link code must be an exact match in order to work. If the customer accidentally adds a character to the end of that link, they won't get access.
Having said that, there is some flexibility on how the URL is constructed. The secret link code can be presented in several, valid ways, illustrated here:
https://example.com/?ls=MYSUPERSECRETLINK
https://example.com/?another_parameter=ABC123&ls=MYSUPERSECRETLINK
https://example.com/?ls=MYSUPERSECRETLINK&another_parameter=ABC123&...
https://example.com/products/my-product?variant=32213744255111¤ty=USD&ls=MYSUPERSECRETLINK
Please note that the secret link must use URL-friendly characters in order to be evaluated correctly.
Acceptable characters are:
Alphanumeric: 0-9a-zA-Z
Special characters: $-_.+!*'()
Once a visitor arrives via a secret link, Locksmith will remember their access for a while. If you're testing, this can make it look like the key is no longer working. Try using a new private browsing session to test for that.
The secret link key condition also has a "Grant access for a limited time" option that can revoke a customer's access after a set amount of time passes from initial use. Details on using this option are here: Grant access for a limited time when using passcodes or secret links
If you've got several secret link keys, across different locks, any keys that re-use the same secret code will all be activated when one link is used. This way, you can unlock several pieces of content across your store, using only a single secret link.
If you're using a referral service (or any other service that generates a URL with a specific code at the end), you can use the referral URL's "query string" as the secret code for your key.
For example, if you're using a referral URL that looks like https://example.com/?rfsn=abc123, you may set your secret link code to "rfsn=abc123", and your Locksmith key will just work:
If your lock has been configured for resource hiding, the successful use of a secret link will reveal the hidden resource across your online store. If you'd like to make sure that your locked product (for example) can only ever be viewed on its product page, and never via store search or collection listings, add a second condition to your key which limits the key's usage to only the product page.
To do this, use the "and..." link next to your existing key, and select the "(custom Liquid)" option. Fill in the Liquid condition with request.page_type == "product", as shown below.
The result: your secret link key will continue to work normally, but the access afforded by the key will only work when the visitor is literally on a product page. This means that the key will not kick in when the visitor is (for example) looking at search results, which means that the product will remain hidden in those places.
If "ls=" hasn't been included at the beginning of the secret link code. A secret link code can still work without this, but if a customer is visiting your store for the first time, Shopify may be unsure of what the code at the end of the URL is doing and could redirect customers to the homepage before the lock is opened. This might make it appear as though the secret link isn't working. However, a second attempt usually succeeds. Including "ls=" at the beginning of the secret link code should prevent this issue.
If you're sending out a marketing email or similar communication, make sure to test the email first. Sometimes the wrong or incomplete secret link can be added, or the marketing email can unexpectedly modify or add additional information to the URL.
If additional information is being added to the URL, ensure that it is separated from the secret link code using an ampersand (&). This allows Locksmith to differentiate the secret link code from other information. See the of this guide for more information.
This key condition can be inverted, resulting in a condition that permits unless the visitor has a certain IP address. When used with a lock on your entire online store, this is a useful way to block certain visitors.
To accomplish this, invert the key condition, as shown below by clicking on the checkbox next to "invert". (To learn more about inverting conditions, see Inverting keys in Locksmith.)
Because of the way IP address detection works, a IP address key on your entire store will show everyone a spinner graphic for a moment, before your store's content is loaded. This will only happen once, if the visitor has an accepted IP address.
Important: When used, this key condition has the potential to negatively affect the SEO of any content that is locked in this way. More information on SEO and Locksmith here.


How to use the Locksmith app set up restricted prices levels on your Shopify Online Store
Many, many merchants use Locksmith for managing different price levels within the same store.
Frequently, this means wholesale and retail. We'll use those terms in the rest of this article, but feel free to substitute them for whatever applies to your situation - for example:
Members vs Non-members
EU customers Vs. Non-EU customers
...or any other situations that require price tiers.
Before setting up your product tiers, you'll need to decide how you want your customers to gain access to the separate tiers. The most common way to do this is to use approved customer registrations. More information on setting this up here:
So in this case, you would use customer tags to denote the customer tiers. So, for example, customers with the "wholesale" customer tag are considered wholesale customers, while customers without the "wholesale" tag are regular/retail customers.
Using Locksmith to sell products at two different prices levels means that your products need to be duplicated in some way. This can be achieved using either product duplicates or by using variant tiers.
Keep in mind that Locksmith itself does not create these alternate versions. No matter which one you choose, the work to duplicate the products will be done on your end.
Pros -
Allows you to have distinct sections in your store that are dedicated to different types of customers.
A straightforward approach
Cons -
Introduces .
Pros -
Uses the same products, collections, and navigation menus
Avoids !
Cons -
This is not a good option if your products already have many variants. Adding a price tier variant essentially doubles the number of product variants that each product has. The Shopify-wide maximum number of variants per product is 100.
Can be seen as more complicated since managing individual variants is less straightforward than managing products.
Variant locks are not compatible with .
Use your Shopify admin area to create duplicate versions of every single one of your products that will be sold at more than one price.
Once your product duplicates are created, create a collection of wholesale-only products - no mixing in other products from other parts of your store! Don't forget you can use.
Next, use Locksmith to on your wholesale collection. This lock will cover all of the products in that collection.
That's it for the basic setup! There are some optional steps below...
You may want to consider also adding a lock to your retail products, so that wholesale customers don't get confused after they sign in. We'll use a new lock with the opposite condition, to make sure that the customer can only view your retail products if they're not approved.
To add a corresponding lock to your retail products, following these steps:
Create a collection that covers all of your non-wholesale products.
on this new collection: search for it by name in the Locksmith app
On the next screen, use the "Keys" section to create that has the .
That's it! Your wholesalers will now be prevented from seeing retail products once they're logged in. (Note: this trick doesn't prevent the wholesaler from arriving at your shop as a guest, adding retail products to the cart, then logging in to their wholesale account!)
Now that you have a wholesale collection set up, you will want give your wholesale customers a way to find their content. You can do this by adding a "Wholesale" link to your navigation menu, that points directly to the Wholesale collection. This link will be visible to everyone, but once it's clicked, Locksmith will ask for access credentials.
Locksmith will automatically use the login template and style from your theme. The message is easily customizable:
If you prefer to leave your wholesale offerings open to the public, but still want to hide the prices, this is also possible!
This requires a few more steps, and we have a guide that covers that kind of thing here:
To create price tiers using product variants, you'll need to use your Shopify admin area to create an "Audience" option on each of your products that you want to add tiers to:
Next, create a variant lock in the Locksmith app:
Create a key. If you are using customer tags to grant access, that will look like this:
Additionally, create a corresponding lock for the retail variant. You should end up with two locks:
Managing inventory across multiple price tiers is a very common concern
Separate inventory for each tier
Some merchants love the ability to set inventory separately for wholesale and retail customers. If that is you, then you're already good to go, no matter which option you have chosen, since each product and variant has separate inventory.
Same inventory across tiers
If you have more retail purchases than wholesale, one option is to let Shopify track the retail products, and manually update your retail inventory when you receive a wholesale order.
If you absolutely need to sync inventory across your products or variants, you'll need to get another app involved. Namely, ! This app is made by the same folks here at Locksmith. It offers several automation "tasks" for syncing inventory levels:
How to use the Locksmith app to hide or "lock" specific page content on your Shopify Online Store
Locksmith's feature can be used to hide your product prices so that customers can still browse your shop, but can only see prices and purchase products if certain conditions are met.
Here is an example of a product page that has been setup properly with Locksmith to hide prices:
Then, when the customer meets the conditions, the product pages will appear normally:
Restricting access to only specific parts of a page in your Shopify Online Store
Out of the box, Locksmith automatically protects all content between the header and footer, for everything covered by your locks.
Sometimes this can be too aggressive - you might want to allow visitors to preview your products without being able to see pricing, for example. Or, you might want to protect just the checkout button in your cart.
Locksmith comes with an advanced manual mode that allows for this sort of thing. It disables Locksmith's full-page protection, stepping aside so that some custom code in your theme can take responsibility for hiding part of your content.
Two important notes:
If a particular piece of content has multiple locks in play (for example, if the customer is viewing a product that is a part of several locked collections), manual locks will only work if
<input type="submit" name="checkout" class="btn" value="{{ 'cart.general.checkout' | t }}">
{% if additional_checkout_buttons %}
<div>
{{ content_for_additional_checkout_buttons }}
</div>
{% endif %}{% if locksmith_access_granted %}
<input type="submit" name="checkout" class="btn" value="{{ 'cart.general.checkout' | t }}">
{% if additional_checkout_buttons %}
<div>
{{ content_for_additional_checkout_buttons }}
</div>
{% endif %}
{% else %}
<p>Please add at least $50 to your cart to check out.</p>
{% endif %}<script>
$(document).on('click', 'a[href="/account/logout"]', function (e) {
e.preventDefault();
$.ajax({ method: 'POST', url: '/cart/clear.js' }).always(function () { window.location = '/account/logout'; });
});
</script><script src="https://ajax.googleapis.com/ajax/libs/jquery/3.5.1/jquery.min.js"></script>


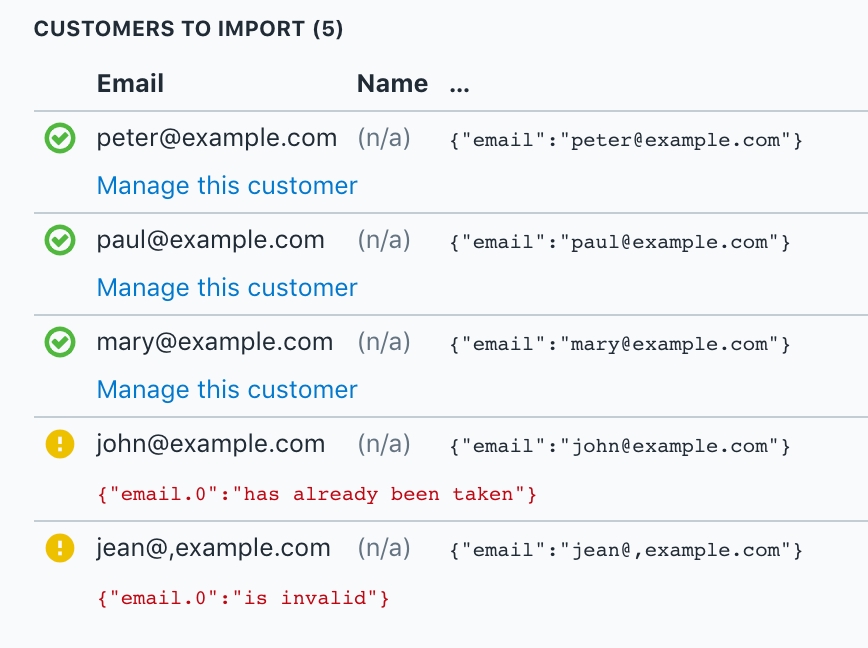

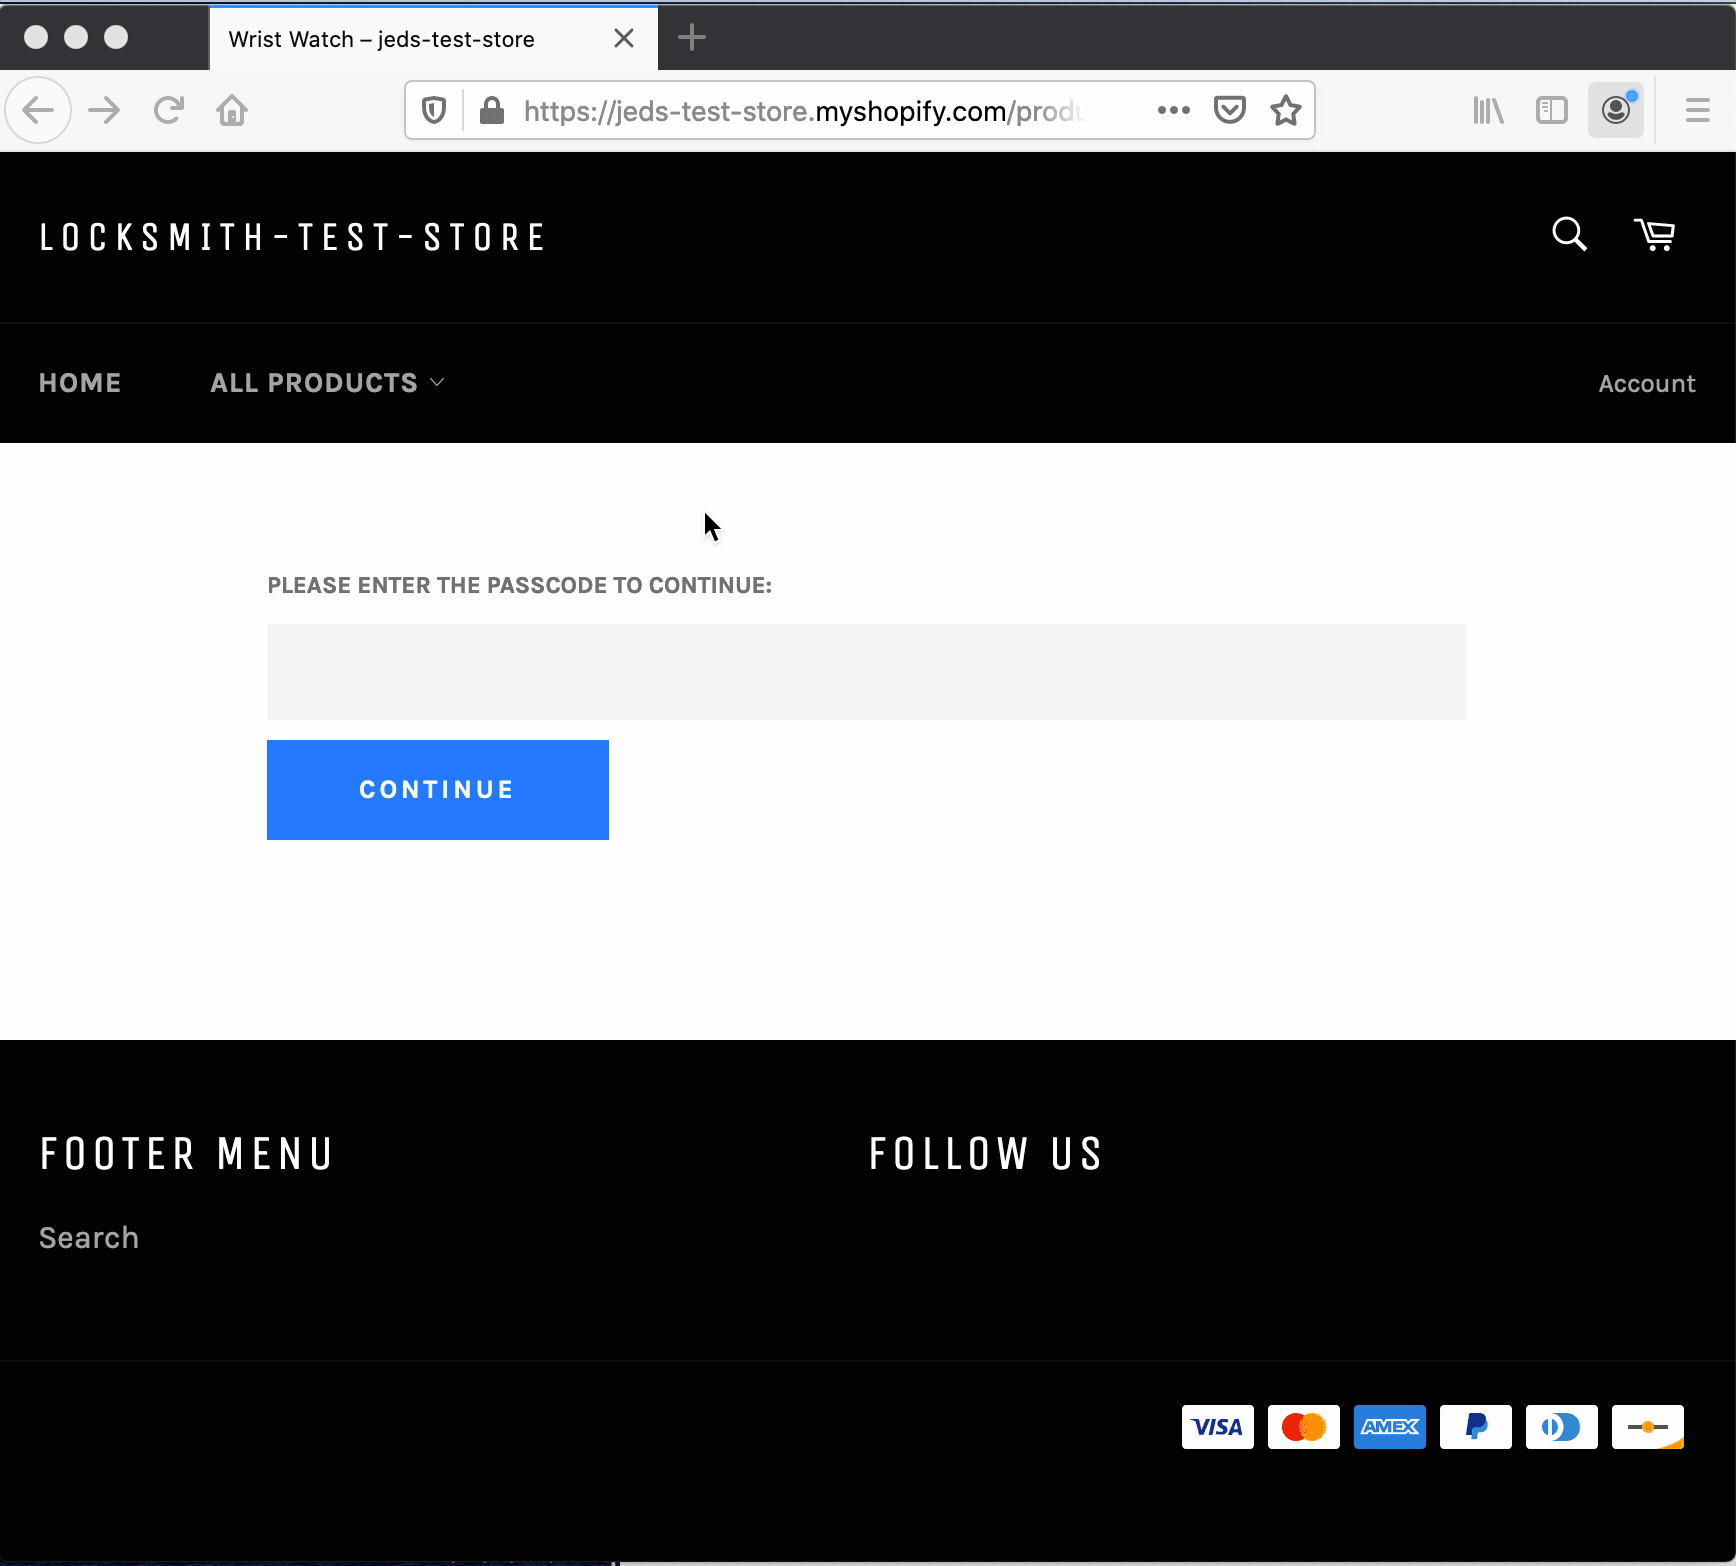
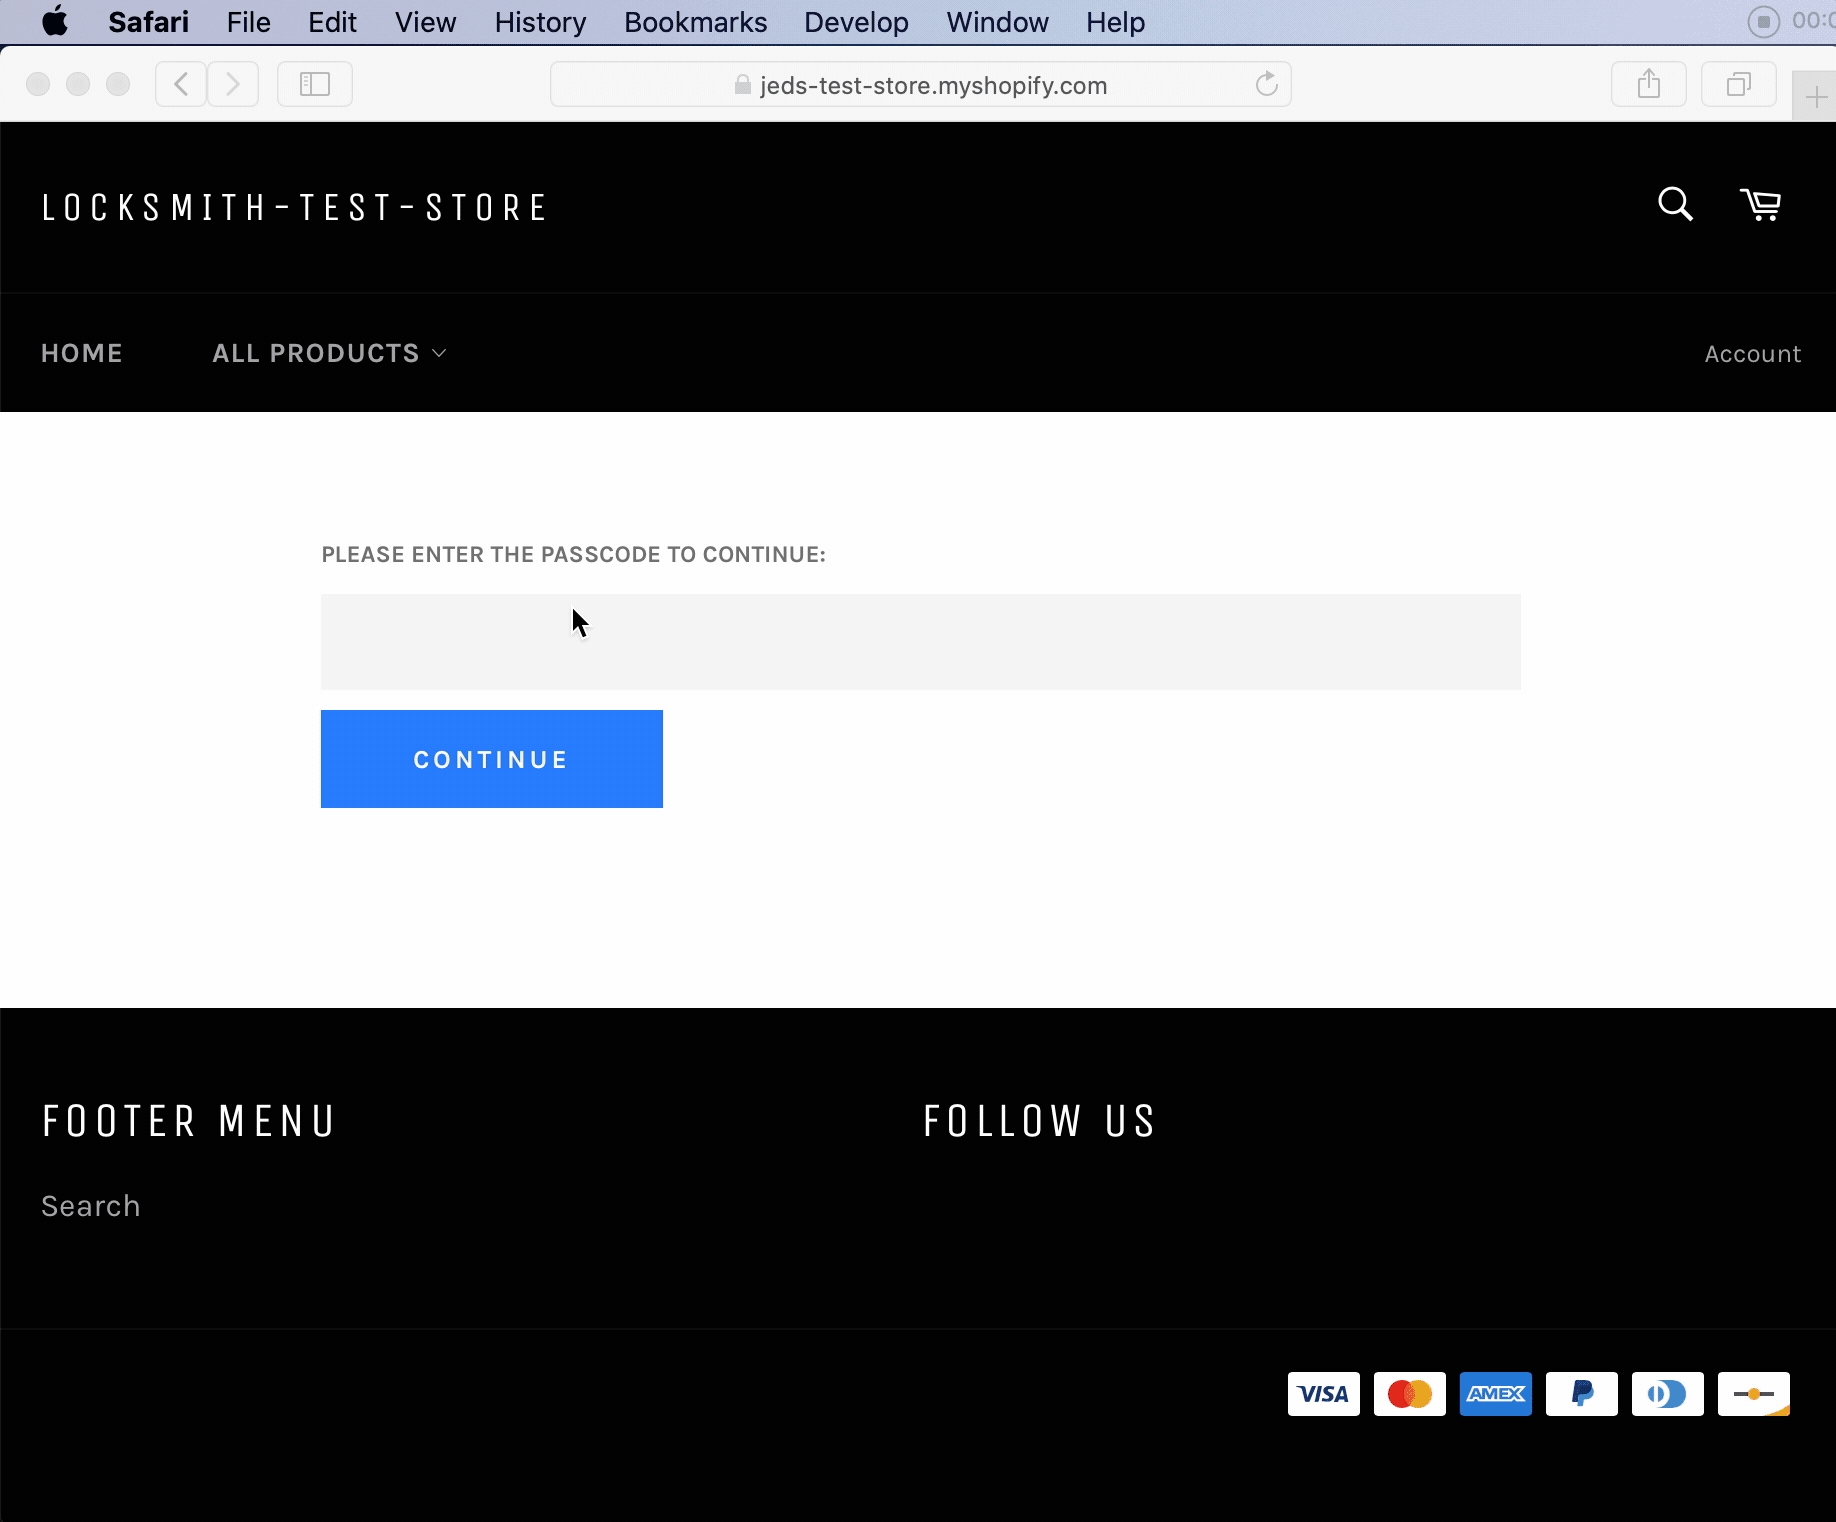
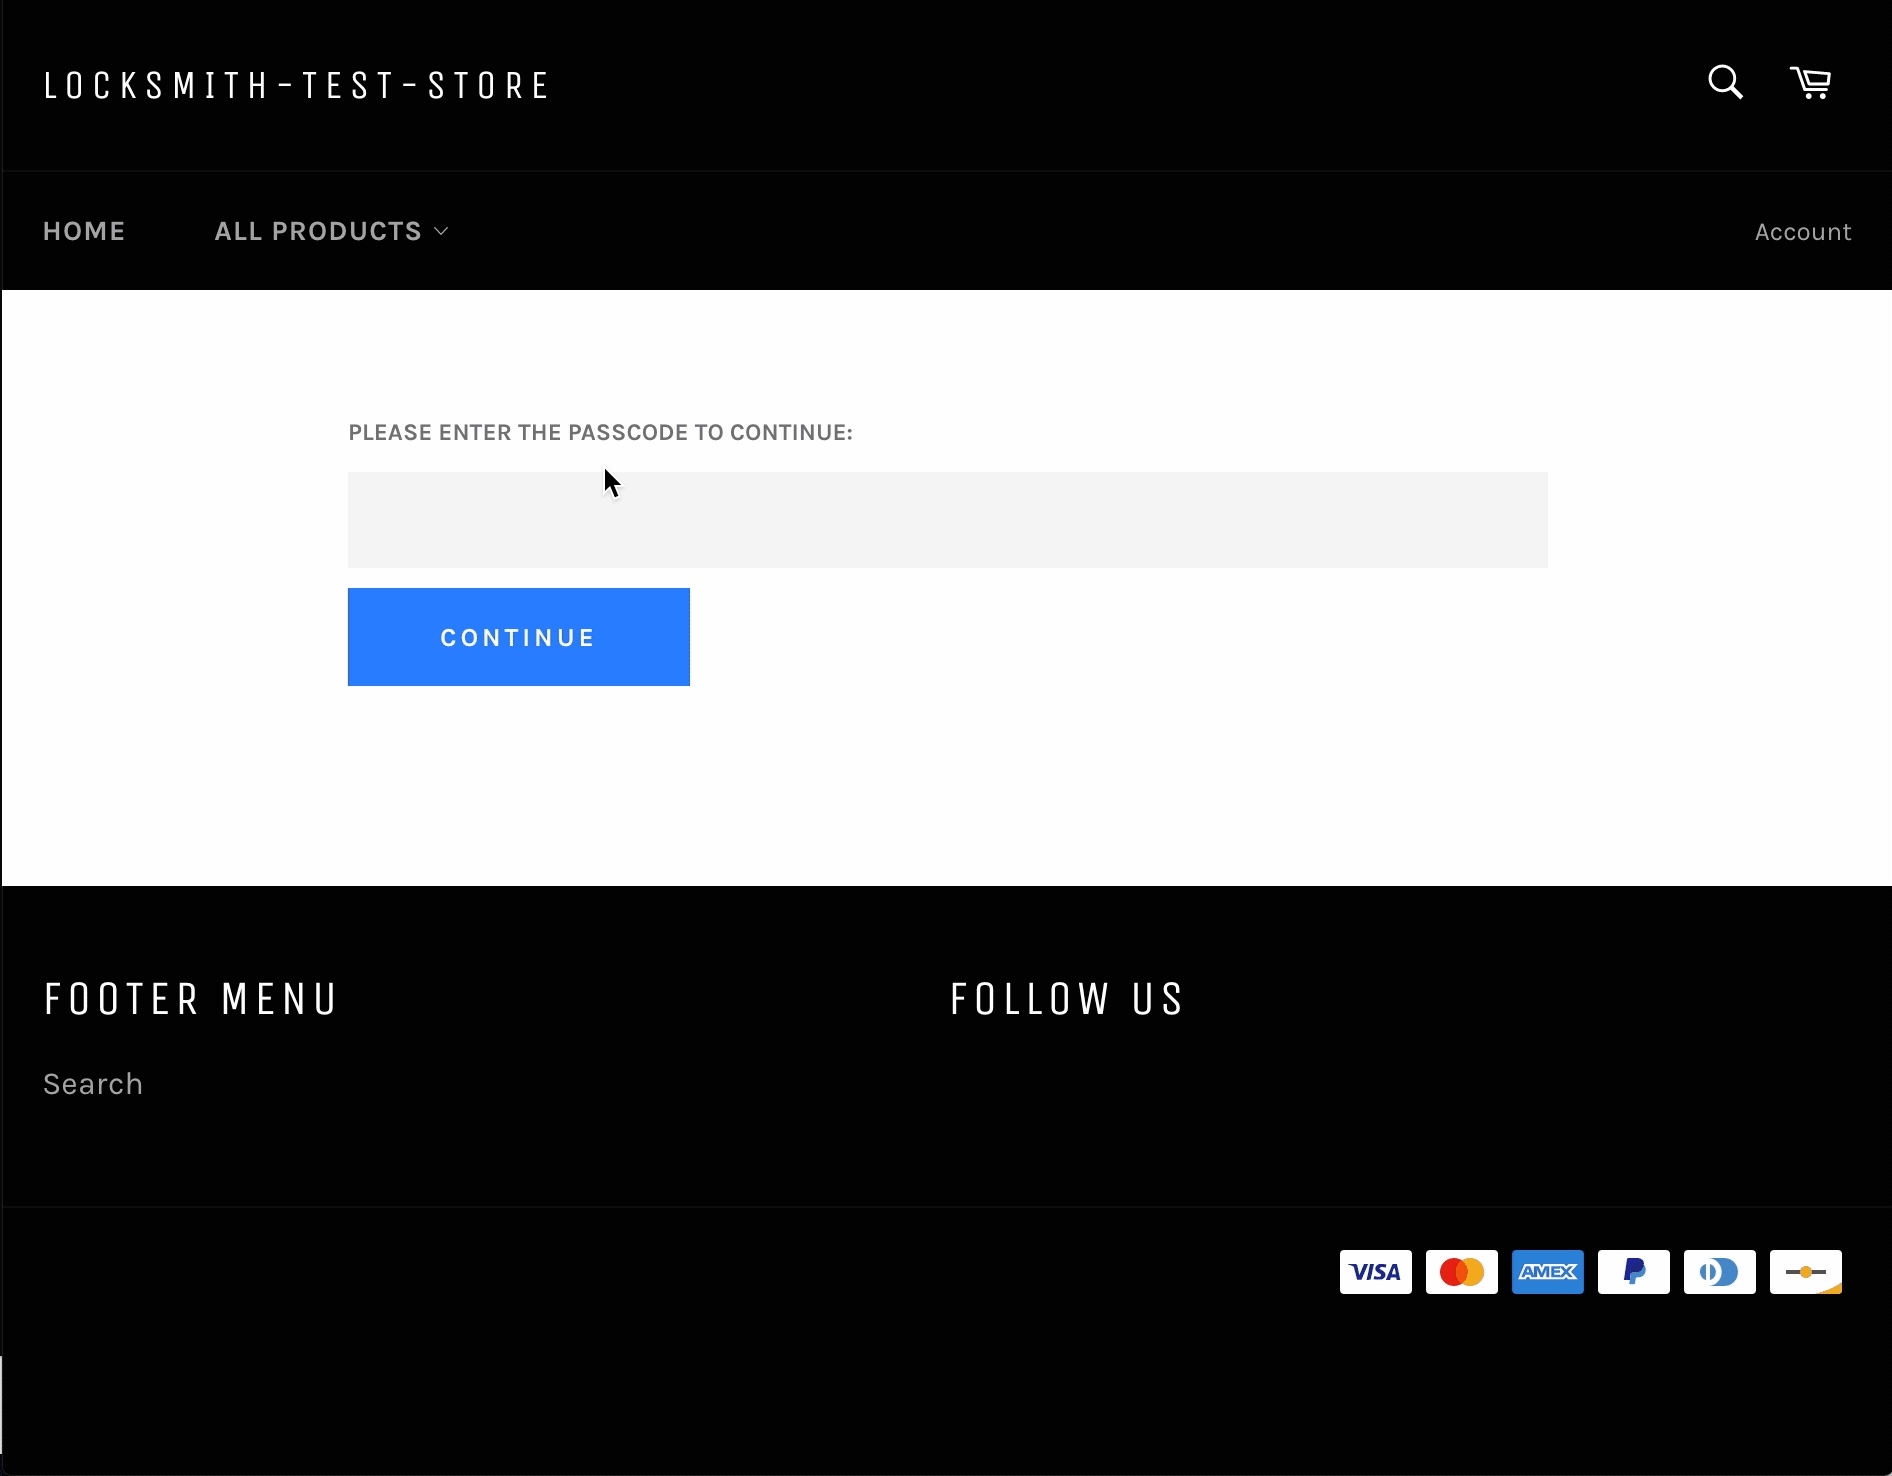


Also note: While this method does hide the price visually, it may still be possible for someone viewing the source (or interacting with the browser console) to see the price. This is because of the presence of things like Google Analytics and other tools, which reproduce the price in the source - but not visually on the page - for their own usage. These are out of control of the Locksmith app.
You can also setup Locksmith to hide from collection pages and searches (as long as the default Shopify search is used).
You have flexibility! For example, you can require accounts to be approved in addition to signed in. Our whole library of key conditions is at your disposal here. You can also set it up on only some of your products if you want to leave some products available. Or, you can simply hide the add-to-cart button and leave the product prices visible.
Use the following two steps to set it all up:
The first step to hiding your prices using Locksmith is to create a lock that covers the products that you would like to hide prices on. To do this, open up Locksmith and use the search bar on the main page of the app. If this is all of your products (most common), you can simply search for "all" and choose the "All Products" collection:
Warning: make sure to choose "Collection: All" and not "Collections Listing"
If you are only wanting to apply pricing hiding to some of your products, you can instead create a lock on different collection(s) or products that you want prices hidden for
Once you've created the lock, you'll choose the conditions for access. Many merchants use the "Permit if customer is tagged with..." key condition, which lets you manually approve accounts for price access by adding a customer tag:
That's the most common way to set it up, but you have the freedom to choose whatever key conditions work for your setup.
Before saving, turn on "Enable manual mode" right there in the lock (Clicking "Advanced" will show the option):
Done with step one!
You'll now need to let Locksmith know which parts of the page should be hidden. There are two methods to handling this:
This method allows you define sections, blocks, or snippets which Locksmith will hide based on locks that have the Manual Locking option enabled.
This method shouldn't require any coding in your theme, if your theme is fully compatible. (Most modern themes are.) This is a newer feature, and we recommend trying this method first.
Here's a complete guide to setting this up:
Because each theme is a bit different, adding manual locking code will require manually editing your theme to hide your pricing or add to cart buttons.
If you install a new theme down the road, these changes will need to be re-applied. Try the the Theme Hiding Profiles method first (outlined above), to avoid these limitations.
The rest of this guide gets a bit technical, we'll happily to the coding portion for you! If you've already created the lock described in step 1, simply write us a message at [email protected] to request help.
Note: Locksmith's manual locking feature generally can not hide elements or sections that are being managed or displayed by other third-party apps, including page builder apps. Manual locking is only compatible with full-page locks, and is not compatible with variant locks.
If you are a developer type, and prefer to do the coding portion yourself, read on... You'll need to start by locating the places in your theme that show the price. Here are some examples of files that you might find the price in:
snippets/product-card-grid.liquid
templates/product.liquid
snippets/product-card-list.liquid
snippets/product-price.liquid
Each theme is very different, so those are simply examples. You'll need to go to each of the files that display price, and do the following steps:
Open up the Liquid file, and add this to the very top of the file:
Find the code you want to hide from unauthorized viewers, and wrap it with:
To hide prices, you'll be looking for elements like:
... or:
Example:
This shows Locksmith manual locking code wrapping an entire price section, which I've highlighted.
Save!
Remember, those 4 steps need to be done for each file that display the price.
You can still restrict purchasing products, while leaving the product details visible to the customer. This also a good option for those wanting to make sure that products are available for search engines to index.
As a reminder, we can help guide you through this process, including adding the code, so don't hesitate to get in touch.
Step 1 is exactly the same, but the code you add in step 2 will be slightly different.
Find the product-template or product-form file in your theme, and locate the code that generates the "add-to-cart" button. This is different for all themes, so it won't be possible to give you an exact location for this. Then, add the code that you want to render, inside of a Liquid "else" statement. For example:
This results in the add-to-cart button being replaced, in cases where the customer doesn't have access. What is shown depends on what is added above. Just make sure your key conditions on the lock match the conditions that you want your customers to meet before being able to purchase.
If you need to render a "Login to purchase" button, use the following code (the button classes may need to be edited). This button includes a redirect to return customers after login:
If you need to render a "Login to purchase" button, use the following code (the button classes may need to be edited). This button will return customers after login:
If you need to render a passcode prompt button, use the following code (the button classes may need to be edited):
You can add an access denied message of location keys by adding paragraph tags and some text within the Liquid "else" statement, for example:
Please note: since the custom liquid code is added manually to the store theme, anytime you switch to a new or updated theme the custom code has to be manually added again to the new theme. We're always happy to add code to new or updated themes if you write into [email protected] We recommend leaving the new theme unpublished while you wait for the code to be added, so that nothing is exposed in the meantime. :)


Remote keys require a special initialization step, when working with manual mode. For more on this, jump to the interactions with remote keys section, later in this article.
Use these if you already know that you're using manual locking for one of the following:
Because each theme is a bit different, manual locking does require manual coding. If you install a new theme down the road, these changes will need to be re-applied.
Moving on, the steps are as follows
Open up the Locksmith lock that you want to enable manual locking for.
Click on "Advanced" in the lock Settings section and tick the checkbox for "Enable manual locking". Then, hit save. Screenshot below...
That's it! Locksmith will hold off on its full-page protection with this enabled, and allow your custom code to enforce protection.
Manual locking leverages Liquid variables to empower you to render content however you'd like, based on Locksmith's permissions.
Locksmith's variables are loaded via the locksmith-variables snippet. It can be included two ways, depending on context:
This usage supports "exporting" a single variable at a time, by informing the snippet of the object you're interested in (e.g. a specific product), capturing the rendered result, and performing any post-processing of the captured value necessary. For booleans and arrays, post-processing is necessary: the render tag necessarily results in a string. Boolean values are represented as their string equivalents, and arrays are represented as comma-delimited values.
The variable names that may be exported match Locksmith's standard list of variables; for variable names and definitions, see Locksmith variables.
To access any supported variable, use this approach:
For variants, one additional argument is required for the render tag: subject_parent, defining the product that contains the variant you're checking in on.
Feel free to adjust this code to taste. Only the capture and render tags need to be used exactly as written; process the rendered value string in whatever way you need to. Use the support button in the corner if you've got any questions. :)
The include tag has been deprecated by Shopify. Locksmith still uses this variable itself, in situations where overriding variables is important. You shouldn't need to use this on a regular basis, but we document it here for completeness.
{% include 'locksmith-variables' %} – In this mode, Locksmith will autodetect the applicable locks for the current url, and set up its access variables accordingly.
{% include 'locksmith-variables', locksmith_subject: foobar %} – In this mode, you specify the exact object that Locksmith should base its access decisions upon. Use this if you need to load up Locksmith's variables based on the cart, or a certain product, or some other Liquid variable, regardless of what url the user is on
For the code following this tag, all of Locksmith's standard variables are now automatically available, their names being prefixed with "locksmith_". For example, you may now use "locksmith_locked", "locksmith_access_granted", and "locksmith_manual_lock". The values differ only in that arrays of integer IDs (e.g. "locksmith_lock_ids", "locksmith_opened_lock_ids", and "locksmith_key_ids") are exported as arrays of numeric strings.
For (unprefixed) variable names and definitions, see Locksmith variables.
After loading the Locksmith variables, wrap the code you'd like to conditionally hide like this:
Some keys that you can configure in Locksmith require contacting our servers, remotely, in order to determine if access should be granted. Remote keys include:
In most usages, remote keys don't require any theme configuration. Locksmith will render a loading screen, with a spinner animation; once it's finished initializing, it'll reload the page automatically, and your storefront's normal content will be displayed.
When using manual mode, Locksmith will show your storefront content immediately by design. Manual mode leaves you with the responsibility of updating your theme's code to show or hide content based on Locksmith's decisions. Without remote keys, this is a simple boolean: either access is granted, or denied. When combined with remote keys, we add a third state: either access is granted, or denied, or Locksmith hasn't finished initializing and the page should be refreshed.
To explain by example: in cases like price hiding, this means that there are three possibilities for the content you should display: either you should display the price (and add-to-cart form), or you should hide it, or you should display a "please wait" message, coupled with some JavaScript that reloads the page when Locksmith has finished initializing in the background. This is necessary when using location-based, IP address, and secret links keys.
To accomplish this, adapt this code for your own purposes:
The code above assumes that you've already exported the locksmith_access_granted and locksmith_initialized variables. Use one of these options to export those variables, making sure to do so before making any content decisions:
Manual locking is not compatible with variant locks.


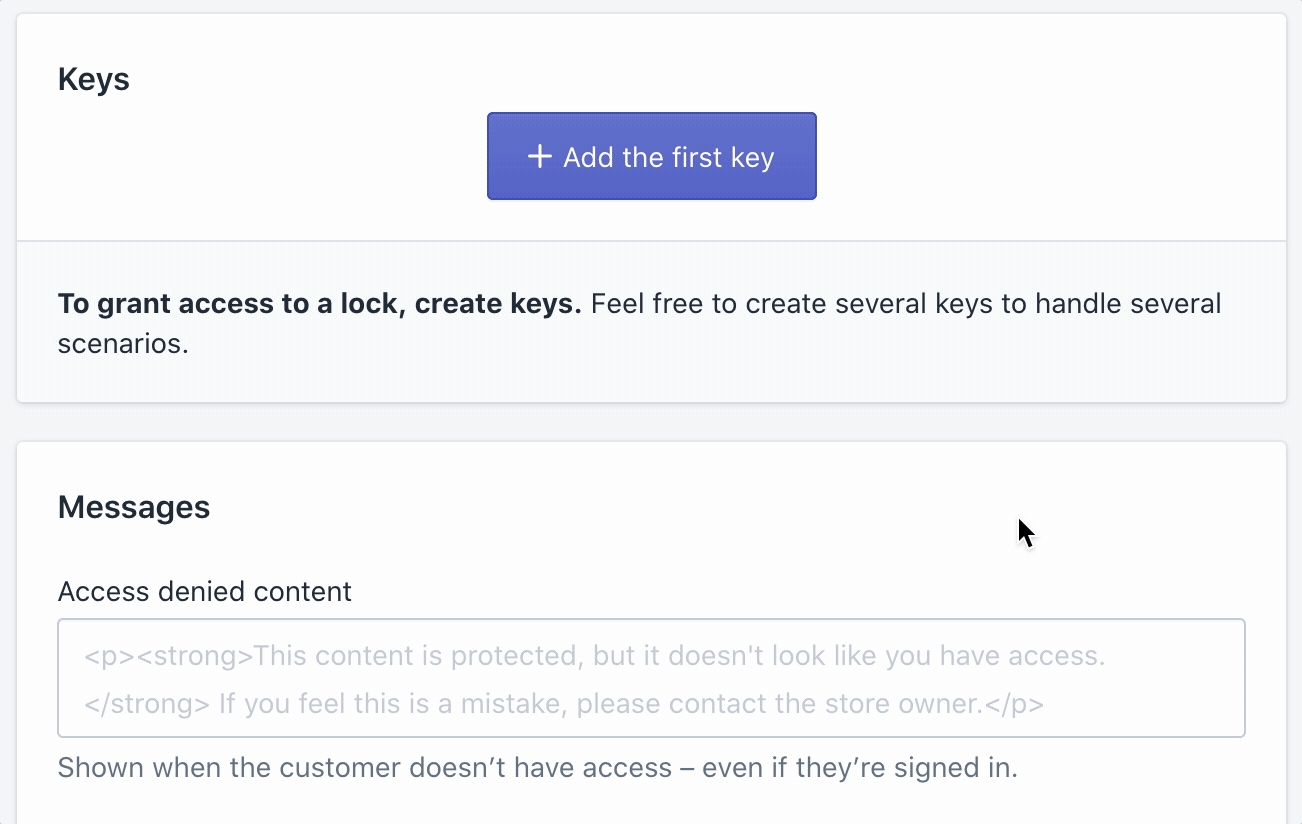
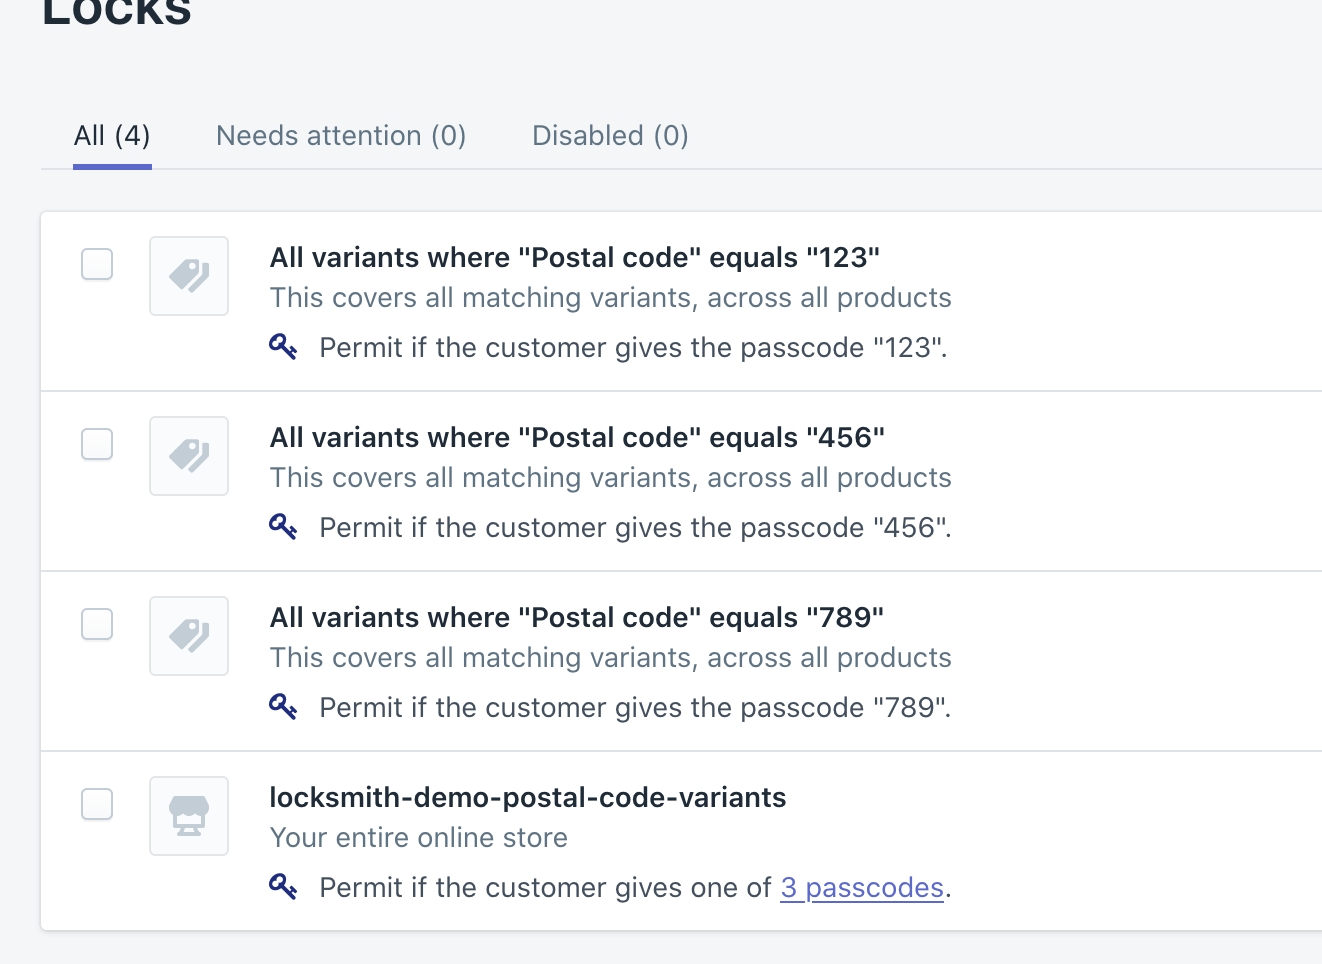
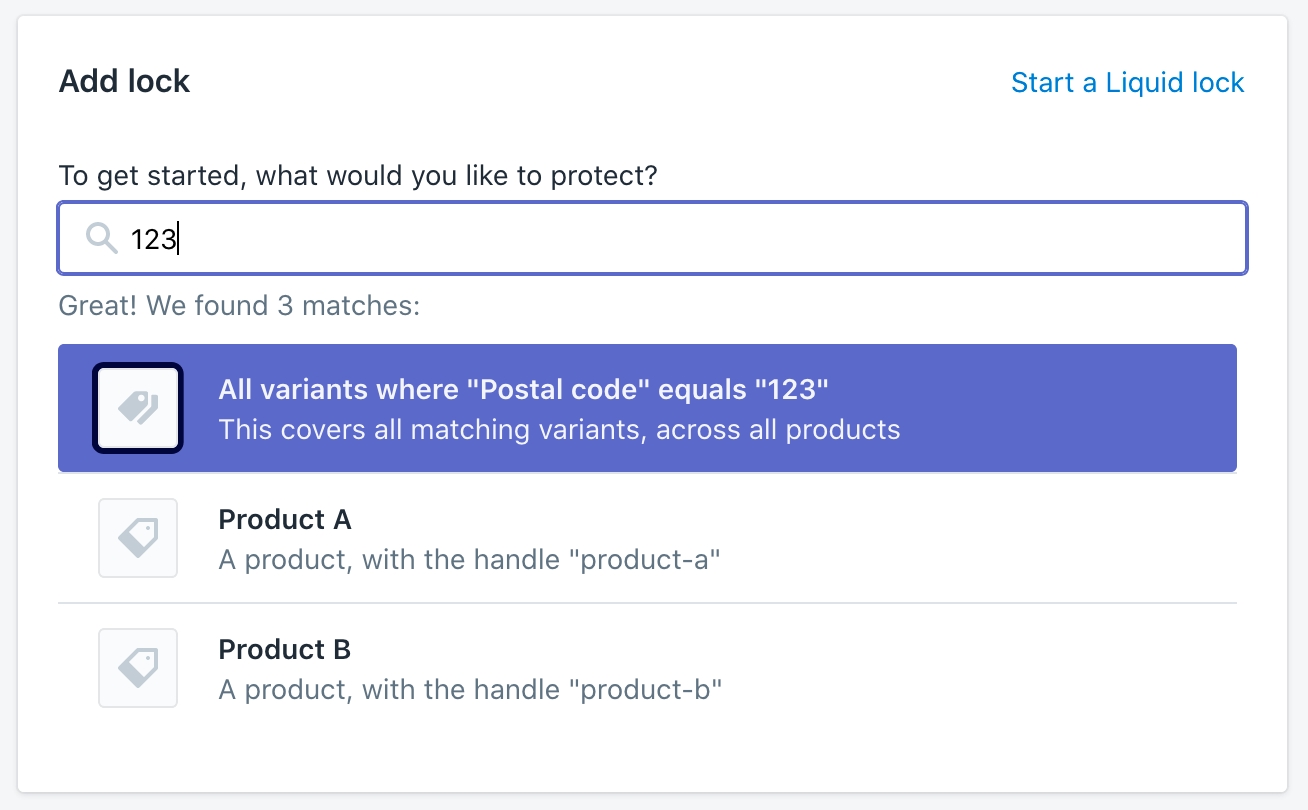
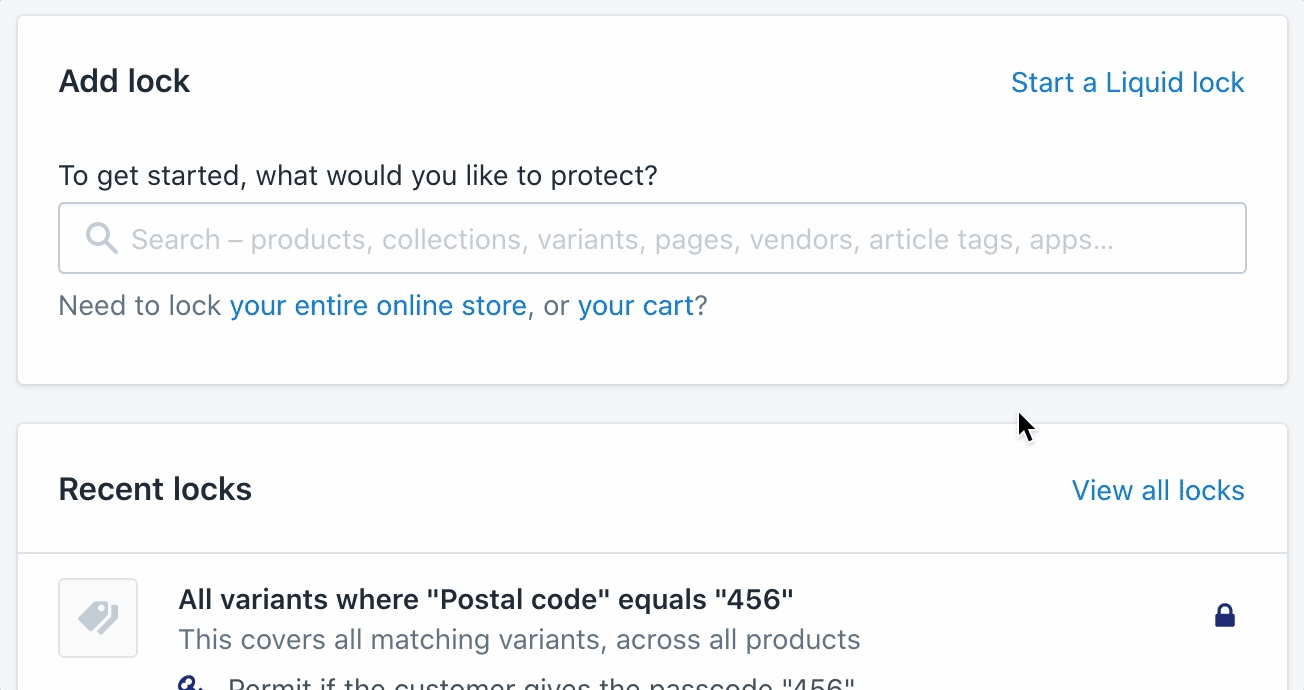
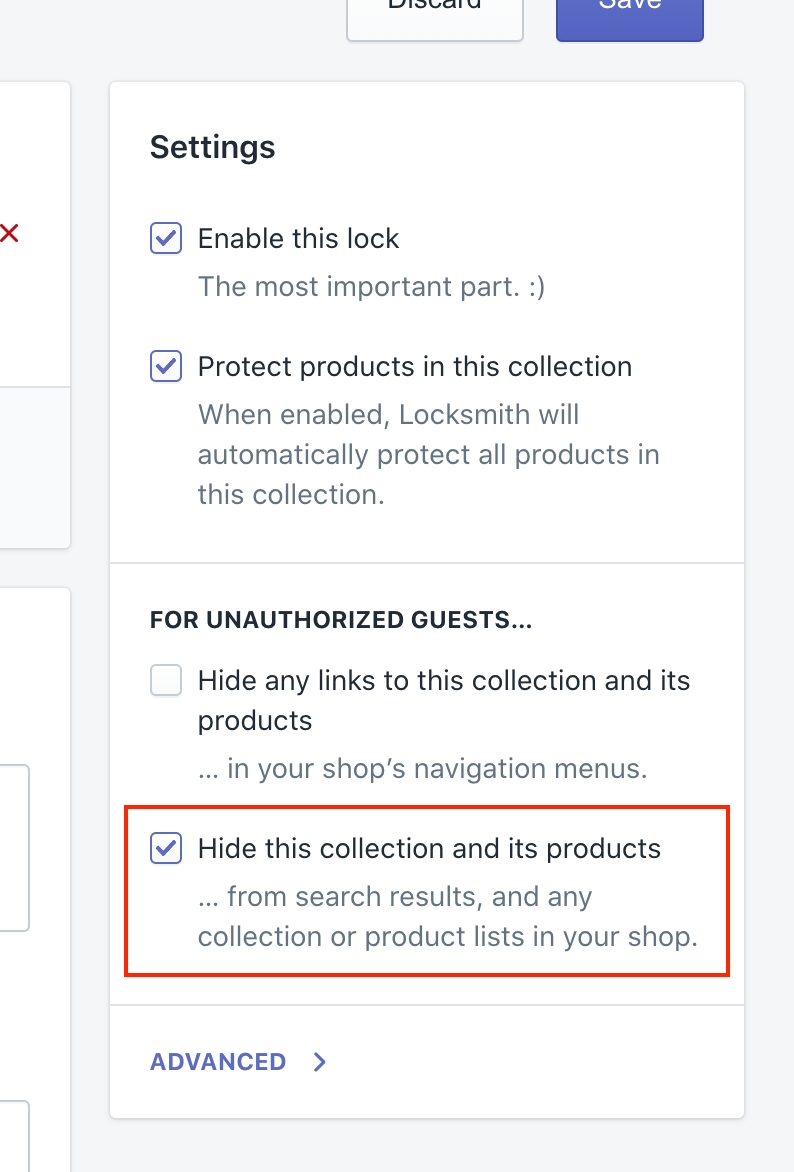
Locksmith gives you flexibility in how you can customize the passcode form!
Here are some of the many different ways you can edit the passcode form!
This is the default behavior for the message. You can add as much content as you need, including text, images and backgrounds, by simply adding code directly to the "Passcode prompt" area, found on the lock page, under Messages:
Any code that you add to this area will be rendered normally, as if adding it to the theme. Including:
How to create customer liquid key conditions in Locksmith
Locksmith allows you to create a custom key conditions that use Liquid to determine whether or not the current visitor has access. This gives you a few more options than what comes with Locksmith's out-of-the-box key conditions.
Before continuing on, you may want to , as that will give you a good idea of the kinds of things you can use when creating Liquid key conditions. Keep in mind that while Liquid key conditions can add more versatility, they are still limited to the scope of what's already available inside of Shopify's Liquid engine for the Online Store channel.
{% capture var %}{% render 'locksmith-variables', variable: 'access_granted', scope: 'subject', subject: product %}{% endcapture %}{% if var == 'true' %}{% assign locksmith_access_granted = true %}{% else %}{% assign locksmith_access_granted = false %}{% endif %}{% if locksmith_access_granted %}...{% endif %}{{ product.price }}{{ item.price }}{% if locksmith_access_granted %}
<button type="submit">
Add to cart button example
</button>
{% else %}
{% if customer %}
<p style="font-weight: bold; padding-top:20px; padding-bottom:20px;">You do not have access to this resource.</p>
{% else %}
<a style="width: 100%;" href="/customer_identity/sso_hint" class="btn button" data-locksmith>Log in to purchase</a>
{% endif %}
{% endif %}{% capture var %}{% render 'locksmith-variables', variable: 'access_granted', scope: 'subject', subject: product %}{% endcapture %}{% if var == 'true' %}{% assign locksmith_access_granted = true %}{% else %}{% assign locksmith_access_granted = false %}{% endif %}
{% if locksmith_access_granted %}
<button type="submit">
Add to cart button example
</button>
{% else %}
<p><strong>Product not available</strong></p>
{% endif %}<a href="/account/login?return_url={{ request.path }}" class="btn button button button--full-width button--secondary">Log in to purchase</a><a href="/customer_authentication/login?locale={{ request.locale.iso_code }}&return_to={{ request.path | url_encode }}" class="btn button button--full-width button--secondary">Log in to purchase</a><button class="locksmith-manual-trigger btn button">Enter passcode to purchase</button><p><strong>Product not available in your country.</strong></p>{% capture var %}{% render 'locksmith-variables', variable: 'access_granted', scope: 'subject', subject: product %}{% endcapture %}
{% if var == 'true' %}
{% assign locksmith_access_granted = true %}
{% else %}
{% assign locksmith_access_granted = false %}
{% endif %}{% render 'locksmith-variables', variable: 'access_granted', scope: 'subject', subject_parent: product, subject: variant %}{% if locksmith_access_granted %}
You've got access!
{% endif %}{% if locksmith_access_granted %}
<!-- the original add-to-cart button code -->
{% elsif locksmith_initialized %}
<p>No access for you!</p>
{% else %}
<p>Please wait…</p>
<script>
Locksmith.on('initialize', function () { window.location.reload(); });
</script>
{% endif %}{% capture var %}{% render 'locksmith-variables', variable: 'access_granted', scope: 'subject', subject: product %}{% endcapture %}
{% if var == 'true' %}
{% assign locksmith_access_granted = true %}
{% else %}
{% assign locksmith_access_granted = false %}
{% endif %}
{% capture var %}{% render 'locksmith-variables', variable: 'initialized', scope: 'subject', subject: product %}{% endcapture %}
{% if var == 'true' %}
{% assign locksmith_initialized = true %}
{% else %}
{% assign locksmith_initialized = false %}
{% endif %}{% include 'locksmith-variables' %}

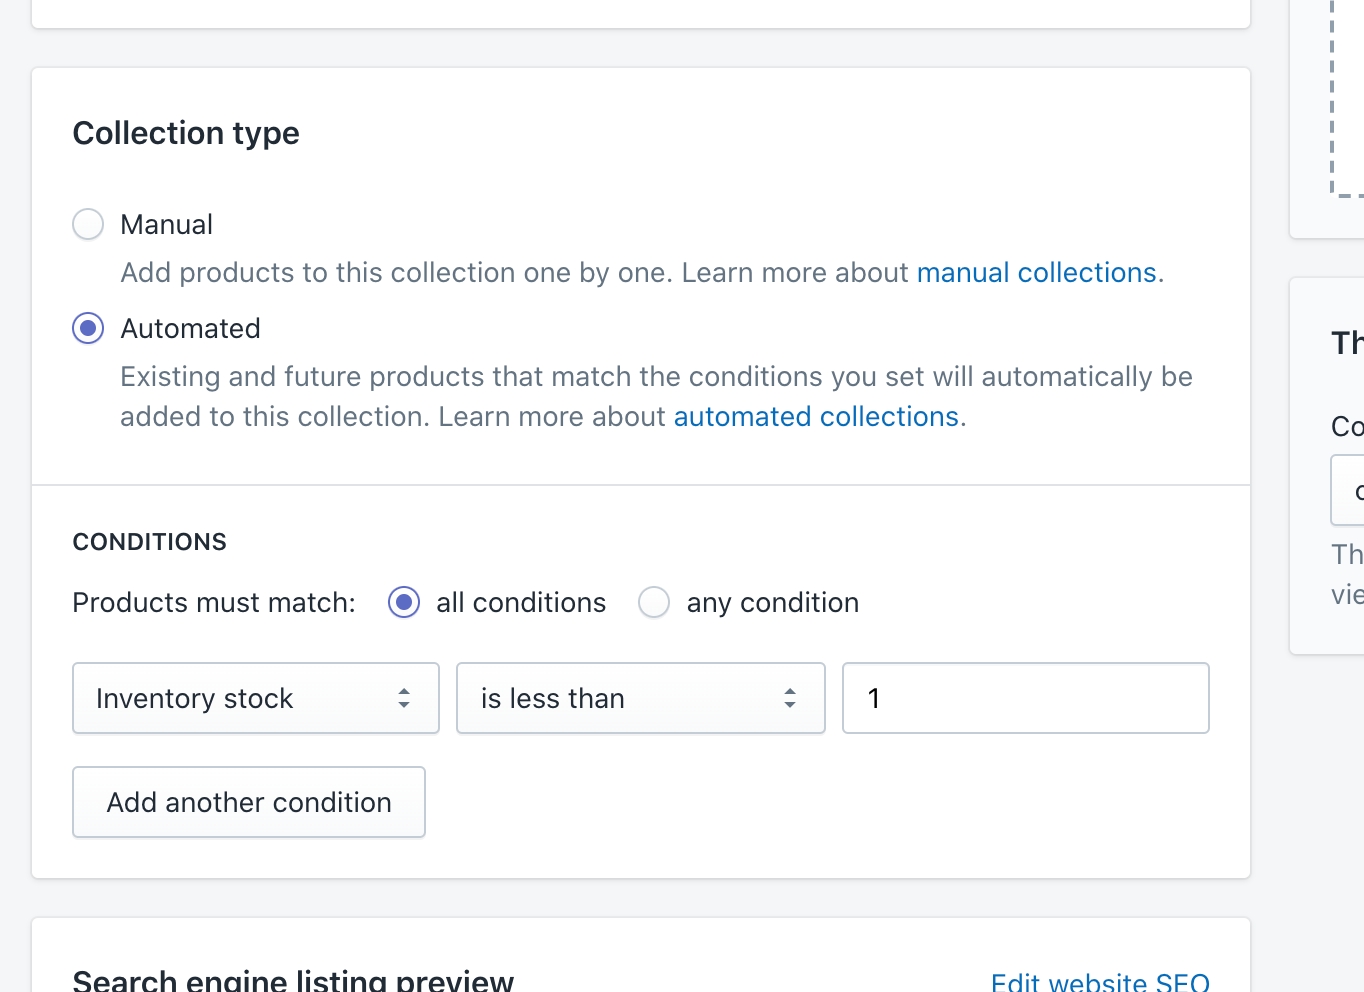
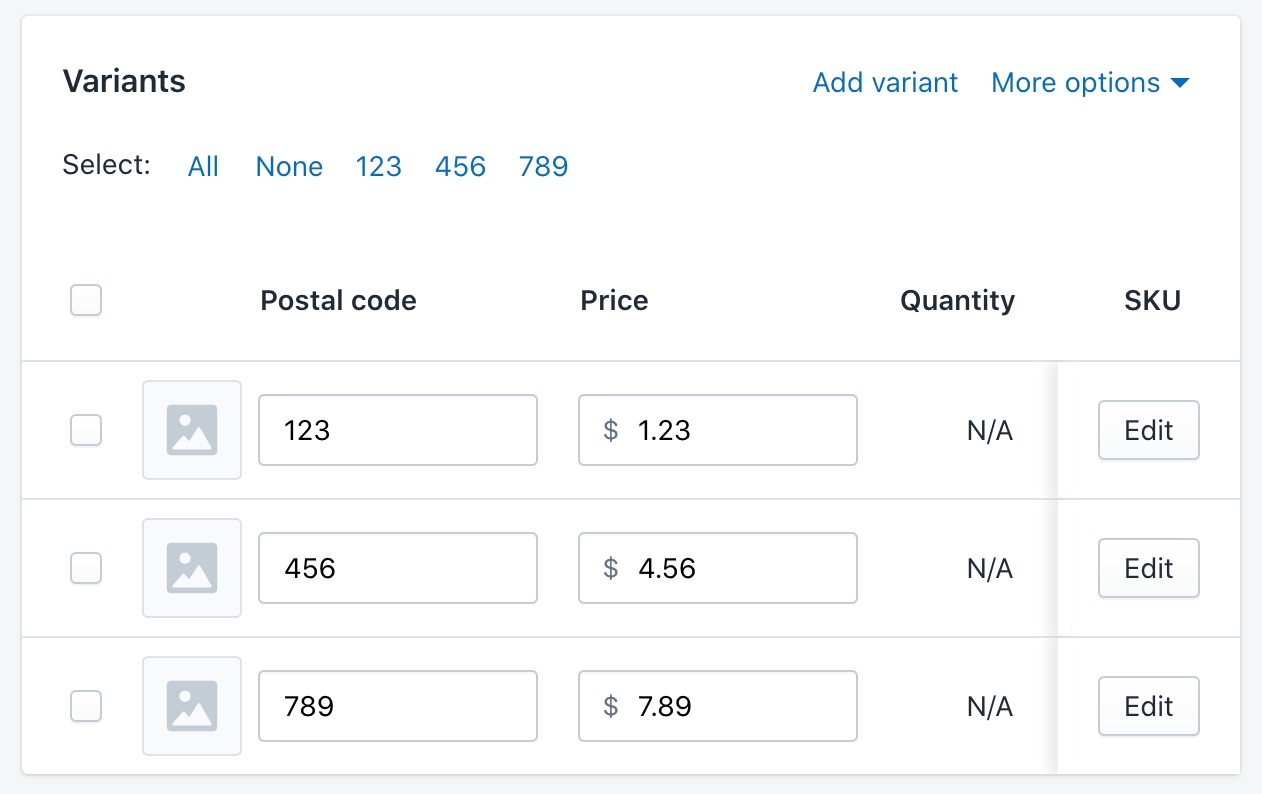
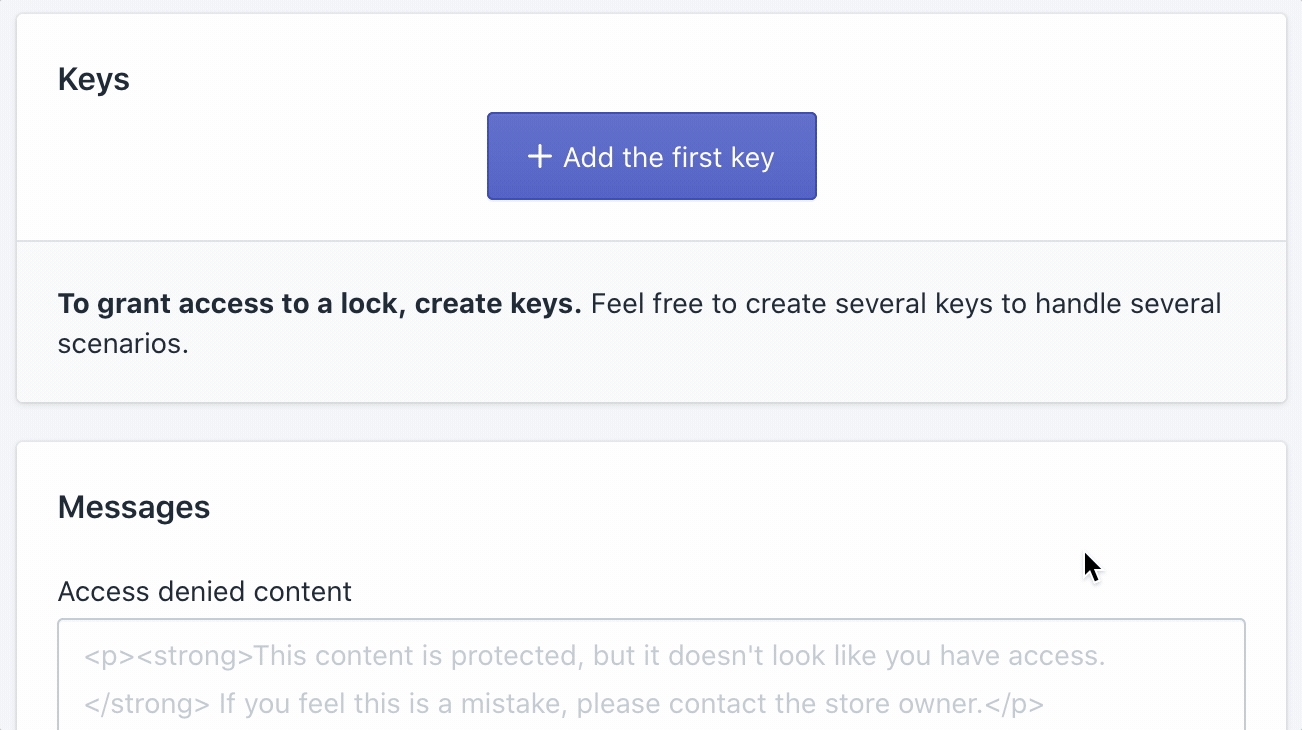
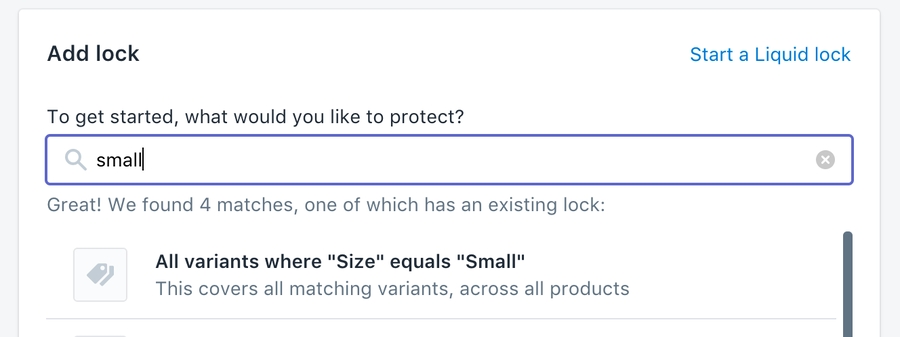

HTML - using regular HTML tags
CSS - using <style> your CSS code here </style>
Javascript - using <script> your javascript code here </script>
Liquid - using regular Liquid syntax
Simply use {{ locksmith_passcode_form }} to denote where the form itself will go, and then add in content that you want to display before and after it.
This is not done in the Locksmith app, but rather in the theme's "Edit default theme content" settings:
Once in the "Theme content" settings, you'll need to go to the "Locksmith" tab, which is typically not visible right away:
So then finally, you can edit the text itself, under the Locksmith tab:
Note: This step only changes the wording for your default language. If you are using multiple languages in your store, you'll also need to go through the "Localize" step. Check out Shopify's guide on doing that here.
If you have multiple key condition types on the same lock, it might be useful to include other form types within the prompt, so that they display on the same page. We have a guide on doing this here:
Please note that this is NOT compatible with replacing/editing the form itself (as detailed in the next section).
Some merchants want more control over the form itself, not just the text that is shown alongside it. This could just be for more granular edits to the way it looks, or to perform more complicated javascript operations on the text input.
Although we can help troubleshoot, if you choose to override the form, the coding and style is up to you, we are not able to create a new form for you.
To do this, simply use the "Passcode prompt" area to put in your new form. Since you're overriding the form, you'll need to add in all the code for the new form. To begin, copy/paste this entire section (including the script!) into the Messages > Passcode prompt area. Then, edit as needed:
If you need to perform text transforms (e.g. downcasing the text for case-insensitivity), do that in the marked area in the script above.
Editing tips
Changing the form too extensively (editing the text input, script, classes/ids) could cause the passcode not to be submitted correctly, so try to stick as close to the above as possible.
Locksmith will look for the <form> tag with the "locksmith_passcode_form" id, so that's something to keep in mind if you see that Locksmith is still rendering the default form when overriding:
Here are a few examples of how you might use CSS to style your passcode messages. You can put these directly in your passcode messages in Locksmith (making sure to surround them with the <style> ... </style> tag), or add them to the stylesheets in your theme.
With jquery:
With vanilla javascript:
While we cannot make extensive custom edits to your form for you, if you have any questions you can contact us via email at [email protected]
This is where you'll write the primary condition, using Liquid. The condition simply needs to evaluate to true or false.
For example, consider if you simply wrote the following:
{% iffalse%}
This would result in this particular key never opening, since it's always false. This is not necessarily advisable(it would be the equivalent of adding no keys at all), but it's a proof of concept.
So, here are some examples of useful conditions.
{% if customer.metafields.namespace.key == "matching-value" %}
{% if cart.item_count > 4 %}
{% if customer.total_spent > 5000 %}
{% if template == "collection" %}
{% if canonical_url contains "/special-product-handle" %}
{% if request.page_type == "index" %}
This is a place for you to write any code that that you may need to set up the Liquid condition. It does not need to evaluate to true or false, but it does need to use valid Liquid syntax.
Basically, you can assign to any custom variable in the prelude, and then use that variable in the condition to ultimately decide whether or not the customer qualifies to use this key.
For example, your prelude could look something like this:
So now, in the "Liquid condition", you would have access to the purchase_allowed variable, so it would simply look like this:
{% if purchase_allowed %}
So that would give you even more flexibility to write different Liquid conditions that can be used to set up your locks and keys.
Relatedly, you can also use Liquid to create Locks! More information on that here:
As always, feel free to check in with us via email at [email protected], if you have any questions about any of this!


How to use Locksmith's Input List feature to work with large numbers of inputs
Locksmith gives you the ability to use input lists for managed sets of , , or . They're useful when you have a very large number of possible inputs.
.locksmith-passcode-container {
content: "";
display: block;
padding-top: 56.25%; /* Adjust this value based on the actual aspect ratio of your background image. For example, here is a calculation of the aspect ratio for an image of size 1080*1920 pixeles: ((1080 / 1920) * 100)% = 56.25% */
flex-direction: column;
justify-content: center; /* Aligns content vertically center */
align-items: center; /* Aligns content horizontally center */
height: 100%; /* Ensures the container takes full height of its parent */
}
#locksmith-content::before {
content: "";
position: absolute;
top: 0;
left: 0;
width: 100%;
height: 100%;
background-image: url('https:// your image source here');
background-size: cover;
background-repeat: no-repeat;
z-index: -1;
}
#locksmith-content {
position: relative;
}
#locksmith-passcode-form {
position: absolute;
top: 50%; /* Aligns content vertically center */
left: 50%; /* Aligns content vertically center */
transform: translate(-50%, -50%); /* Adjusts the position of the passcode from so that its center aligns with the center of the div. */
box-sizing: inherit;
max-width: 475px; /* Sets the maximum width of the passcode form */
width: 100%;
padding: 20px 25.45px;
z-index: 1;
}<p>Please enter the passcode to continue: </p>
{{ locksmith_passcode_form }}
<p> Content to be displayed after the form </p><div class="locksmith-passcode-container container page-width">
<form id="locksmith_passcode_form">
<p>Enter the passcode to continue: </p>
<p><input autofocus id="locksmith_passcode" class="locksmith-passcode {% if locksmith_passcode_attempted %}failed{% endif %}"></p>
<p><button type="submit" class="button button-primary btn btn-primary action-button action_button">CONTINUE</button></p>
</form>
</div>
<script>
var passcodeForm = document.getElementById("locksmith_passcode_form");
passcodeForm.addEventListener('submit', function (event) {
event.preventDefault();
var passcode = document.getElementById("locksmith_passcode").value;
/* REMOVE THIS LINE and insert any desired transforms to passcode here */
Locksmith.submitPasscode(passcode, event);
});
</script><form id="locksmith_passcode_form">
...rest of form code...
</form>#locksmith_passcode_submit { color: blue; }#locksmith_passcode { border: 1px solid red; }.locksmith-passcode-container p:last-child { text-align: center; }form.locksmith-authorization-failed::before {
content: 'The passcode you have entered is invalid. Please enter another passcode.';
color: red;
}<img src="https:// your image source here" alt="Your image description">body {
background-image: url('https://YOUR-URL-HERE') !important;
}#locksmith-content {
background-image: url('https://YOUR-URL-HERE');
background-size: 100%;
background-repeat: no-repeat;
} #MainContent {
background: url(//https://YOUR-URL-HERE') center bottom no-repeat;
background-size: cover;
padding-top: 10%;
padding-bottom: 10%;
max-width: 100%;
}<script> setTimeout(() => { $('#locksmith_passcode').attr('placeholder', 'This is a placeholder!'); }, 10); </script><script>document.querySelector('#locksmith_passcode').setAttribute('placeholder', 'Enter password');</script>{% assign purchase_allowed = true %}
{% for item in cart.items %}
{% if item.product.handle contains "members-only" %}
{% assign purchase_allowed = false %}
{% endif %}
{% endfor %}
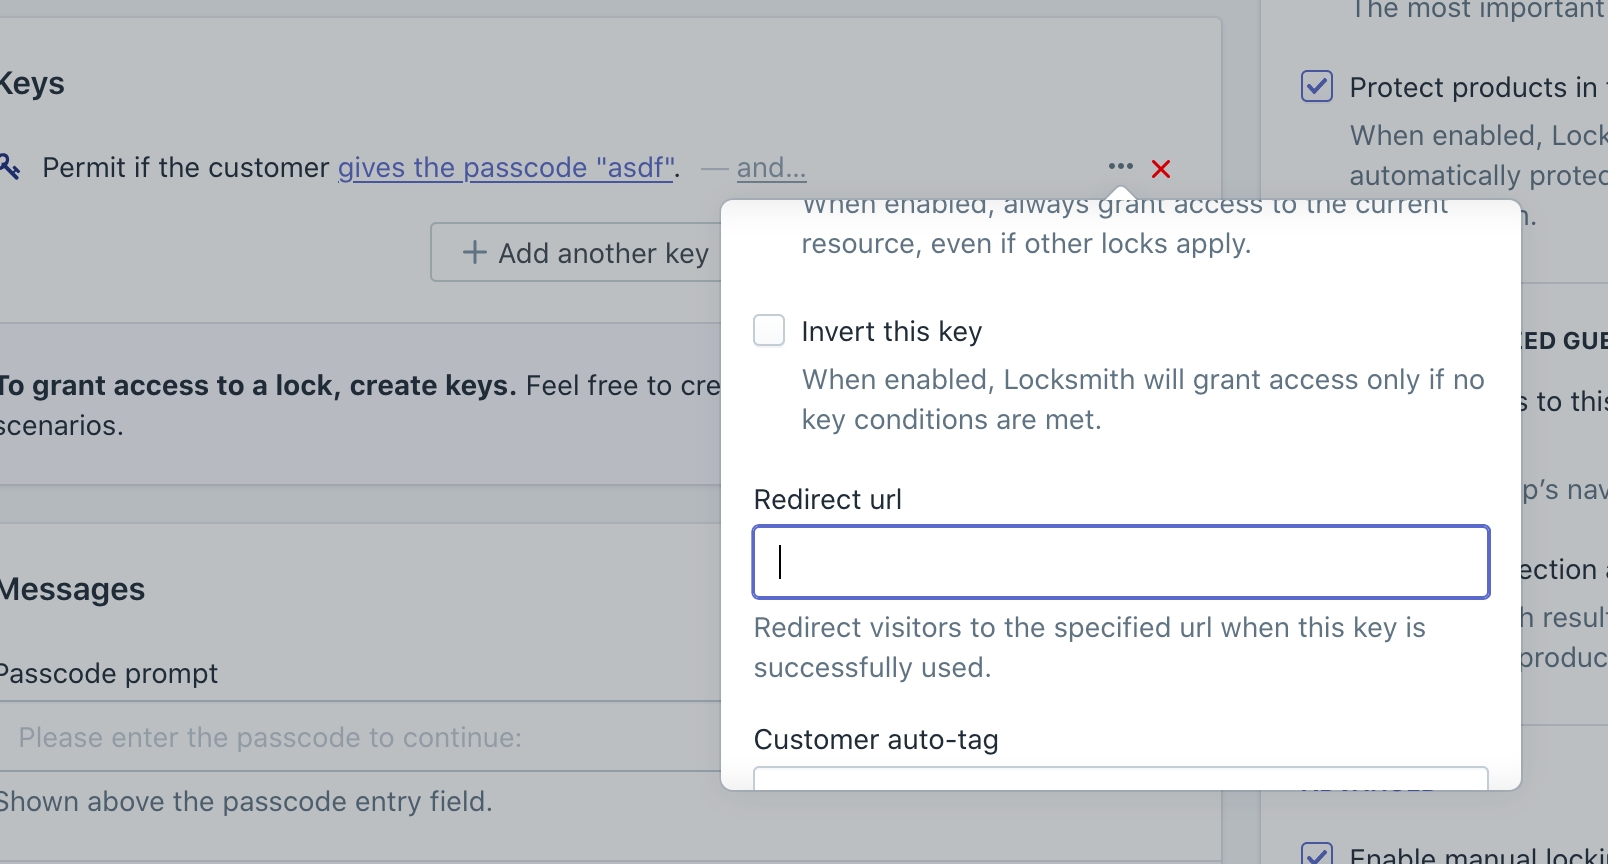
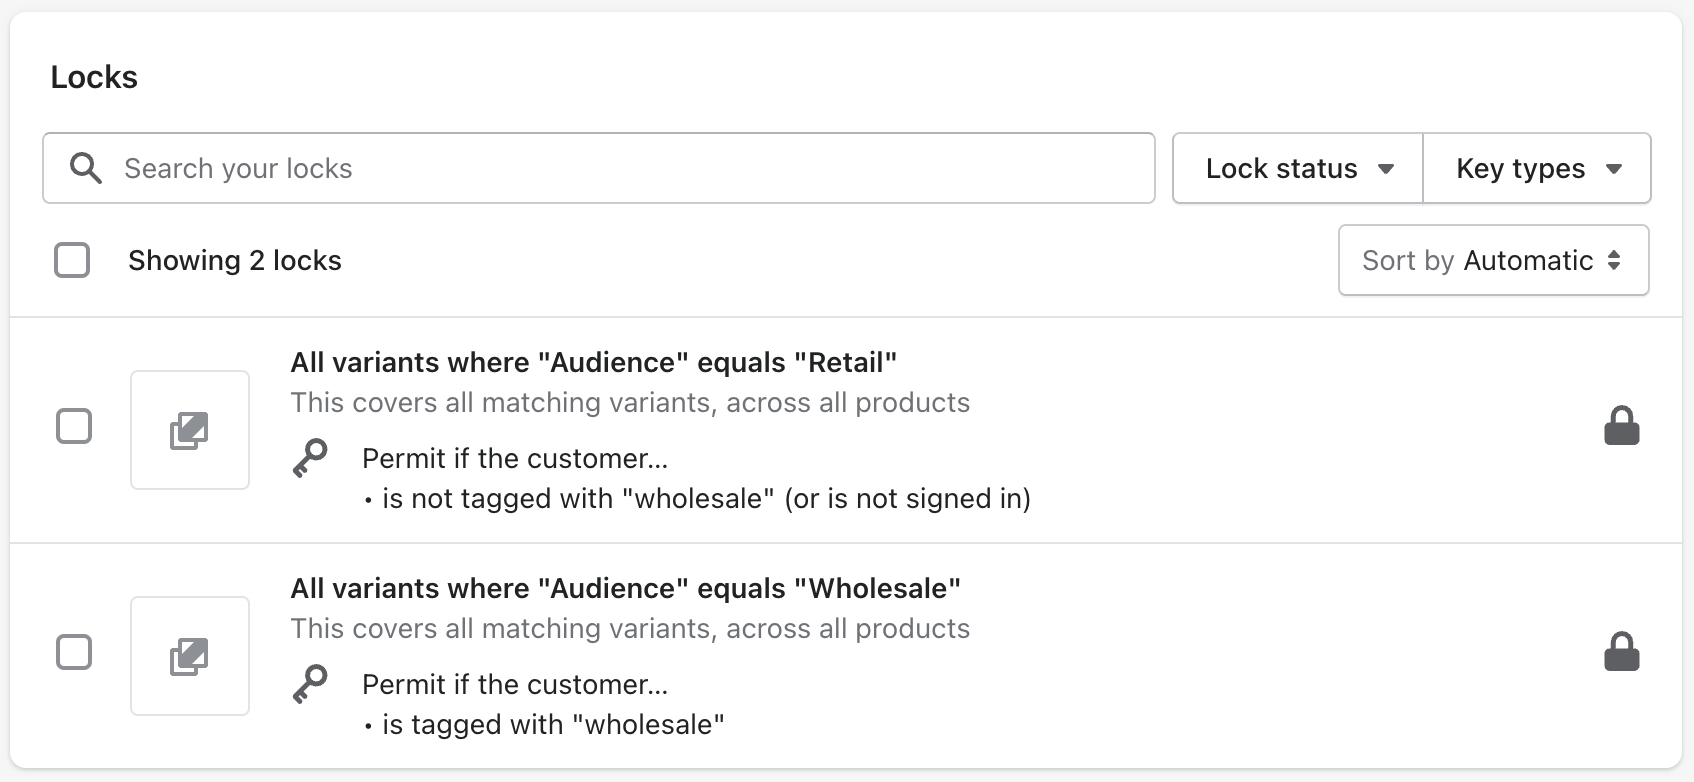
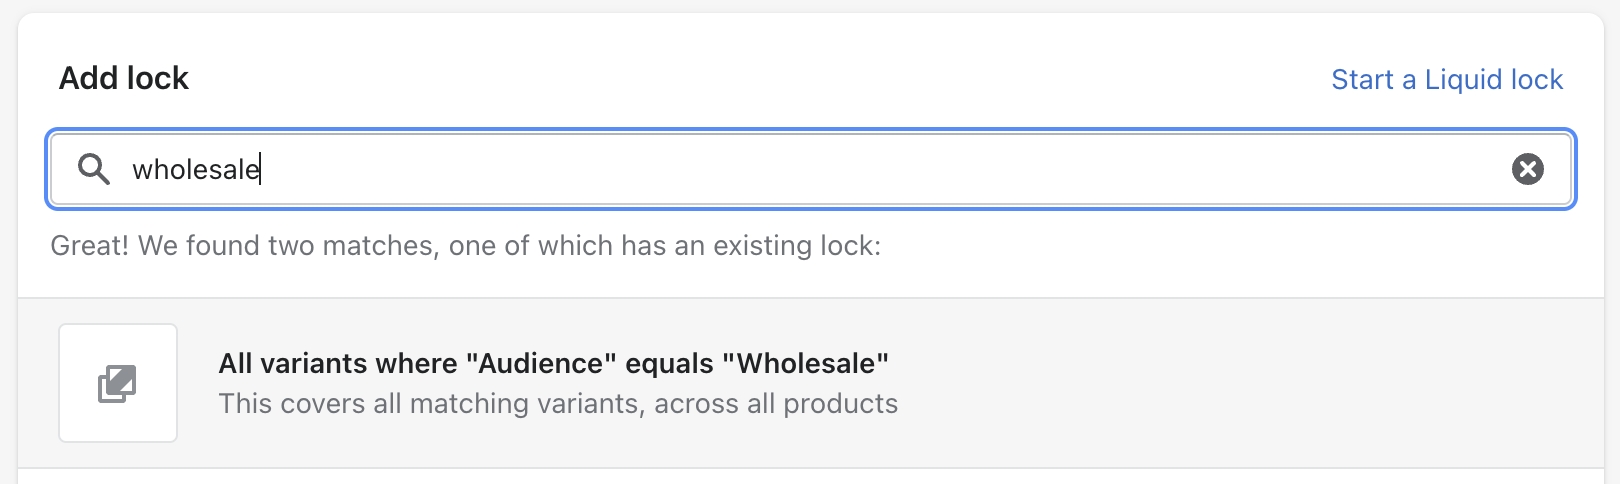
Input lists are stored externally! So you'll need to create a file that is accessible via a URL, adding all of the values to it that you would like to use.
The most straightforward way to do it is to simply use Google sheets: https://www.google.com/sheets
Google Sheets must be formatted as a document having a single column of input values, one value per row:
In addition to Google Sheets, sources may be of the following formats:
TXT (one input value per line)
CSV (a single column of input values, one value per row)
JSON (an array of strings)
Microsoft Excel XLSX (a spreadsheet having a single column of input values, one per row)
JSON array provided by a Mechanic cache endpoint ()
Important: The source file must be either unauthenticated OR must be a Google Sheet or Google Doc that has been shared with the following email address: [email protected]. If you send a notification directly to this email address, it may bounce. However, as long as the document is properly shared with that email address, Locksmith will be able to access it.
Input lists are configured in your Locksmith account settings. To find this area, open the Locksmith app and go to the Settings area (using the left-hand navigation):
Input lists are available in the "Extensions" area:
An input list has four options:
Name
Source URL
Input values are case-sensitive (enable to require an exact case match)
Default usage limit per input list item - allows you to specify a default usage limit for any items that you add to the list. This is a great way to add unique inputs - simply enter 1 as the usage limit and each input can only be used once.
Partial match - when this option is enabled, Locksmith will accept submissions that contain an input list value, rather than requiring an exact match. This is useful for matching part of an email address ( e.g. the domain of the email address) or other partial string. Partial matching is available for any input list (including when they are used for passcodes, secret links, and email addresses) but for performance reasons, can only be used with input lists that have fewer than 1000 values. If you need to grant access to a larger list of values, and then a few partial matches, you can create two separate input lists and two separate keys.
When an input list is synchronized with its source, any new items found in the source file will be added to Locksmith's copy of the list. Any items that are no longer found in the source file will be removed from Locksmith's copy of the list.
Input lists that are sourced from Google Drive will be automatically synchronized whenever the source file is changed. (When used with Google Sheets, this allows for interesting flexibility: one could use a Google Form that saves data to a Google Sheets file, which then feeds into an input list. Whenever the form is submitted, Locksmith would automatically sync a new value into the input list.)
All other input lists are automatically synchronized on a regular basis (currently at midnight UTC, subject to change without notice).
All input lists may be synchronized manually, by using the "Sync input list" button for the respective list.
Once you've created at least one input list, you may use it when configuring a new key condition in your lock settings, by choosing one of the "Permit if..." options that mentions input lists. When adding keys to you locks, use the corresponding options...
When configuring your key condition, select the "Permit if the customer has an email address from an input list…" option to have Locksmith compare customer inputs with items in your input list:
More information on using customer account key conditions here:
When configuring your key condition, select the "Permit if the customer gives a passcode from an input list…" option to have Locksmith compare customer input with items in your input list
As with Locksmith's other passcode conditions, you may configure this condition to "remember" returning customers who are logged in. If this option is enabled, Locksmith will compare previously-accepted passcodes from the customer's records with current items in the selected input list. This means that removing previously-used items from the input list will result in the relevant returning customers being "forgotten".
More information on using passcodes here:
When configuring your key condition, select the "Permit if the customer arrives using a secret link code from an input list…" option to match the visitor's current URL with items in your input list:
As with standard secret link keys, Locksmith will be trying to find matching secret link codes in the following parts of the URL:
The URL's "search" portion. For example, in a URL that looks like "https://example.com/?foo=bar&baz&ls=qux", Locksmith will consider items in your input list having the value "foo=bar&baz&ls=qux".
Any component in the URL's "search" portion. For example, in a URL that looks like "https://example.com/?foo=bar&baz&qux", Locksmith will consider items in your input list having one of these values: "foo=bar", "baz", "ls=qux".
The "ls" query parameter, if present. For example, in a URL that looks like "https://example.com/?foo=bar&baz&ls=qux", Locksmith will consider items in your input list having the value "qux".
This means that you may form your shared URLs in any of the following ways, using an example secret link code of "foobar" to illustrate:
Feel free to combine either option with other query parameters, like so:
As with Locksmith's other secret link condition, you may configure this condition to "remember" returning customers who are logged in. If this option is enabled, Locksmith will compare previously-accepted secret link codes from the customer's records with current items in the selected input list. This means that removing previously-used items from the input list will result in the relevant returning customers being "forgotten".
More information on using secret links here:


Granting access to content in your store only after the appropriate purchase has been made
Locksmith allows you to check for a purchase of a specific product and only grant access to your locked content if an applicable purchase has been made.
This key condition can only account for a customer's latest 50 orders (and in some cases only the latest 25). Learn more about this in the Limitations section.
Once you that covers the content that you want to require a purchase for, click the "+ Add key" button. In the condition selector that appears, select "if the customer has purchased...".
Locksmith will examine the customer's order history for products matching what you enter.
Important: Whether you choose to enter the SKU, title (shown above), variant ID, or product tag, they are all case sensitive!
Sets a maximum allowed purchase amount. When used, Locksmith will only grant access if the customer has not yet purchased this many units of the product
Allows to you specify how far back, in days, you would like Locksmith to check for the purchase of the specified product. E.g. you may want to only allow access for 30 days after purchase.
When ON - Cancelled orders will not fulfill the requirements for access. Default: ON.
When ON - Unfulfilled orders will not fulfill the requirements for access. Default: OFF, most merchants will want to leave it this way.
When ON - Only orders with a payment status of "Paid" will fulfill the requirements for this lock. Default: ON.
Caution: This setting often causes issues for merchants who are testing out their locks. Consider turning this setting OFF while testing, but back ON for general use.
Like all key conditions, this one can be inverted. This is useful to verify that a customer has NOT yet purchased a specific product:
On its own, the inverted "unless the customer has purchased..." key will grant access to anyone who has not purchased the product, including non-signed in customers. To require customers sign in, you'll want to combine the "unless the customer has purchased..." key with the "is signed in" key:
This key condition can only account for the 50 most recent orders for the current customer. In some cases, it can only account for the most recent 25 orders instead.
The stricter 25-order limit comes into play when a customer navigates to a URL that includes a page number, e.g. a URL with "?page=2" in it. This is because a page number in the URL limits Locksmith's ability to ask Shopify for the maximum number of orders possible (i.e. 50), leaving Locksmith to work with the default number of orders (i.e. 25).
<style>
.or-cancel a:nth-child(1) {
visibility: hidden;
position: relative;
}
.or-cancel a:nth-child(1):after {
content: "Close";
visibility: visible;
position: absolute;
top: 0;
left: 0;
color:black
}
</style>Mechanic (also made by Lightward) has a variety of tasks that can be used for this purpose. Like Locksmith, Mechanic is also available under Lightward's Pay What Feels Good pricing policy.